My Dearest Maker,
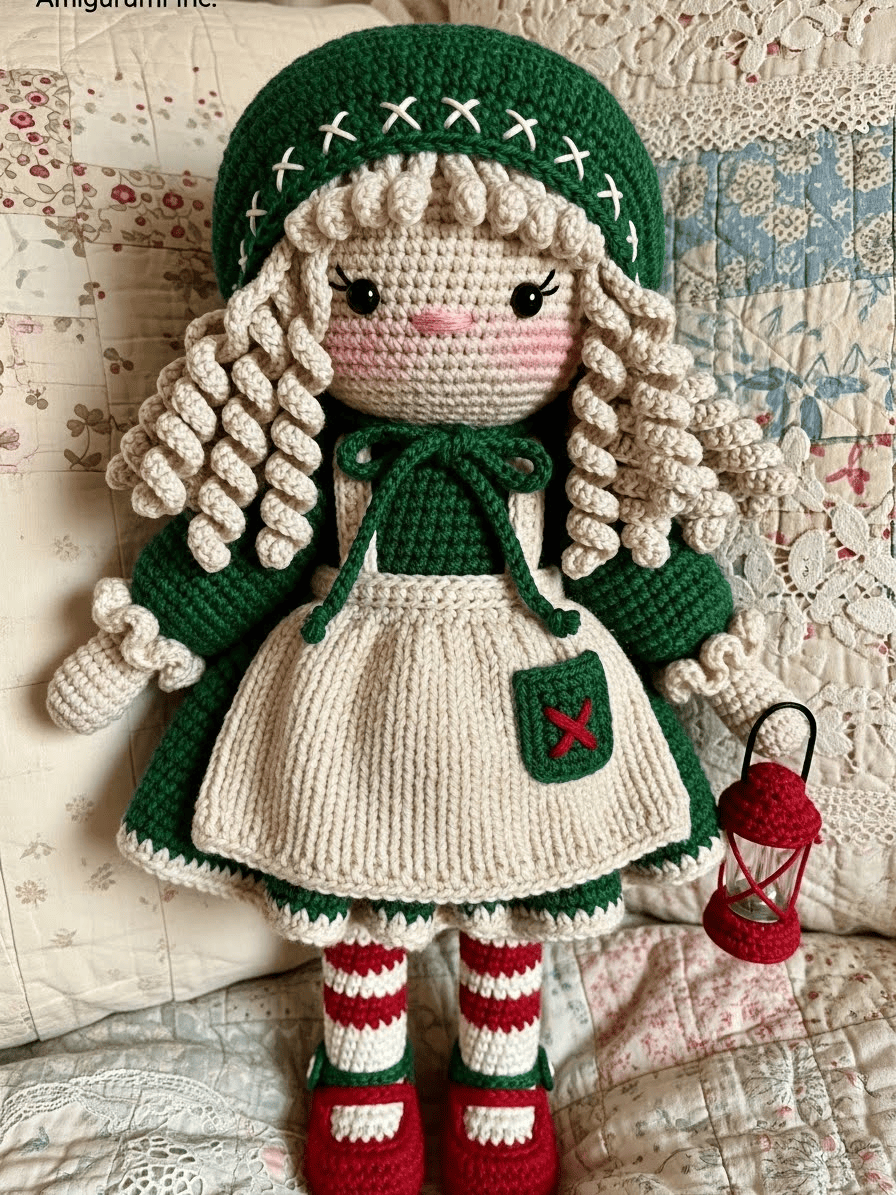
There is a profound stillness in winter that calls for our warmest wool and our most patient stitches. Holly, our Winter Gatherer, was born from that very silence. She is not merely a doll; she is a keeper of stories, designed to sit upon a mantelpiece or be held by small, appreciative hands. As we begin, remember that the magic of this project lies in the layers—the petticoats, the apron, the curls. Take your time. Let the yarn tell you where it wants to go.
About This Creation & The Heirloom Angle
In a world of fast fashion and instant gratification, Holly stands as a testament to the slow, deliberate art of doll making. We are focusing here on “Heirloom Construction.” Unlike simple seamless dolls, Holly utilizes distinct clothing layers and mixed textures—ribbing on the apron against the smooth stitch of the dress—to create depth. This project is perfect for the creator looking to master garment construction in miniature. It is a study in texture and patience.
Project Snapshot:
📊 Difficulty: Intermediate to Advanced (Requires focus on hair assembly and clothing layers)
⏰ Est. Time: 12–15 Hours of joyful crafting
📏 Size: Approximately 28cm (11 inches) tall using DK weight yarn
“The soul of the doll is not in the stuffing, but in the intention of the final stitch.” — Patricia
Materials & Tools Needed
🧶 Yarn: DK or Sport Weight Cotton Blend. Colors: Forest Green (100g), Cream/Oatmeal (50g), Skin Tone (50g), Berry Red (30g), Beige/Sand (for hair, 50g), Scrap amount of Gold/Mustard for embroidery.
🪡 Hook: 2.25mm or 2.5mm (to ensure tight stitches with no gaps)
✨ Other Materials: 10mm Black Safety Eyes Fiberfill stuffing (high quality) Tapestry needle (long) Pink pastel chalk or blush Cardboard or plastic sheet (for shoe insoles) Stitch markers
Abbreviations & Stitches Used
ch: chain
sl st: slip stitch
sc: single crochet
hdc: half double crochet
dc: double crochet
inc: increase (2 sc in one st)
dec: decrease (invisible decrease preferred)
BLO: back loop only
FLO: front loop only
st(s): stitch(es)
The Complete Holly the Winter Gatherer Pattern
Component 1: The Head Use Skin Tone yarn.
Round 1: Start 6 sc in a magic ring.
Round 2: Inc in each st around (12).
Round 3: (Sc 1, inc) repeat 6 times (18).
Round 4: (Sc 2, inc) repeat 6 times (24).
Round 5: (Sc 3, inc) repeat 6 times (30).
Round 6: (Sc 4, inc) repeat 6 times (36).
Round 7: (Sc 5, inc) repeat 6 times (42).
Round 8: (Sc 6, inc) repeat 6 times (48).
Round 9: (Sc 7, inc) repeat 6 times (54).
Rounds 10–19: Sc in each st around (54) [10 rounds].
Round 20 (Cheek Shaping): Sc 18, (inc, sc 1) x 6, sc 6, (sc 1, inc) x 6, sc 6 (66). Note: This creates chubby cheeks.
Rounds 21–24: Sc in each st around (66).
Insert safety eyes between Rounds 19 and 20, approximately 10 stitches apart, centered above the cheek increases.
Round 25: Sc 18, (dec, sc 1) x 6, sc 6, (sc 1, dec) x 6, sc 6 (54).
Round 26: (Sc 7, dec) repeat 6 times (48).
Round 27: (Sc 6, dec) repeat 6 times (42).
Round 28: (Sc 5, dec) repeat 6 times (36).
Round 29: (Sc 4, dec) repeat 6 times (30).
Round 30: (Sc 3, dec) repeat 6 times (24).
Stuff the head firmly, focusing on the cheeks.
Round 31: (Sc 2, dec) repeat 6 times (18).
Fasten off, leaving a long tail for sewing.
Component 2: The Legs & Body Start with Berry Red (Shoes).
Round 1: Ch 6. Start in 2nd ch from hook. Sc 4, 3 sc in last ch. Turn and work along other side: sc 3, inc (12).
Round 2: Inc, sc 3, inc x 3, sc 3, inc x 2 (18).
Round 3: Sc 1, inc, sc 3, (sc 1, inc) x 3, sc 3, (sc 1, inc) x 2 (24).
Round 4: BLO Sc in each st around (24).
Rounds 5–6: Sc in each st around (24).
Round 7: Sc 6, dec x 6, sc 6 (18). Shoe shaping.
Change to Skin Tone.
Round 8: BLO Sc 6, dec x 3, sc 6 (15).
Rounds 9–20: Sc in each st around (15). Stuff leg firmly. Insert cardboard insole if desired.
Make second leg. Do not fasten off second leg. Ch 3 and join to first leg.
Round 21 (Joining): Sc 15 around first leg, sc 3 along chain, sc 15 around second leg, sc 3 along other side of chain (36).
Round 22: (Sc 5, inc) repeat 6 times (42).
Rounds 23–25: Sc in each st around (42).
Change to Forest Green (Dress).
Round 26: Sc in each st around (42).
Round 27: BLO Sc in each st around (42). The skirt will attach here later.
Rounds 28–35: Sc in each st around (42).
Round 36: (Sc 5, dec) repeat 6 times (36).
Rounds 37–40: Sc in each st around (36).
Round 41: (Sc 4, dec) repeat 6 times (30).
Rounds 42–44: Sc in each st around (30).
Round 45: (Sc 3, dec) repeat 6 times (24).
Round 46: (Sc 2, dec) repeat 6 times (18).
Fasten off. Stuff body.
Component 3: The Skirt Attach Forest Green yarn to the FLO of Round 27 on the body, holding the doll upside down.
Round 1: Ch 2 (counts as dc), dc in same st, 2 dc in each st around. Join (84).
Rounds 2–12: Ch 2, dc in each st around. Join (84).
Round 13 (Hem): Change to Cream. (Sc, ch 3, sk 1) repeat around.
Cross-stitch detail: Using Gold/Camel yarn, embroider small “X” marks on Round 10 of the skirt.
Component 4: The Apron Use Cream/Oatmeal yarn. Worked in rows.
Row 1: Ch 16. Sc in 2nd ch from hook and each ch across (15). Turn.
Rows 2–16: Ch 1, BLO sc in each st across (15). This creates the vertical ribbing.
Row 17: Turn the piece 90 degrees to work along the long edge. Sc 16 evenly across the top edge.
Row 18 (Waistband): Ch 20 (for tie), sc across the 16 sts of the apron top, ch 20 (for other tie). Fasten off.
Bib: Attach yarn to the center 8 stitches of the waistband. Work 6 rows of sc. Add a ruffle border: (ch 3, sc) around the bib edge.
Patch Pocket: With Red yarn, ch 5, sc 4 rows. Sew to apron. Embroider green “ribbon” on it.
Component 5: The Arms Make 2. Start with Skin Tone.
Round 1: 6 sc in magic ring.
Round 2: (Sc 1, inc) x 3 (9).
Rounds 3–5: Sc in each st around (9).
Change to Forest Green.
Round 6: Inc in each st around (18). Puffed sleeve base.
Rounds 7–9: Sc in each st around (18).
Round 10: (Sc 1, dec) x 6 (12).
Rounds 11–15: Sc in each st around (12).
Round 16: Dec x 6 (6). Fasten off, leaving tail to sew.
Component 6: The Hair Wig Use Beige/Sand yarn.
Round 1: 6 sc in magic ring.
Round 2: Inc in each st (12).
Round 3: (Sc 1, inc) x 6 (18).
Round 4: (Sc 2, inc) x 6 (24).
Round 5: (Sc 3, inc) x 6 (30).
Round 6: (Sc 4, inc) x 6 (36).
Round 7: (Sc 5, inc) x 6 (42).
Rounds 8–11: Sc in each st around (42).
Curls: Do not fasten off. Ch 35. Start in 2nd ch from hook, 2 sc in each ch back to base. Sl st into next st on cap. Repeat this 20-24 times around the cap edge.
Fringe/Bangs: In the front center space, ch 6, sc back. Repeat 5-6 times for short bangs.
Component 7: The Bonnet Use Forest Green.
Round 1: 6 sc in magic ring.
Round 2: Inc in each st (12).
Round 3: (Sc 1, inc) x 6 (18).
Round 4: (Sc 2, inc) x 6 (24).
Round 5: (Sc 3, inc) x 6 (30).
Round 6: (Sc 4, inc) x 6 (36).
Round 7: (Sc 5, inc) x 6 (42).
Rounds 8–12: Sc in each st around (42).
Row 13: Ch 1, turn. Sc 38 (leave 4 sts unworked for the neck gap).
Rows 14–18: Ch 1, turn. Sc across (38).
Row 19 (Brim): Ch 1, turn. FLO (Sc 1, inc) across.
Row 20: Sc across.
Embroider cross-stitches along the brim with Gold yarn.
Assembly & Final Touches
🧵 Head to Body: Secure the head to the neck opening. The neck must be stuffed very firmly to prevent wobbling.
🧵 Face: Using a single strand of embroidery thread, stitch a small nose between the eyes. Add eyebrows 2 rounds above eyes. Apply pink blush gently to the cheeks using a dry brush.
🧵 Dressing: Sew the apron onto the dress at the waist (or tie it if you prefer removable).
🧵 The Lantern: With Red yarn, make a small cylinder (6 sc in MR, inc to 12, work 5 rounds, dec to 6). Chain 10 for a handle. Embroider yellow “light” specs on the side. Attach to hand.
Artisan’s Tips
🧶 The Curl Factor: If your curls are twisting the wrong way, twist them manually with your fingers clockwise to “set” the yarn memory.
🧶 Texture Balance: When working the apron ribbing, keep your tension slightly looser than the amigurumi body to ensure the apron drapes rather than stands stiff.
A Final Word
And so, Holly is complete. She is ready to bring a quiet, rustic charm to your home. I hope the rhythm of the ribbing and the repetition of the curls brought you a sense of peace. Remember, every loop you pulled through was a moment of time devoted to creating something beautiful. Until our hooks meet again.