
My dearest artisan, welcome back to the crafting table. Today, we work with the colors of the coral reef and the deep blue sea. Marina is not merely a doll; she is a keepsake, a tribute to the patience required to create true beauty.
About This Creation & Angle
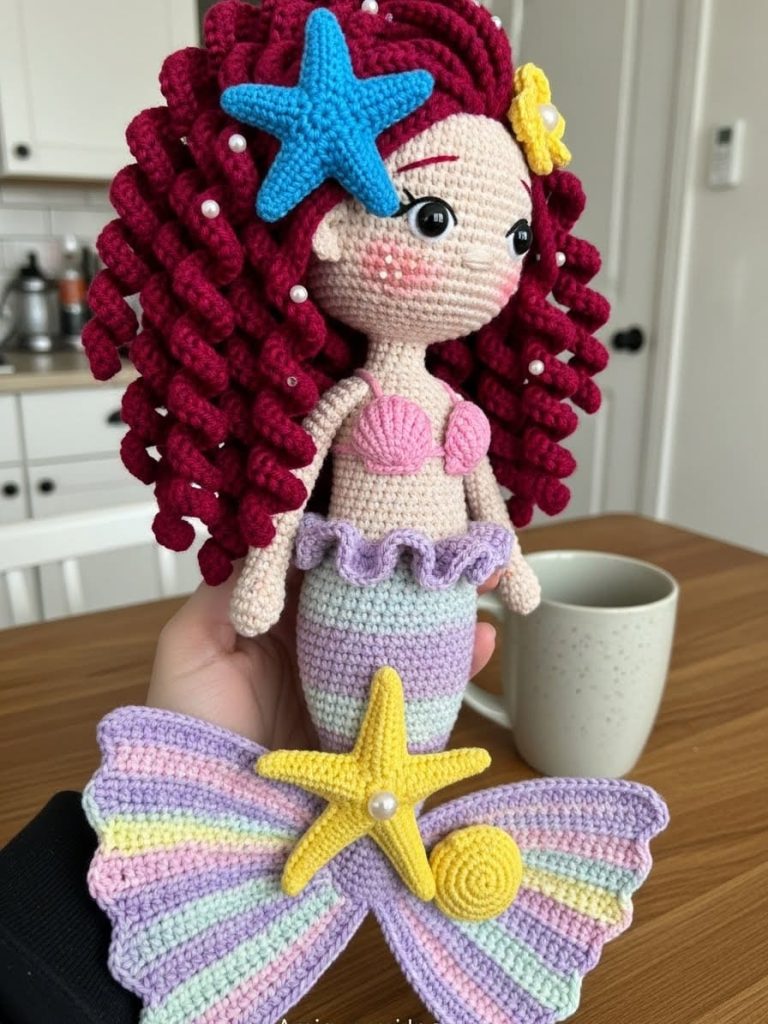
This project focuses on “Heirloom Texture.” Unlike simple amigurumi, Marina features a rich combination of stitch techniques—from the ribbed fan of her tail to the cascading corkscrew curls of her hair. We are crafting a piece designed to sit on a collector’s shelf or be the centerpiece of a nursery. The variegated yarn for the tail mimics the shimmering scales of a real fish, providing a professional finish without complex color changes.
Project Snapshot:
📊 Difficulty: Intermediate to Advanced (Patience required for hair)
⏰ Est. Time: 12–15 Hours
📏 Size: Approx. 28cm (11 inches) tall
“The ocean does not hurry, yet everything is accomplished. We shall adopt the same pace for her hair.” — Patricia
Materials & Tools Needed
🧶 Yarn: Sport or DK weight cotton.
- Color A: Pale Peach/Beige (Skin)
- Color B: Deep Crimson Red (Hair)
- Color C: Variegated Purple/Lilac/White (Tail)
- Color D: Soft Pink (Bikini/Peplum)
- Color E: Scrap Yellow and Blue (Accessories)
🪡 Hook: 2.5mm (or size needed for tight tension)
✨ Other Materials:
- 4mm and 6mm White Pearl Beads (approx. 50)
- 10mm Safety Eyes
- Polyester Fiberfill
- Tapestry Needle & Invisible Thread (for pearls)
- Pink Blush/Pastel chalk
ch: chain
sl st: slip stitch
sc: single crochet
inc: increase (2 sc in one st)
dec: invisible decrease (sc 2 together through front loops)
hdc: half double crochet
dc: double crochet
BLO: back loop only
The Complete Marina Mermaid Pattern
Component 1: The Head Using Color A (Skin)
➡️ Round 1: 6 sc in a magic ring. (6)
➡️ Round 2: Inc in each st around. (12)
➡️ Round 3: (Sc 1, inc) x 6. (18)
➡️ Round 4: (Sc 2, inc) x 6. (24)
➡️ Round 5: (Sc 3, inc) x 6. (30)
➡️ Round 6: (Sc 4, inc) x 6. (36)
➡️ Round 7: (Sc 5, inc) x 6. (42)
➡️ Round 8: (Sc 6, inc) x 6. (48)
➡️ Round 9: (Sc 7, inc) x 6. (54)
➡️ Rounds 10–22: Sc in each st around. (54) Insert safety eyes between Rounds 19 and 20, 11 stitches apart.
➡️ Round 23: (Sc 7, dec) x 6. (48)
➡️ Round 24: (Sc 6, dec) x 6. (42)
➡️ Round 25: (Sc 5, dec) x 6. (36)
➡️ Round 26: (Sc 4, dec) x 6. (30)
➡️ Round 27: (Sc 3, dec) x 6. (24)
➡️ Round 28: (Sc 2, dec) x 6. (18) Stuff the head firmly.
➡️ Round 29: (Sc 1, dec) x 6. (12)
➡️ Round 30: (Sc 4, dec) x 2. (10) Do not fasten off; continue to neck.
Component 2: The Torso Continuing with Color A
➡️ Round 31: Sc in each st around. (10) The Neck
➡️ Round 32: (Sc 1, inc) x 5. (15)
➡️ Round 33: (Sc 2, inc) x 5. (20)
➡️ Round 34: (Sc 4, inc) x 4. (24)
➡️ Rounds 35–40: Sc in each st around. (24)
➡️ Round 41: (Sc 3, inc) x 6. (30)
➡️ Rounds 42–44: Sc in each st around. (30)
➡️ Change to Color C (Variegated Purple) for the Tail.
Component 3: The Tail Using Color C
➡️ Round 45: BLO sc in each st around. (30) This leaves front loops open for the peplum later.
➡️ Round 46: Sc in each st around. (30)
➡️ Round 47: (Sc 3, dec) x 6. (24)
➡️ Rounds 48–50: Sc in each st around. (24)
➡️ Round 51: (Sc 2, dec) x 6. (18)
➡️ Rounds 52–55: Sc in each st around. (18) Stuff the body firmly.
➡️ Round 56: (Sc 4, dec) x 3. (15)
➡️ Rounds 57–60: Sc in each st around. (15)
➡️ Round 61: (Sc 3, dec) x 3. (12)
➡️ Rounds 62–65: Sc in each st around. (12) Stuff lightly as you go.
➡️ Round 66: (Sc 2, dec) x 3. (9)
➡️ Rounds 67–70: Sc in each st around. (9)
➡️ Round 71: (Sc 1, dec) x 3. (6)
➡️ Round 72: Dec x 3. (3)
➡️ Fasten off and sew the tip closed.
Component 4: The Arms (Make 2) Using Color A
➡️ Round 1: 5 sc in a magic ring. (5)
➡️ Round 2: Inc in each st around. (10)
➡️ Rounds 3–4: Sc in each st around. (10)
➡️ Round 5: Dec, sc 8. (9)
➡️ Rounds 6–18: Sc in each st around. (9)
➡️ Flatten the opening and sc 4 through both layers to close. Leave a long tail for sewing. Do not stuff the arms.
Component 5: The Crimson Wig Cap & Curls Using Color B (Red)
Artisan’s Note: This is the labor of love. We create a cap first, then crochet curls directly onto it.
➡️ Round 1: 6 sc in a magic ring. (6)
➡️ Round 2: Inc in each st around. (12)
➡️ Round 3: (Sc 1, inc) x 6. (18)
➡️ Round 4: (Sc 2, inc) x 6. (24)
➡️ Round 5: (Sc 3, inc) x 6. (30)
➡️ Round 6: (Sc 4, inc) x 6. (36)
➡️ Round 7: (Sc 5, inc) x 6. (42)
➡️ Round 8: (Sc 6, inc) x 6. (48)
➡️ Round 9: (Sc 7, inc) x 6. (54)
➡️ Round 10: Sc in each st around. (54)
➡️ The Curls: Sl st into the first stitch. Chain 45. Starting from the 2nd chain from hook, sc 2 in each chain stitch all the way back to the cap (this creates the corkscrew). Sl st into the next stitch on the cap. Repeat around the entire edge of the cap.
➡️ Crown Curls: Create a second layer of curls by surface crocheting 10–12 more curls near the top center of the wig cap for volume.
Component 6: The Tail Fin (Fluke) Using Color C or D (Pink/Purple Mix)
➡️ Row 1: Chain 15. Sc in 2nd ch from hook and each ch across. (14). Turn.
➡️ Row 2: Ch 1, BLO sc in each st across. (14). Turn.
➡️ Repeat Row 2 for 24 rows to create a ribbed rectangle.
➡️ Fold the rectangle in half. Sew the short ends together. Gather the center tight to create a bow/fan shape. This forms the large fin at the bottom.
Component 7: Accessories
Bikini Shells (Make 2): Using Color D ➡️ Magic ring, ch 2, 3 dc, ch 2, sl st into ring. Pull tight.
Waist Peplum: Using Color D ➡️ Attach yarn to the front loops of Round 45 on the body. (Ch 2, dc in next st, 2 dc in next st) repeat around. Sl st to join.
Starfish: Using Color E (Yellow) ➡️ Magic ring. (Ch 4, sl st in 2nd ch from hook, sc in next 2 ch, sl st into magic ring) x 5.
Assembly & Final Touches
- Face: Sew the wig cap to the head. Arrange the curls so they frame the face, pinning some back to create volume. Apply blush under the eyes.
- Pearls: Using invisible thread, sew 4mm pearls sporadically onto the red curls and the tail fin. This mimics ocean droplets.
- Body: Sew arms to Round 31/32. Sew the Bikini Shells to the chest.
- Fin: Sew the gathered Tail Fin to the very tip of the body.
- Decor: Sew the Starfish and small blue crown flower to the waist or hair as desired.
Tips & FAQs
Q: My curls aren’t twisting! A: Ensure you are putting 2 or even 3 single crochets in every chain stitch. Twist them manually with your finger after crocheting to help the yarn set.
Q: Can I use acrylic yarn? A: You can, but cotton provides that clean, defined stitch definition that looks more premium for a doll like Marina.
A Final Word
Creating Marina is a journey through the tides. When you attach that last pearl, you haven’t just finished a project; you have brought a character to life. May she bring the calm of the sea to your home.