Welcome back to the atelier, my dear creator. Let us begin our work. This piece requires a gentle touch and an understanding of soft architecture. By carefully controlling our tension and relying on precise decreases, we will shape a slice of toast that feels substantial yet entirely huggable. We are creating a creature of comfort, blending the familiar warmth of a childhood lunch with the fascinating anatomy of the sea.
About This Creation
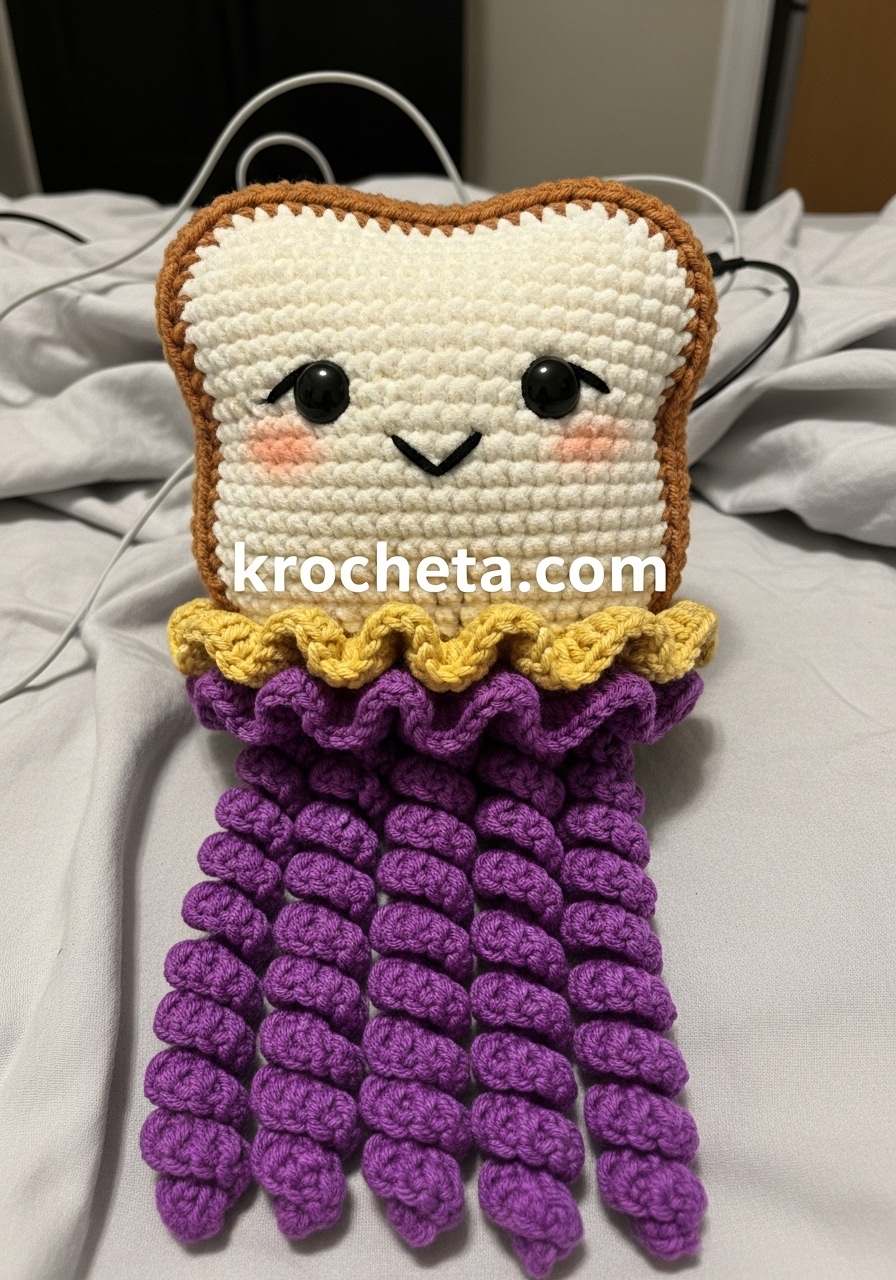
The PB&J Jellyfish is a masterclass in hybrid design. We avoid harsh corners entirely, opting instead for a beautifully rounded top crust achieved through strategic, asymmetrical decreases. The Gaze of Innocence is secured by anchoring the eyes exceptionally low and wide upon the cream canvas. This specific placement instantly triggers our innate fondness for the Baby Schema. The ruffles mimic the organic folds of a jellyfish bell while clearly reading as generous layers of peanut butter and grape jelly.
Project Snapshot
🧶 Skill Level: Advanced Beginner
⏱️ Estimated Time: 4 to 5 Hours
📏 Finished Size: Approximately 12 inches from the top crust to the tip of the tentacles.
Materials
🧶 Chunky chenille yarn in Cream (100g)
🧶 Chunky chenille yarn in Warm Brown (50g)
🧶 Chunky chenille yarn in Golden Yellow (25g)
🧶 Chunky chenille yarn in Vibrant Purple (100g)
🪡 5.0mm crochet hook
✨ 15mm black safety eyes
✨ Black embroidery floss for the smile
✨ Peach or pink yarn for the blush
✨ Premium polyester fiberfill
✨ Large-eye blunt tapestry needle
Abbreviations
➡️ ch: chain
➡️ sc: single crochet
➡️ inc: increase (2 sc in the same stitch)
➡️ dec: decrease (sc 2 stitches together)
➡️ sl st: slip stitch
➡️ st/sts: stitch/stitches
➡️ BLO: back loop only
➡️ FLO: front loop only
The Pattern
The Front Bread Panel (Cream)
Row 1: ch 17, begin in the 2nd ch from the hook, sc 16. (16)
Row 2 to 18: ch 1, turn, sc 16. (16)
Row 19: ch 1, turn, dec, sc 12, dec. (14)
Row 20: ch 1, turn, dec, sc 10, dec. (12)
Fasten off and weave in the end securely.
The Back Bread Panel (Cream)
Row 1: ch 17, begin in the 2nd ch from the hook, sc 16. (16)
Row 2 to 18: ch 1, turn, sc 16. (16)
Row 19: ch 1, turn, dec, sc 12, dec. (14)
Row 20: ch 1, turn, dec, sc 10, dec. (12)
Fasten off and weave in the end securely.
Facial Detailing (Pre-Assembly)
Take your Front Bread Panel.
Count upward from the bottom foundation chain. Insert your 15mm safety eyes between Row 13 and Row 14.
Ensure there are exactly 9 stitches of space between the two eyes. Secure the safety backings firmly.
Using black embroidery floss, stitch a small “V” shaped smile directly centered between the eyes, resting gently over Row 11.
Using a small amount of peach or pink yarn, stitch a single horizontal line directly beneath the outer edge of each eye over Row 12 to create a soft blush.
The Crust Edging and Joining (Warm Brown)
Place the Front Panel over the Back Panel, aligning all edges perfectly.
Attach the Warm Brown yarn to the bottom right corner, working through both panels simultaneously.
Row 1: sc 20 evenly up the right side. Work 2 sc in the top right corner. sc 12 across the curved top edge. Work 2 sc in the top left corner. sc 20 evenly down the left side. Work 2 sc in the bottom left corner. sc 16 across the bottom edge. Work 2 sc in the final bottom right corner. (76)
Pause your stitching before completing the bottom edge. Firmly pack the interior with polyester fiberfill. Push the stuffing gently into the rounded upper corners to ensure a plump, even finish.
Complete the final stitches of the bottom edge, sl st to the first sc, and fasten off.
The Peanut Butter Ruffle (Golden Yellow)
Hold the toast upside down. Attach the Golden Yellow yarn to the FLO (Front Loop Only) of the very first stitch on the bottom crust edge. We will work across the 16 bottom stitches, plus the 2 corner stitches on either side, for a working base of 18 stitches.
Row 1: ch 1, [inc] 18 times. (36)
Row 2: ch 1, turn, [sc 1, inc] 18 times. (54)
Fasten off and weave in the end.
The Grape Jelly Ruffle (Vibrant Purple)
Attach the Vibrant Purple yarn to the BLO (Back Loop Only) of the exact same 18 stitches on the bottom crust edge.
Row 1: ch 1, [inc] 18 times. (36)
Row 2: ch 1, turn, [sc 1, inc] 18 times. (54)
Row 3: ch 1, turn, sc 54. (54)
Fasten off and weave in the end.
The Curly Jelly Tentacles (Vibrant Purple – Make 7)
Row 1: ch 41.
Row 2: Work 3 sc into the 2nd ch from the hook. Continue to work 3 sc into every remaining ch across. (120)
Fasten off, leaving a very long tail for sewing. The sheer volume of stitches will force the fabric to coil naturally into a perfect spiral.
Final Assembly
Thread your blunt needle with the long tail of a tentacle.
Sew the top of the tentacle securely to the bottom brown crust, positioning it directly behind the Grape Jelly Ruffle so the attachment point is hidden.
Repeat this process for all 7 tentacles, spacing them evenly across the bottom width of the bread slice. Ensure they are anchored tightly, as they provide the wonderful weight and movement characteristic of this design.