Greetings, my dedicated creator. I am thrilled you have chosen to bring these woodland companions to life. Precision and patience are our greatest tools today. We shall employ strategic tension and calculated shaping to ensure these reindeer possess that irresistible, rounded charm. Pay close attention to the stitch counts, for the architecture relies entirely on mathematical exactness. Let us begin our work.
[📸 PASTE IMAGE 1 HERE]
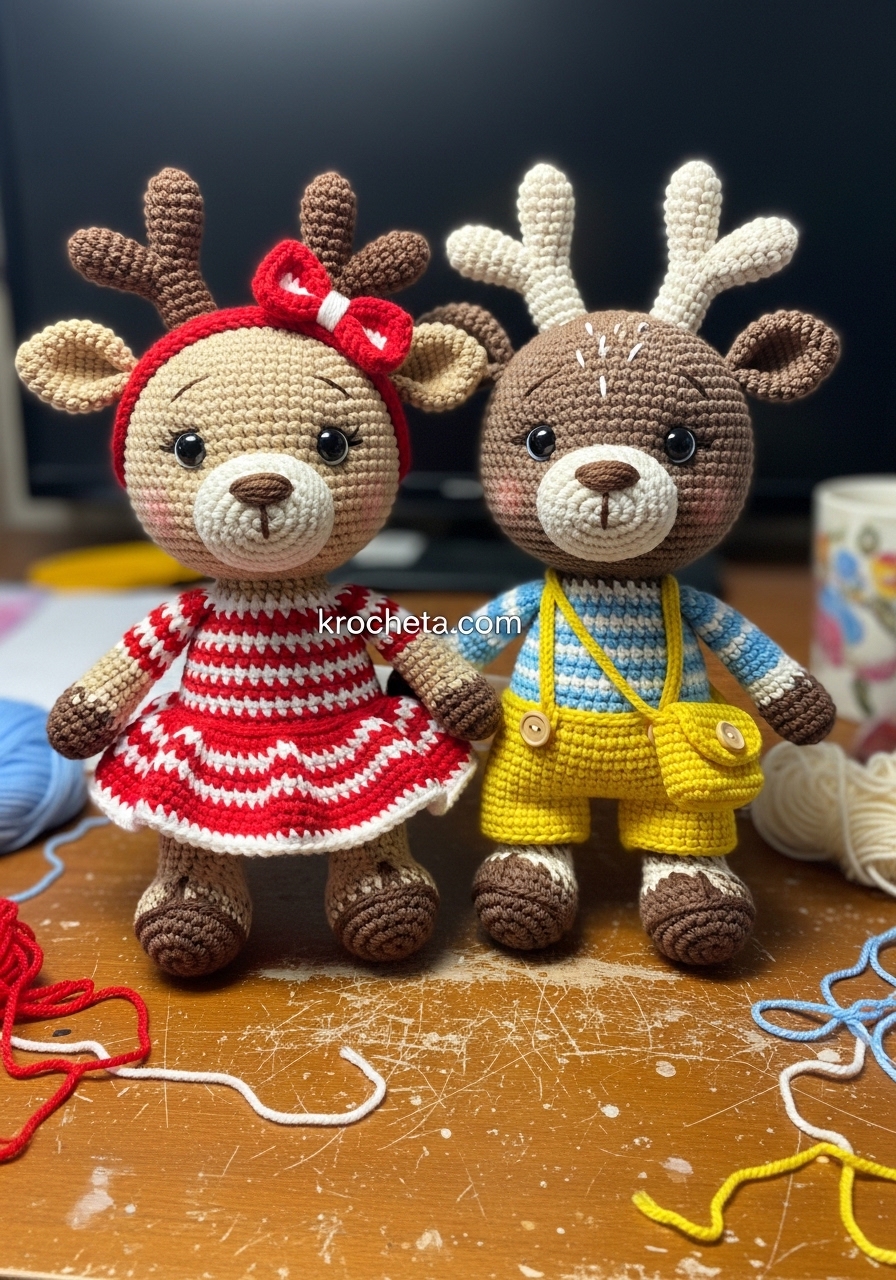
About This Creation
This project yields two flawlessly structured reindeer, standing approximately 14cm tall. Their architecture relies heavily on a 60/40 head-to-body ratio, emphasizing a youthful, innocent gaze. The girl wears a flared, striped dress utilizing front-loop techniques and a delicate headband. Her companion sports tailored shorts and a functional crossbody bag, creating a perfectly balanced aesthetic pair.
Project Snapshot
➡️ Skill Level: Intermediate to Advanced
➡️ Estimated Time: 8 to 10 hours per figure
➡️ Finished Size: 14cm (excluding antlers)
➡️ Construction: Legs joined to body, head sewn separately
Materials
🧶 Sport weight cotton yarn (Light Brown, Dark Brown, Cream, Red, White, Light Blue, Yellow)
🪡 2.5mm crochet hook
✨ 6mm safety eyes (two pairs)
➡️ Toy stuffing (premium fiberfill)
➡️ Tapestry needle and stitch markers
➡️ Small wooden button (for the bag)
Abbreviations (US Terminology)
➡️ MR: Magic Ring
➡️ sc: single crochet
➡️ inc: increase (2 sc in one stitch)
➡️ dec: invisible decrease (sc 2 together)
➡️ hdc: half double crochet
➡️ FLO: front loops only
➡️ BLO: back loops only
➡️ sl st: slip stitch
➡️ ch: chain
➡️ st/sts: stitch/stitches
The Pattern
The Head (Make 2: One Light Brown, One Dark Brown)
Round 1: 6 sc in MR (6)
Round 2: 6 inc (12)
Round 3: [1 sc, inc] x 6 (18)
Round 4: [2 sc, inc] x 6 (24)
Round 5: [3 sc, inc] x 6 (30)
Round 6: [4 sc, inc] x 6 (36)
Round 7: [5 sc, inc] x 6 (42)
Round 8: [6 sc, inc] x 6 (48)
Rounds 9-14: 48 sc (48)
We now build the structural foundation for the cheeks.
Round 15: 12 sc, [inc, 1 sc] x 4, 8 sc, [1 sc, inc] x 4, 12 sc (56)
Round 16-18: 56 sc (56)
Insert 6mm safety eyes between rounds 15 and 16, precisely 9 stitches apart, perfectly centered above the 8 sc gap created in round 15.
Round 19: 12 sc, [dec, 1 sc] x 4, 8 sc, [1 sc, dec] x 4, 12 sc (48)
Round 20: [6 sc, dec] x 6 (42)
Round 21: [5 sc, dec] x 6 (36)
Round 22: [4 sc, dec] x 6 (30)
Round 23: [3 sc, dec] x 6 (24)
Round 24: [2 sc, dec] x 6 (18)
Fasten off, leaving a very long tail for assembly. Stuff the head firmly, paying special attention to expanding the cheeks outward.
The Cream Muzzle (Make 2)
Round 1: 6 sc in MR (6)
Round 2: 6 inc (12)
Round 3: [1 sc, inc] x 6 (18)
Rounds 4-5: 18 sc (18)
Fasten off, leaving a tail for sewing. Embroider a small red or dark brown nose in the center, and a straight vertical line downward.
The Antlers (Make 2 Dark Brown, 2 Light Brown)
Small Branch:
Round 1: 5 sc in MR (5)
Rounds 2-3: 5 sc (5)
Fasten off.
Main Branch:
Round 1: 5 sc in MR (5)
Rounds 2-5: 5 sc (5)
Round 6: 5 sc across the Small Branch, 5 sc across the Main Branch (10)
Round 7: [3 sc, dec] x 2 (8)
Rounds 8-9: 8 sc (8)
Fasten off, leaving a tail for sewing. Do not stuff.
The Ears (Make 4 matching the base head colors)
Round 1: 4 sc in MR (4)
Round 2: [1 sc, inc] x 2 (6)
Round 3: [2 sc, inc] x 2 (8)
Round 4: [3 sc, inc] x 2 (10)
Round 5: 10 sc (10)
Pinch the opening flat and crochet 5 sc through both layers to close. Fasten off.
The Arms (Make 4)
Start with Cream yarn.
Round 1: 6 sc in MR (6)
Round 2: [1 sc, inc] x 3 (9)
Rounds 3-4: 9 sc (9)
Change to the respective body base color (Light or Dark Brown).
Rounds 5-14: 9 sc (9)
Stuff only the cream hoof lightly. Pinch flat and crochet 4 sc across the top to close. Fasten off.
The Legs & Body (Make 2 bodies total)
Start with Cream yarn for the first leg.
Round 1: 6 sc in MR (6)
Round 2: 6 inc (12)
Rounds 3-4: 12 sc (12)
Change to the base body color.
Rounds 5-10: 12 sc (12)
Fasten off the first leg. Repeat Rounds 1-10 for the second leg, but do not fasten off.
Round 11: Chain 3 from the second leg. 12 sc around the first leg, 3 sc across the front loops of the chain, 12 sc around the second leg, 3 sc across the back loops of the chain (30)
Round 12: [4 sc, inc] x 6 (36)
Rounds 13-17: 36 sc (36)
Important note for the Girl: Change to Red yarn at the start of Round 17.
Round 18: [4 sc, dec] x 6 (30)
Rounds 19-20: 30 sc (30)
Important note for the Girl: Work Round 19 in BLO (Back Loops Only) to create the ridge for the skirt.
Round 21: [3 sc, dec] x 6 (24)
Rounds 22-24: 24 sc (24)
Round 25: [2 sc, dec] x 6 (18)
Round 26: 18 sc (18)
Fasten off. Stuff the body firmly, ensuring the hips are well-rounded to support the sitting posture.
The Girl’s Skirt Details
Attach Red yarn to the FLO (Front Loops Only) left exposed in Round 19 of the girl’s body.
Round 1: 2 hdc in each st around (60)
Rounds 2-5: 60 hdc (60)
Change to White yarn.
Round 6: 60 sc (60)
Fasten off and weave in ends. To complete the bodice, use surface slip stitches with white yarn across rounds 21 and 23 of the body to create horizontal stripes.
The Girl’s Headband & Bow
Headband: With Red yarn, chain 45. Sc in the 2nd ch from hook and each chain across (44). Fasten off.
Bow: Chain 10, sl st to first ch to form a ring. [Ch 2, 4 hdc, ch 2, sl st, sl st in next 4 sts] x 2. Wrap yarn tightly around the center to shape the bow. Sew securely to the headband.
The Boy’s Striped Shirt
Start with Light Blue yarn.
Chain 25, join with a sl st to form a ring.
Rounds 1-2: 24 sc (24)
Change to White yarn.
Round 3: 24 sc (24)
Change to Light Blue yarn.
Rounds 4-5: 24 sc (24)
Round 6: [2 sc, dec] x 6 (18)
Fasten off. Slide this tailored piece onto the boy’s body before attaching the head.
The Boy’s Yellow Shorts
Make the first pant leg: Chain 15, join with a sl st to form a ring.
Rounds 1-3: 14 sc (14)
Fasten off. Repeat for the second leg, but do not fasten off.
Round 4: Join the legs by working 14 sc across the first leg, then 14 sc across the second leg (28)
Rounds 5-8: 28 sc (28)
Fasten off and weave in ends. Slide onto the lower body.
Suspenders: Attach yellow yarn to the front edge of the shorts. Chain 16, cross it over the shoulder, and attach it to the back edge with a slip stitch. Repeat for the opposite side.
The Boy’s Crossbody Bag
Start with Yellow yarn.
Round 1: 6 sc in MR (6)
Round 2: 6 inc (12)
Round 3: 12 sc in BLO (12)
Round 4: 12 sc (12)
Fasten off.
Strap: Attach yellow yarn to one side of the bag, chain 30, and attach to the exact opposite side. Sew a small wooden button to the front flap area.
Assembly Instructions
➡️ Head: Center the muzzle between rounds 15 and 19 of the face and sew securely. Sew the ears to the sides of the head, aligned slightly behind the eyes at rounds 10 and 11. Attach the antlers to the very top of the head, resting between rounds 3 and 5. Sew the completed head to the opening of the body.
➡️ Arms: Sew the flat top of the arms directly to the sides of the body, precisely one round below the neck join (Round 25).
➡️ Accessories: Position the girl’s headband over her ears and secure with a few hidden stitches. Place the boy’s crossbody bag over his shoulder.