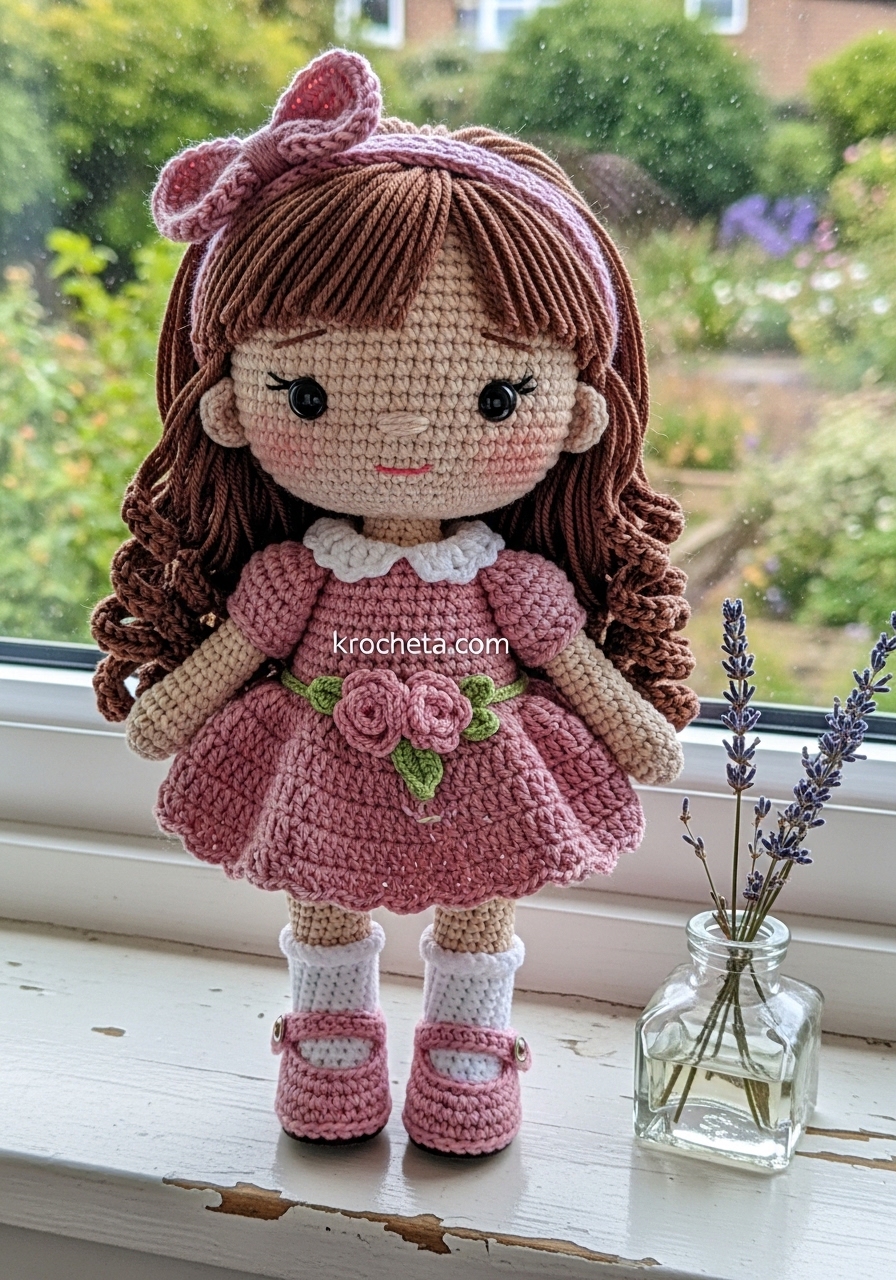
My dear artisan, it is a joy to have you back in the studio. Today, we focus our energy on a piece that celebrates the timeless elegance of handmade dolls. Penelope is more than a project; she is a study in proportion and character. By placing her eyes lower and wider than traditional patterns suggest, we evoke a sense of quiet wonder. We shall use strategic increases to sculpt her cheeks, ensuring she possesses that soft, rounded vitality that defines a true heirloom. Let your tension be even and your heart be light as we begin.
About This Creation
Penelope stands as a testament to the power of subtle shaping. This project moves beyond simple spheres to create a silhouette that feels weighted and intentional. The dress features a structured Peter Pan collar and a scalloped hem that mirrors the delicate nature of a spring garden. Every stitch is calculated to contribute to a sturdy yet soft form, perfect for those who value the technical precision of high-end amigurumi.
Project Snapshot
🧶 Skill Level: Advanced Intermediate
🧶 Size: Approximately 22cm tall
🧶 Time: 12-15 hours
🧶 Category: Heritage Doll
Materials
✨ 100% Mercerized Cotton Yarn in Skin Tone, Chocolate Brown, Dusty Pink, and White
✨ 2.25mm Crochet Hook
✨ 10mm Safety Eyes
✨ Polyester Fiberfill
✨ Pink Embroidery Floss for nose and mouth
✨ Stitch markers and a long sewing needle
Abbreviations
✨ mr: Magic Ring
✨ sc: Single Crochet
✨ inc: Increase
✨ dec: Decrease
✨ hdc: Half Double Crochet
✨ dc: Double Crochet
✨ BLO: Back Loop Only
✨ FLO: Front Loop Only
✨ st(s): Stitch(es)
The Pattern
The Head
We begin with the focal point of our muse. The shaping here is vital for the Krocheta look.
➡️ Round 1: 6 sc in mr (6)
➡️ Round 2: [inc] x 6 (12)
➡️ Round 3: [1 sc, inc] x 6 (18)
➡️ Round 4: [2 sc, inc] x 6 (24)
➡️ Round 5: [3 sc, inc] x 6 (30)
➡️ Round 6: [4 sc, inc] x 6 (36)
➡️ Round 7: [5 sc, inc] x 6 (42)
➡️ Round 8: [6 sc, inc] x 6 (48)
➡️ Round 9: [7 sc, inc] x 6 (54)
➡️ Round 10-18: 54 sc (54)
➡️ Note: Insert 10mm safety eyes between Rounds 13 and 14, leaving 9 stitches of space between them. This low, wide placement is essential.
➡️ Round 19 (Cheek Shaping): 18 sc, [inc, 1 sc] x 3, 6 sc (center of face), [1 sc, inc] x 3, 18 sc (60)
➡️ Round 20-22: 60 sc (60)
➡️ Round 23: [8 sc, dec] x 6 (54)
➡️ Round 24: [7 sc, dec] x 6 (48)
➡️ Round 25: [6 sc, dec] x 6 (42)
➡️ Round 26: [5 sc, dec] x 6 (36)
➡️ Round 27: [4 sc, dec] x 6 (30)
➡️ Round 28: [3 sc, dec] x 6 (24)
➡️ Round 29: [2 sc, dec] x 6 (18)
➡️ Fasten off, leaving a long tail. Stuff firmly, especially around the cheek increases.
The Body
The body is compact to maintain our 70/30 ratio.
➡️ Round 1: 6 sc in mr (6)
➡️ Round 2: [inc] x 6 (12)
➡️ Round 3: [1 sc, inc] x 6 (18)
➡️ Round 4: [2 sc, inc] x 6 (24)
➡️ Round 5: [3 sc, inc] x 6 (30)
➡️ Round 6: [4 sc, inc] x 6 (36)
➡️ Round 7-10: 36 sc (36)
➡️ Round 11: [4 sc, dec] x 6 (30)
➡️ Round 12-13: 30 sc (30)
➡️ Round 14: [3 sc, dec] x 6 (24)
➡️ Round 15: 24 sc (24)
➡️ Round 16: [2 sc, dec] x 6 (18)
➡️ Round 17: 18 sc (18)
➡️ Fasten off and stuff firmly.
Legs, Shoes, and Socks (Make 2)
We start with the shoes in Dusty Pink.
➡️ Round 1: 6 sc in mr (6)
➡️ Round 2: [inc] x 6 (12)
➡️ Round 3: [1 sc, inc] x 6 (18)
➡️ Round 4: [2 sc, inc] x 6 (24)
➡️ Round 5: BLO 24 sc (24)
➡️ Round 6: 24 sc (24)
➡️ Round 7: 8 sc, 4 dec, 8 sc (20)
➡️ Switch to White for the socks.
➡️ Round 8: BLO 20 sc (20)
➡️ Round 9-11: 20 sc (20)
➡️ Switch to Skin Tone.
➡️ Round 12: BLO 20 sc (20)
➡️ Round 13-22: 20 sc (20)
➡️ Fasten off. For the shoe strap, join Pink yarn at the side of the shoe and chain 8, then slip stitch to the opposite side.
The Garden Dress
Worked top-down in Dusty Pink.
➡️ Row 1: Chain 25. Starting in 2nd ch from hook, 24 sc. Chain 1, turn. (24)
➡️ Row 2: [3 sc, inc] x 6. Chain 1, turn. (30)
➡️ Row 3 (Sleeve holes): 5 sc, chain 6, skip 5 sts, 10 sc, chain 6, skip 5 sts, 5 sc. Chain 1, turn. (32)
➡️ Row 4-8: 32 sc. Join in the round at the end of Row 8.
➡️ Round 9: [inc] in every st around (64)
➡️ Round 10-18: 64 sc (64)
➡️ Round 19 (Hem): [Skip 2 sts, 5 dc in next st, skip 2 sts, sl st in next] repeat around.
➡️ For the Peter Pan Collar: Join White yarn at the neckline. [2 dc in each st] for the first 4 sts and last 4 sts of the neckline to create the rounded collar look.
The Hair Wig Cap
In Chocolate Brown.
➡️ Round 1-9: Follow the Head pattern to Round 9 (54)
➡️ Round 10-18: 54 sc (54)
➡️ To create the tendrils: Chain 40, starting in 2nd ch from hook, 39 hdc. Slip stitch to the next stitch of the wig cap. Repeat around the entire edge of the cap.
Assembly
🪡 Sew the head to the body using the 18 stitches of the neck. Ensure the chin is centered between the cheek increases.
🪡 Position the wig cap on the head so the hairline sits 4 rounds above the eyes. Secure with pins and sew in place.
🪡 Attach the arms at Round 16 of the body.
🪡 Sew the legs to the bottom of the body, ensuring the doll can stand or sit with balance.
🪡 Embroider a tiny nose between the eyes using pink floss across 2 stitches. Add a small, gentle smile one round below.
🪡 Place the double-layered bow on the headband and secure it to the side of the hair.