welcome back to the worktable, my friend. Today we honor the hands that heal with a design both technically precise and undeniably endearing. Let us pick up our hooks and bring Dr. Clara to life.
About This Creation
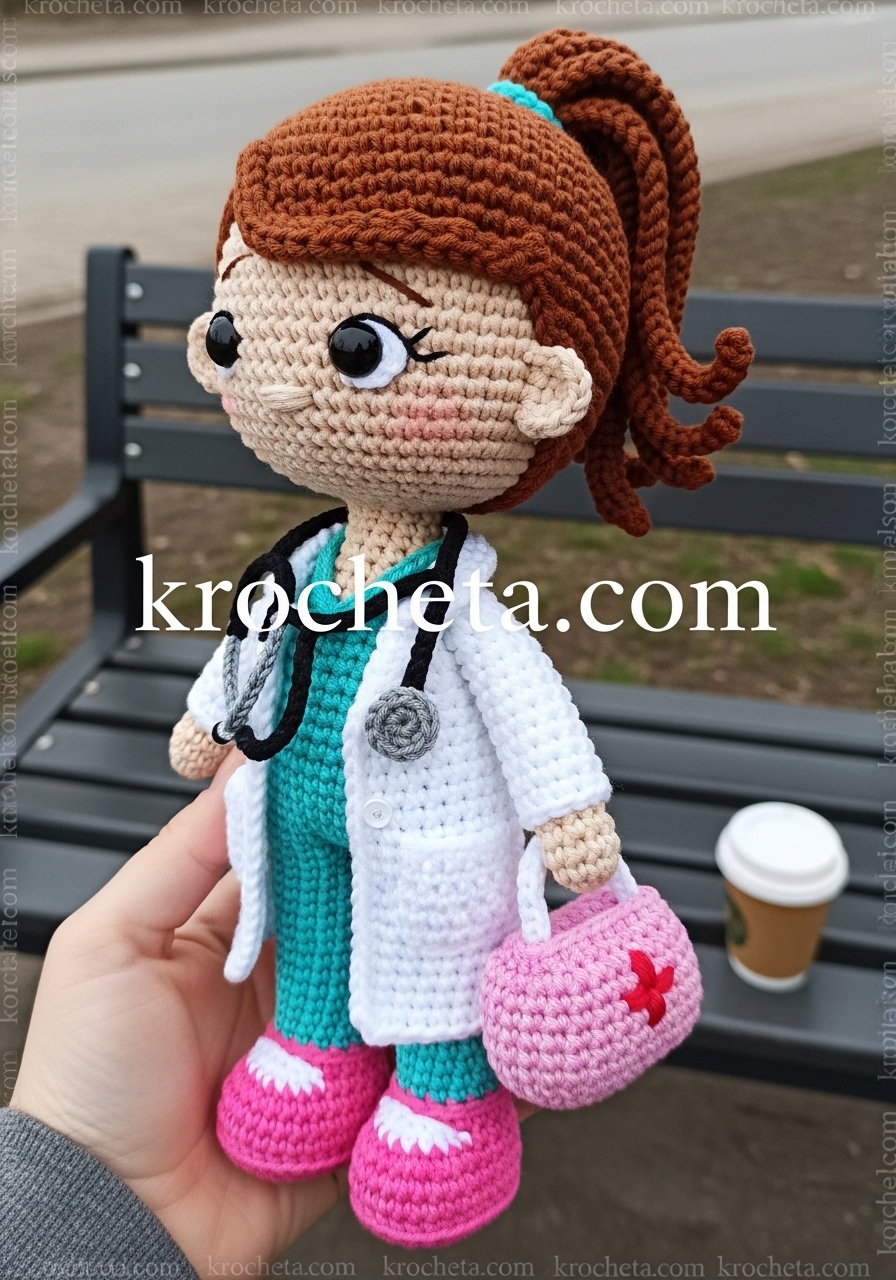
We are crafting a professional healer, complete with her essential, life-saving tools. This project merges structural integrity with the soft, rounded aesthetics that define our artisan style. By incorporating her teal scrub colors directly into the foundation of her body, we eliminate unnecessary bulk. This ensures her crisp white lab coat drapes naturally and elegantly across her shoulders.
The true magic lies in the details. You will crochet her pink shoes directly into the feet, giving her a sturdy, amateur-crafted charm. We completely avoid harsh plastics or felt pieces here. The storytelling deepens with her accessories. The meticulously shaped stethoscope and the structured medical bag bring her profession into sharp, charming focus. Whether you are crafting a meaningful gift for a recent medical graduate or expanding your own collection of characters, this pattern offers a highly satisfying, architectural building process.
Project Snapshot:
📊 Difficulty: Intermediate
⏰ Est. Time: 12 to 15 hours
📏 Size: Approximately 28cm (11 inches) tall
“When layering garments in amigurumi, always crochet the under-layers as part of the body. True elegance comes from eliminating unnecessary bulk.”
Materials & Tools Needed
🧶 Yarn: Medium weight (worsted) cotton yarn in Beige (skin), Brown (hair), White (coat/socks), Pink (shoes/bag), Teal (scrubs), Black (stethoscope), Grey (stethoscope), Red (medical cross)
🪡 Hook: 2.5mm
✨ Other Materials: 10mm safety eyes, polyester fiberfill stuffing, yarn needle, stitch markers, black embroidery floss, pink blush
Abbreviations & Stitches Used
ch: chain
sl st: slip stitch
sc: single crochet
inc: increase
dec: decrease
BLO: back loops only
FLO: front loops only
The Complete Dr. Clara Pattern
The Legs (Make 2)
We begin at the soles of her beautifully crocheted pink shoes.
Start with Pink yarn.
Rnd 1: ch 6. Starting in 2nd ch from hook: 4 sc, 3 sc in last ch. Work on opposite side of foundation chain: 3 sc, inc. (12)
Rnd 2: inc, 3 sc, 3 inc, 3 sc, 2 inc. (18)
Rnd 3: 1 sc, inc, 3 sc, (1 sc, inc) x3, 3 sc, (1 sc, inc) x2. (24)
Rnd 4: In BLO, sc around. (24)
Rnd 5: sc around. (24)
Rnd 6: Change to White yarn. 8 sc, 4 dec, 8 sc. (20)
Rnd 7: 6 sc, 4 dec, 6 sc. (16)
Rnd 8: 6 sc, 2 dec, 6 sc. (14)
Rnd 9: In BLO, sc around. (14)
Artisan’s Note: Leaving the unworked front loops in Round 9 creates a subtle ridge that separates the shoe from the sock.
Rnd 10-12: sc around. (14)
Rnd 13: Change to Teal yarn. In BLO, sc around. (14)
Rnd 14-25: sc around. (14)
Fasten off the first leg. Repeat Rounds 1 through 25 for the second leg, but do not fasten off.
The Body
We will now join the legs to build the torso.
Rnd 26: ch 3. Join to the first leg with a sc. Work 13 more sc around the first leg, 3 sc along the chain, 14 sc around the second leg, and 3 sc along the opposite side of the chain. (34)
Rnd 27: (16 sc, inc) x2. (36)
Rnd 28: (5 sc, inc) x6. (42)
Rnd 29-33: sc around. (42)
Rnd 34: (5 sc, dec) x6. (36)
Rnd 35-37: sc around. (36)
Rnd 38: (4 sc, dec) x6. (30)
Rnd 39: In BLO, sc around. (30)
Artisan’s Note: We use the back loops here so you can later attach yarn to the front loops and create the bottom hem of her scrub top.
Rnd 40-42: sc around. (30)
Rnd 43: (3 sc, dec) x6. (24)
Rnd 44-46: sc around. (24)
Rnd 47: (2 sc, dec) x6. (18)
Rnd 48: Change to Beige yarn. In BLO, sc around. (18)
Rnd 49: (1 sc, dec) x6. (12)
Rnd 50: sc around. (12)
The Head
Continue directly from the neck using Beige yarn.
Rnd 51: (1 sc, inc) x6. (18)
Rnd 52: (2 sc, inc) x6. (24)
Rnd 53: (3 sc, inc) x6. (30)
Rnd 54: (4 sc, inc) x6. (36)
Rnd 55: (5 sc, inc) x6. (42)
Rnd 56: (6 sc, inc) x6. (48)
Rnd 57: (7 sc, inc) x6. (54)
Rnd 58: (8 sc, inc) x6. (60)
Rnd 59-71: sc around. (60)
Artisan’s Note: Pause here. Insert your 10mm safety eyes between rounds 62 and 63. Space them exactly 11 stitches apart. This wide placement is the secret to achieving that sweet, innocent gaze.
Rnd 72: (8 sc, dec) x6. (54)
Rnd 73: (7 sc, dec) x6. (48)
Rnd 74: (6 sc, dec) x6. (42)
Rnd 75: (5 sc, dec) x6. (36)
Rnd 76: (4 sc, dec) x6. (30)
Rnd 77: (3 sc, dec) x6. (24)
Rnd 78: (2 sc, dec) x6. (18)
Rnd 79: (1 sc, dec) x6. (12)
Rnd 80: 6 dec. (6)
Fasten off. Weave your tail through the remaining front loops and pull tightly to close the top of the head.
The Arms (Make 2)
Start with Beige yarn for the hands.
Rnd 1: 6 sc in a magic ring. (6)
Rnd 2: (1 sc, inc) x3. (9)
Rnd 3-4: sc around. (9)
Rnd 5: Change to White yarn. sc around. (9)
Rnd 6: In BLO, sc around. (9)
Rnd 7-22: sc around. (9)
Fasten off, leaving a long tail for sewing. Stuff only the bottom half of the arm lightly so it rests flat against her side.
The Ears (Make 2)
Using Beige yarn.
Row 1: 5 sc in a magic ring. Do not join. Pull the ring tight to form a neat semicircle. (5)
Fasten off, leaving a long tail for sewing.
The Hair Cap & Ponytail
Start with Brown yarn.
Rnd 1: 6 sc in a magic ring. (6)
Rnd 2: 6 inc. (12)
Rnd 3: (1 sc, inc) x6. (18)
Rnd 4: (2 sc, inc) x6. (24)
Rnd 5: (3 sc, inc) x6. (30)
Rnd 6: (4 sc, inc) x6. (36)
Rnd 7: (5 sc, inc) x6. (42)
Rnd 8: (6 sc, inc) x6. (48)
Rnd 9: (7 sc, inc) x6. (54)
Rnd 10: (8 sc, inc) x6. (60)
Rnd 11-18: sc around. (60)
We will now work in flat rows to create the sweeping front bangs.
Row 19: ch 1, turn. 40 sc along the rim. (40)
Row 20: ch 1, turn. dec, 36 sc, dec. (38)
Fasten off and leave a very long tail.
For the Ponytail Base, use Brown yarn.
Rnd 1: 6 sc in a magic ring. (6)
Rnd 2: 6 inc. (12)
Rnd 3: (1 sc, inc) x6. (18)
Rnd 4: (2 sc, inc) x6. (24)
Rnd 5-8: sc around. (24)
Fasten off, leaving a tail for sewing.
The Lab Coat
Worked flat in rows using White yarn.
Row 1: ch 31. Starting in 2nd ch from hook, 30 sc. (30)
Row 2: ch 1, turn. (4 sc, inc) x6. (36)
Row 3: ch 1, turn. (5 sc, inc) x6. (42)
Row 4: ch 1, turn. 6 sc, ch 6, skip 8 sts, 14 sc, ch 6, skip 8 sts, 6 sc. (38)
Row 5: ch 1, turn. 6 sc, 6 sc in the ch space, 14 sc, 6 sc in the ch space, 6 sc. (38)
Row 6-18: ch 1, turn. 38 sc across. (38)
Fasten off and weave in your ends neatly.
The Stethoscope
For the main tubing, use Grey yarn. ch 35. Fasten off.
For the earpieces, make 2 in Grey yarn. ch 10. Fasten off.
For the chestpiece, use Black yarn. Work 6 sc in a magic ring, sl st to join. Fasten off.
The Medical Bag
Using Pink yarn.
Rnd 1: ch 11. Starting in 2nd ch from hook: 9 sc, 3 sc in last ch. Work on the opposite side: 8 sc, inc. (22)
Rnd 2: In BLO, sc around. (22)
Rnd 3-8: sc around. (22)
Rnd 9: (9 sc, dec) x2. (20)
Fasten off. Lightly stuff the bag to hold its rectangular shape. Pinch the top edges flat and sew them completely shut.
For the handles, make 2. ch 12, fasten off.
Using Red yarn, embroider a neat medical cross on the front of the bag.
Assembly & Final Touches
➡️ First, secure the hair cap onto the head. Position it so the bangs sweep gracefully to one side, just above the eyes. Sew the perimeter down firmly.
➡️ Next, stuff the ponytail base lightly and sew it to the high crown of the hair cap, slightly off-center for character.
➡️ Sew the ears directly onto the head, positioning them exactly parallel to the eyes, sitting securely against the edge of the hair cap.
➡️ Attach the arms to the sides of the body, sewing them precisely between rounds 46 and 47.
➡️ Dress Dr. Clara in her lab coat. Fold the front top corners slightly outward to mimic lapels.
➡️ Assemble the stethoscope by sewing the grey earpiece chains to the top of the main tubing. Sew the black chestpiece to the bottom end. Drape it around her neck.
➡️ Sew the pink handles to the top pinched edge of the medical bag.
➡️ Finally, use black embroidery floss to stitch a small, horizontal line for her nose, placed one round below the eyes. Apply a soft touch of pink blush to her cheeks.
Tips & FAQs
How do I make the lab coat lie perfectly flat? Blocking is your best friend here. Before dressing your amigurumi, pin the finished lab coat flat on a blocking mat, spritz it lightly with water, and let it dry. This relaxes the stitches and prevents the edges from curling inward.
My doll’s head is flopping. How can I fix this? Because her head is beautifully oversized to maintain that youthful charm, you must support the neck. When stuffing the body, push the fiberfill extremely firmly into the neck cavity. You can also insert a thick plastic craft dowel right down the center of the body up into the head for absolute stability.
Can I make the stethoscope out of wire instead? Absolutely. If you want a stethoscope that holds a rigid, realistic shape, you can use craft wire. Simply crochet your single crochets tightly around the wire instead of working a standard chain.
A Final Word
You have just created a masterpiece, an homage to care and compassion. Trust in your tension, rely on your stitch counts, and let your hands guide the yarn. I am incredibly proud of what we have accomplished today. Keep creating, my dear friend.