
My dear friend, there is a profound joy in bringing nature’s vibrant colors straight into our homes. I designed this piece as a celebration of life and growth, a permanent spring to brighten your favorite room. Let us pick up our hooks and shape this beautiful story together.
About This Creation & Angle
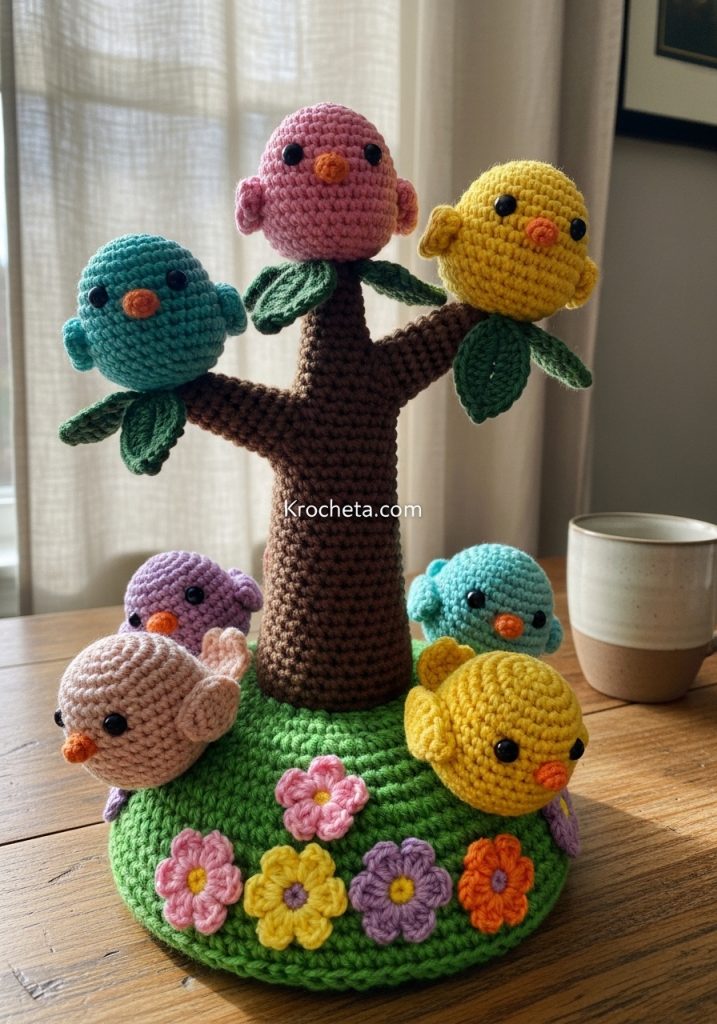
Creating a structured piece requires thoughtful planning and an eye for balance. The charm of this display lies in the striking contrast between the rigid, supportive trunk and the soft, plush birds perched upon its branches. Choosing a sturdy acrylic or tight cotton blend for the tree ensures it stands tall and proud. Conversely, using softer, squishier yarns for the little songbirds gives them an irresistible, gentle appeal. This project is a wonderful centerpiece for your dining table, a joyful desk companion, or a lovely addition to a nursery.
Project Snapshot:
📊 Difficulty: Advanced Intermediate
⏰ Est. Time: 12 to 15 hours
📏 Size: Approximately 10 inches tall and 8 inches wide
“Patience is the truest tool in your box; stitch by stitch, an entire forest can grow.” – Patricia Poltera
Materials & Tools Needed
🧶 Yarn: Worsted weight (Category 4) in Brown, Light Green, Dark Green, Teal, Pink, Purple, Mint, Yellow, Goldenrod, and Orange.
🪡 Hook: 3.0mm (to keep stitches tight and hide the stuffing completely).
✨ Other Materials: Fiberfill stuffing, 14 gauge craft wire, heavy floral tape, 6mm safety eyes (12 total), a heavy base weight (like a large flat stone or a sealed bag of poly-pellets), yarn needle, and stitch markers.
Abbreviations & Stitches Used
➡️ MR: Magic Ring
➡️ ch: chain
➡️ sl st: slip stitch
➡️ sc: single crochet
➡️ inc: single crochet increase (2 sc in one stitch)
➡️ dec: invisible decrease (sc 2 together through front loops only)
➡️ hdc: half double crochet
➡️ dc: double crochet
➡️ BLO: back loops only
The Complete Springtime Chorus Pattern
The Grassy Meadow Base
Artisan’s Note: Work in continuous spirals using Light Green yarn. We are building a wide foundation to hold the weight of the tree without tipping.
Round 1: 6 sc in MR (6)
Round 2: inc in each st around (12)
Round 3: [sc in next st, inc] 6 times (18)
Round 4: [sc in next 2 st, inc] 6 times (24)
Round 5: [sc in next 3 st, inc] 6 times (30)
Round 6: [sc in next 4 st, inc] 6 times (36)
Round 7: [sc in next 5 st, inc] 6 times (42)
Round 8: [sc in next 6 st, inc] 6 times (48)
Round 9: [sc in next 7 st, inc] 6 times (54)
Round 10: [sc in next 8 st, inc] 6 times (60)
Round 11: [sc in next 9 st, inc] 6 times (66)
Round 12: [sc in next 10 st, inc] 6 times (72)
Round 13: [sc in next 11 st, inc] 6 times (78)
Round 14: [sc in next 12 st, inc] 6 times (84)
Round 15: [sc in next 13 st, inc] 6 times (90)
Round 16: [sc in next 14 st, inc] 6 times (96)
Round 17: Working in BLO, sc in each st around to create the bottom edge (96)
Rounds 18-22: sc in each st around (96)
Fasten off, leaving a very long tail for sewing the bottom shut later.
The Main Trunk
Artisan’s Note: Switch to Brown yarn. Keep your tension very tight. You will insert the taped wire frame and stuff firmly around it as you build the height.
Round 1: 8 sc in MR (8)
Round 2: inc in each st around (16)
Round 3: [sc in next st, inc] 8 times (24)
Round 4: [sc in next 2 st, inc] 8 times (32)
Rounds 5-10: sc in each st around (32)
Round 11: [sc in next 6 st, dec] 4 times (28)
Rounds 12-18: sc in each st around (28)
Round 19: [sc in next 5 st, dec] 4 times (24)
Rounds 20-28: sc in each st around (24)
Round 29: [sc in next 4 st, dec] 4 times (20)
Rounds 30-38: sc in each st around (20)
Round 39: [sc in next 3 st, dec] 4 times (16)
Rounds 40-48: sc in each st around (16)
Fasten off, leaving a long tail for attaching to the base.
The Branches (Make 3)
Artisan’s Note: Continue with Brown yarn. We want varied lengths, so you may stop early on one or two branches for a natural look.
Round 1: 6 sc in MR (6)
Round 2: inc in each st around (12)
Rounds 3-16: sc in each st around (12)
Fasten off, leaving a tail for sewing. Insert wire before attaching to the trunk.
The Verdant Leaves (Make 10)
Artisan’s Note: Use Dark Green yarn. This creates a beautifully pointed, textured leaf.
Row 1: ch 8.
Row 2: Working down the chain, sl st in 2nd ch from hook, sc in next, hdc in next, dc in next 2 chains, hdc in next, sc in last chain.
Row 3: ch 1, turn the piece to work down the opposite side of the foundation chain. sc in first, hdc in next, dc in next 2, hdc in next, sc in next, sl st in tip.
Fasten off, leaving a tail for sewing.
The Blossom Assortment (Make 8)
Artisan’s Note: Use Pink, Yellow, Purple, and Orange. These are simple, elegant five-petal flowers.
Round 1: In a Magic Ring, work [ch 2, 2 dc, ch 2, sl st into the ring] 5 times to create 5 petals.
Pull the ring tight, fasten off, and leave a tail for attaching. Add a small French knot in the center using contrasting yarn if desired.
The Little Songbirds (Make 6)
Artisan’s Note: Use your bright and pastel colors. The head and body are worked in one continuous piece, expanding at the cheeks for our signature youthful charm.
Round 1: 6 sc in MR (6)
Round 2: inc in each st around (12)
Round 3: [sc in next st, inc] 6 times (18)
Round 4: [sc in next 2 st, inc] 6 times (24)
Round 5: [sc in next 3 st, inc] 6 times (30)
Round 6: [sc in next 4 st, inc] 6 times (36)
Rounds 7-11: sc in each st around (36)
Round 12: [sc in next 5 st, inc] 6 times (42) – This shapes the lower, chubby cheeks.
Rounds 13-17: sc in each st around (42)
Artisan’s Note: Insert 6mm safety eyes between rounds 9 and 10, spaced about 8 stitches apart. Ensure they sit low on the face to capture that sweet, innocent gaze.
Round 18: [sc in next 5 st, dec] 6 times (36)
Round 19: [sc in next 4 st, dec] 6 times (30)
Round 20: [sc in next 3 st, dec] 6 times (24)
Round 21: [sc in next 2 st, dec] 6 times (18)
Stuff the bird body firmly, paying special attention to the wide cheeks.
Round 22: [sc in next st, dec] 6 times (12)
Round 23: dec 6 times (6)
Fasten off, sew the remaining hole closed, and weave in the end.
The Little Wings (Make 12, 2 per bird)
Artisan’s Note: Match or contrast with the bird bodies.
Round 1: 5 sc in MR (5)
Round 2: inc in each st around (10)
Round 3: [sc in next st, inc] 5 times (15)
Rounds 4-6: sc in each st around (15)
Fold flat and sc across the top through both layers to close (7 sc). Fasten off, leaving a tail for sewing.
The Tiny Beaks (Make 6)
Artisan’s Note: Use Orange yarn.
Round 1: 4 sc in MR (4)
Round 2: [sc in next st, inc] 2 times (6)
Fasten off, leaving a tail. Do not stuff.
The Tail Feathers (Make 6)
Artisan’s Note: Match the bird body color.
Row 1: ch 5.
Row 2: sc in 2nd ch from hook and in each across (4).
Row 3: ch 1, turn. sc in each st across (4).
Fasten off, leaving a tail for sewing.
Assembly & Final Touches
First, prepare your grassy base. Place your heavy weight inside and cut a flat circle of cardboard to fit the bottom. Sew the base closed using a flat piece of green crochet or felt.
Next, twist your craft wires together to form a tree skeleton, wrapping them in floral tape. Insert the main stalk into your brown trunk, and the branch wires into your crochet branches.
Sew the branches securely to the main trunk. Sew the entire tree firmly to the center of the grassy meadow base.
Assemble your birds by sewing the beaks centered between the eyes. Attach the wings to the sides, angled slightly backward, and sew the tail feathers to the lower back.
Finally, position your songbirds on the branches and the base. Sew them securely into place. Scatter and sew the verdant leaves and beautiful blossoms around the tree to complete your stunning display.
Tips & FAQs
❓ How do I ensure my tree doesn’t fall over? A strong, heavy base is crucial. I recommend using a heavy, flat river stone tucked inside the bottom of the grassy meadow before you seal it.
❓ Can I make the birds removable? Absolutely. Instead of sewing the birds directly to the branches, you can attach small, sturdy snaps or hook-and-loop fasteners to the bottom of the birds and the tops of the branches.
A Final Word
Creating this piece is an act of love, turning simple strands of yarn into a vibrant celebration of nature. Take your time with every stitch, shape the wires with care, and let the bright colors bring a smile to your face. I cannot wait to see your glorious springtime creations bloom.