Greetings from the atelier, my dear friends. Today, I am overjoyed to share a project that captures the very soul of spring in soft, pastel yarn. Petal the Piglet is a labor of love, designed to bring a touch of blooming warmth into your home and your heart.
About This Creation
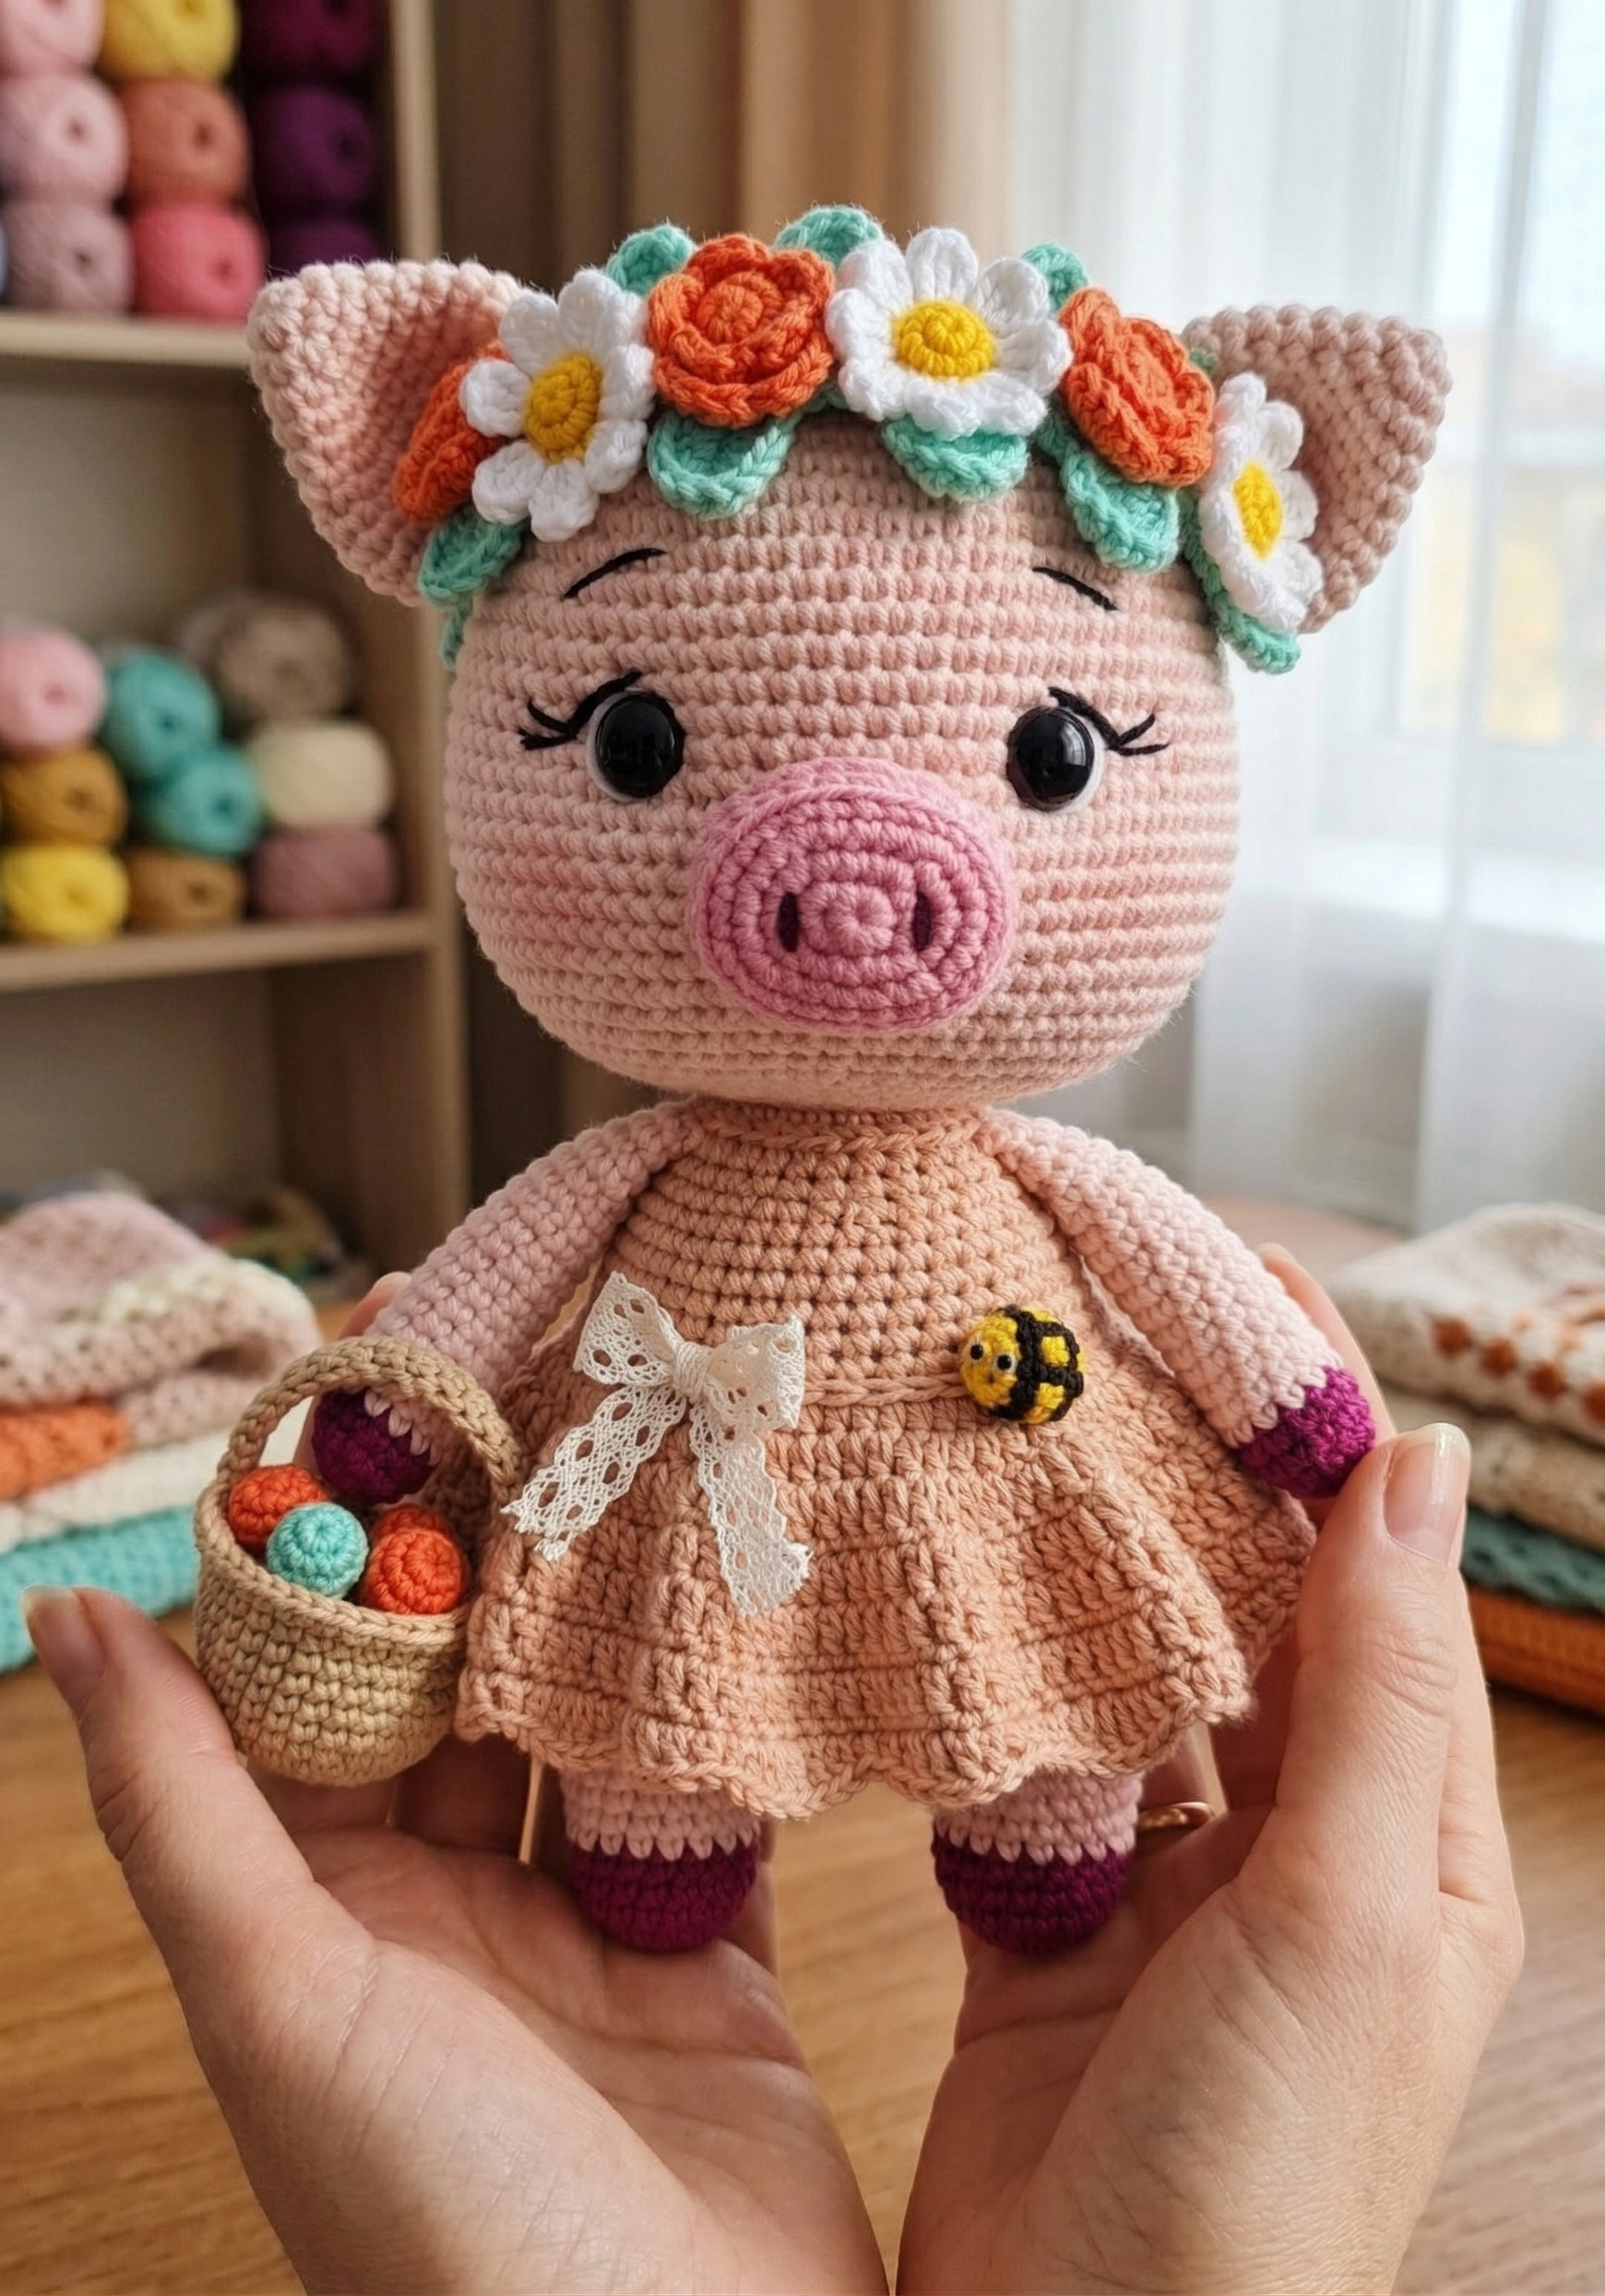
There is a profound joy in watching a character take shape stitch by stitch. Petal the Springtime Piglet embodies the innocence and gentle warmth of the season. Her oversized head and large, soulful eyes are carefully calculated to evoke an immediate sense of adoration. Every element, from her tiny hooves to her flourishing flower crown, is crafted entirely from yarn, maintaining that authentic, fully crocheted, handmade charm we cherish.
This guide is meticulously structured to ensure your success. We are using a soft, sport-weight cotton blend, which I find is the absolute best yarn for amigurumi when you need precise stitch definition without sacrificing an ounce of softness. The resulting fabric is sturdy enough to hold its shape, yet supple enough to be undeniably huggable.
Project Snapshot
📊 Difficulty: Advanced Beginner to Intermediate
⏰ Est. Time: 12-15 Hours
📏 Size: Approximately 20cm (8 inches) tall using recommended yarn
“The secret to a truly expressive face lies not just in the eyes, but in the subtle sculpting of the cheeks. A few strategic increases can transform a simple sphere into a face full of life and character.” – Patricia Poltera
Materials & Tools Needed
🧶 Yarn: Sport weight cotton blend. Colors: Light Pink (Main), Dark Pink (Hooves/Snout), Peach/Soft Pink (Dress), White, Yellow, Orange, Mint Green, Tan/Jute (Basket), Black (Bee).
🪡 Hook: 2.5mm crochet hook
✨ Other Materials: 12mm safety eyes, soft polyester fiberfill stuffing, yarn needle, stitch marker, black embroidery floss, pink blush (optional, for cheeks).
Abbreviations & Stitches Used
ch: chain
sl st: slip stitch
sc: single crochet
inc: increase (2 sc in one stitch)
dec: invisible decrease (sc 2 together through front loops)
hdc: half double crochet
dc: double crochet
FLO: front loops only
BLO: back loops only
The Complete Petal the Springtime Piglet Pattern
1. The Head (Light Pink)
Round 1: 6 sc in a magic ring. (6)
Round 2: inc in each st around. (12)
Round 3: (1 sc, inc) 6 times. (18)
Round 4: (2 sc, inc) 6 times. (24)
Round 5: (3 sc, inc) 6 times. (30)
Round 6: (4 sc, inc) 6 times. (36)
Round 7: (5 sc, inc) 6 times. (42)
Round 8: (6 sc, inc) 6 times. (48)
Round 9: (7 sc, inc) 6 times. (54)
Round 10: (8 sc, inc) 6 times. (60)
Round 11: (9 sc, inc) 6 times. (66)
Rounds 12-20: sc in each st around. (66)
Artisan’s Note: We will now create the distinct, chubby cheeks. Pay close attention to the stitch counts here.
Round 21: 20 sc, (inc, 1 sc) 6 times, 8 sc, (1 sc, inc) 6 times, 14 sc. (78)
Rounds 22-26: sc in each st around. (78)
Round 27: 20 sc, (dec, 1 sc) 6 times, 8 sc, (1 sc, dec) 6 times, 14 sc. (66)
Round 28: (9 sc, dec) 6 times. (60)
Round 29: (8 sc, dec) 6 times. (54)
Round 30: (7 sc, dec) 6 times. (48)
Round 31: (6 sc, dec) 6 times. (42)
Round 32: (5 sc, dec) 6 times. (36)
Artisan’s Note: Insert safety eyes between rounds 19 and 20, leaving 12 stitches between them. Begin stuffing the head firmly, shaping the cheeks outwards.
Round 33: (4 sc, dec) 6 times. (30)
Round 34: (3 sc, dec) 6 times. (24)
Round 35: (2 sc, dec) 6 times. (18)
Fasten off, leaving a long tail for sewing. Finish stuffing firmly.
2. The Snout (Medium Pink)
Round 1: ch 6. Starting in the 2nd ch from hook: 4 sc, 3 sc in the last ch. Working down the opposite side of the ch: 3 sc, 1 inc in the first ch. (12)
Round 2: 1 inc, 3 sc, 3 inc, 3 sc, 2 inc. (18)
Round 3: BLO sc in each st around. (18)
Round 4: sc in each st around. (18)
Fasten off, leaving a tail for sewing.
3. The Ears (Make 2, Light Pink)
Round 1: 6 sc in a magic ring. (6)
Round 2: (1 sc, inc) 3 times. (9)
Round 3: (2 sc, inc) 3 times. (12)
Round 4: (3 sc, inc) 3 times. (15)
Round 5: (4 sc, inc) 3 times. (18)
Round 6: (5 sc, inc) 3 times. (21)
Round 7: (6 sc, inc) 3 times. (24)
Rounds 8-10: sc in each st around. (24)
Fold flat and sc 12 across the top to close. Fasten off, leaving a tail.
4. The Plump Body (Light Pink)
Round 1: 6 sc in a magic ring. (6)
Round 2: inc in each st around. (12)
Round 3: (1 sc, inc) 6 times. (18)
Round 4: (2 sc, inc) 6 times. (24)
Round 5: (3 sc, inc) 6 times. (30)
Round 6: (4 sc, inc) 6 times. (36)
Round 7: (5 sc, inc) 6 times. (42)
Round 8: (6 sc, inc) 6 times. (48)
Rounds 9-13: sc in each st around. (48)
Round 14: (6 sc, dec) 6 times. (42)
Rounds 15-16: sc in each st around. (42)
Round 17: (5 sc, dec) 6 times. (36)
Rounds 18-19: sc in each st around. (36)
Round 20: (4 sc, dec) 6 times. (30)
Rounds 21-22: sc in each st around. (30)
Round 23: (3 sc, dec) 6 times. (24)
Round 24: sc in each st around. (24)
Round 25: (2 sc, dec) 6 times. (18)
Fasten off. Stuff the body firmly, emphasizing the plump base.
5. The Arms (Make 2, Start with Dark Pink)
Round 1: 6 sc in a magic ring. (6)
Round 2: inc in each st around. (12)
Round 3: BLO sc in each st around. (12)
Round 4: sc in each st around. (12)
Change to Light Pink yarn.
Rounds 5-14: sc in each st around. (12)
Stuff lightly in the lower half only. Fold flat and sc 6 across to close. Fasten off.
6. The Legs (Make 2, Start with Dark Pink)
Round 1: 6 sc in a magic ring. (6)
Round 2: inc in each st around. (12)
Round 3: (1 sc, inc) 6 times. (18)
Round 4: BLO sc in each st around. (18)
Rounds 5-6: sc in each st around. (18)
Change to Light Pink yarn.
Round 7: (4 sc, dec) 3 times. (15)
Rounds 8-10: sc in each st around. (15)
Stuff firmly. Fasten off, leaving a long tail for sewing.
7. The Spring Dress (Peach/Soft Pink)
Artisan’s Note: This dress is worked top-down in rows, then joined in the round for the skirt.
Row 1: ch 25. Starting in 2nd ch from hook, sc 24. ch 1, turn. (24)
Row 2: (3 sc, inc) 6 times. ch 1, turn. (30)
Row 3: 4 sc, ch 6, skip 6 sts (armhole), 10 sc, ch 6, skip 6 sts (armhole), 4 sc. ch 1, turn. (30)
Row 4: sc in each st and ch space across. (30)
Row 5: (4 sc, inc) 6 times. (36)
Join to the first st with a sl st to work in the round. ch 2.
Round 6: FLO 2 dc in each st around. Join with sl st. (72)
Rounds 7-10: ch 2, dc in each st around. Join. (72)
Round 11: ch 1, (sc in next st, skip 1 st, 5 dc in next st, skip 1 st) repeat around to create a scallop edge. Join and fasten off.
8. Flower Crown: Daisies (Make 3, White/Yellow)
Start with Yellow: 5 sc in a magic ring, sl st to join. (5)
Change to White: (ch 3, sl st back into the same st, sl st into next st) 5 times. (5 petals)
Fasten off, leave tail.
9. Flower Crown: Ruffled Blooms (Make 2, Orange/Peach)
Round 1: 6 sc in a magic ring. (6)
Round 2: FLO 3 hdc in each st around. (18)
Fasten off and spiral the ruffles together.
10. Flower Crown: Leaves (Make 5, Mint Green)
ch 6. Starting in 2nd ch: sc, hdc, dc, hdc, sc. (5)
Fasten off.
11. The Gathering Basket (Tan/Jute)
Round 1: 6 sc in a magic ring. (6)
Round 2: inc in each st around. (12)
Round 3: (1 sc, inc) 6 times. (18)
Round 4: (2 sc, inc) 6 times. (24)
Round 5: (3 sc, inc) 6 times. (30)
Round 6: BLO sc in each st around. (30)
Rounds 7-12: sc in each st around. (30)
Fasten off. For the handle: ch 20, sc in each ch back down. Sew to the sides of the basket.
12. Basket Florals & Buds
Create 5 tiny buds. (With yellow/orange: 4 sc in a magic ring, fasten off). Attach to green ch-5 stems.
13. The Little Bee Companion (Yellow/Black)
With Yellow: 6 sc in a magic ring. (6)
Round 2: (1 sc, inc) 3 times. (9)
Change to Black: Round 3: sc in each st around. (9)
Change to Yellow: Round 4: sc in each st around. (9)
Change to Black: Round 5: (1 sc, dec) 3 times. (6)
Fasten off. Embroider tiny white wings with yarn.
14. Dress Accents
Tiny Lace Bow: With thin white cotton, ch 4, (3 dc, ch 3, sl st) into the first ch, (ch 3, 3 dc, ch 3, sl st) into the same first ch. Fasten off.
Assembly & Final Touches
➡️ Sew the Snout to the Head: Position the snout between rounds 21 and 25, perfectly centered between the eyes. Add a tiny bit of stuffing before closing.
➡️ Attach the Ears: Pinch the bases in half. Sew them securely to the top of the head between rounds 6 and 8, spaced about 12 stitches apart.
➡️ Connect Head to Body: Using the long tail from the head, sew the head onto the open neck of the body (Round 25). Ensure the chin points forward over the belly.
➡️ Attach the Legs: Sew the legs to the underside of the body, between rounds 6 and 10, angling them slightly outward so Petal can stand with balance.
➡️ Attach the Arms: Sew the flat-closed top of the arms strictly to Round 23 of the body, resting flush against the sides.
➡️ Dress the Piglet: Slip the Spring Dress onto the body before adding the final accessories.
➡️ Assemble the Crown: Carefully arrange and sew the daisies, ruffled blooms, and leaves along the forehead, right in front of the ears.
➡️ Add Details: Embroider eyelashes with black floss. Lightly brush pink blush under the eyes. Tack the tiny lace bow and the bee companion to the front of the dress skirt. Tack the basket to one hand.
Tips & FAQs
❓ My piglet’s head keeps tilting forward. How do I fix this? This happens when the neck joint isn’t supported. When you have about a one-inch gap left while sewing the head to the body, aggressively pack extra fiberfill directly into the center of the neck opening.
❓ The dress skirt isn’t flaring out as much as the picture. What did I do wrong? Ensure you are placing two double crochets (2 dc) into the front loop only (FLO) of every single stitch on Round 6 of the dress. This severe increase is what forces the fabric into a beautiful ruffled flare.
❓ How do I make the hooves look flat on the bottom? Working in the back loops only (BLO) for Round 4 of the legs and Round 3 of the arms creates a sharp edge that flattens the bottom of the limb. Do not overstuff the very bottom to maintain that edge perfectly.
A Final Word
Creating this piglet brings an undeniable sense of accomplishment and calm. Remember, your stitches are the foundation of your artistry. Trust your hands, follow the counts meticulously, and breathe life into your beautiful creation.

