Welcome back to the worktable, my creative friend. Today, we embark on a project that demands patience and rewards it with unparalleled charm. These slumbering puppies are an exercise in anatomical shaping, designed specifically to capture the heavy, peaceful posture of a resting dog. Let us begin.
About This Creation
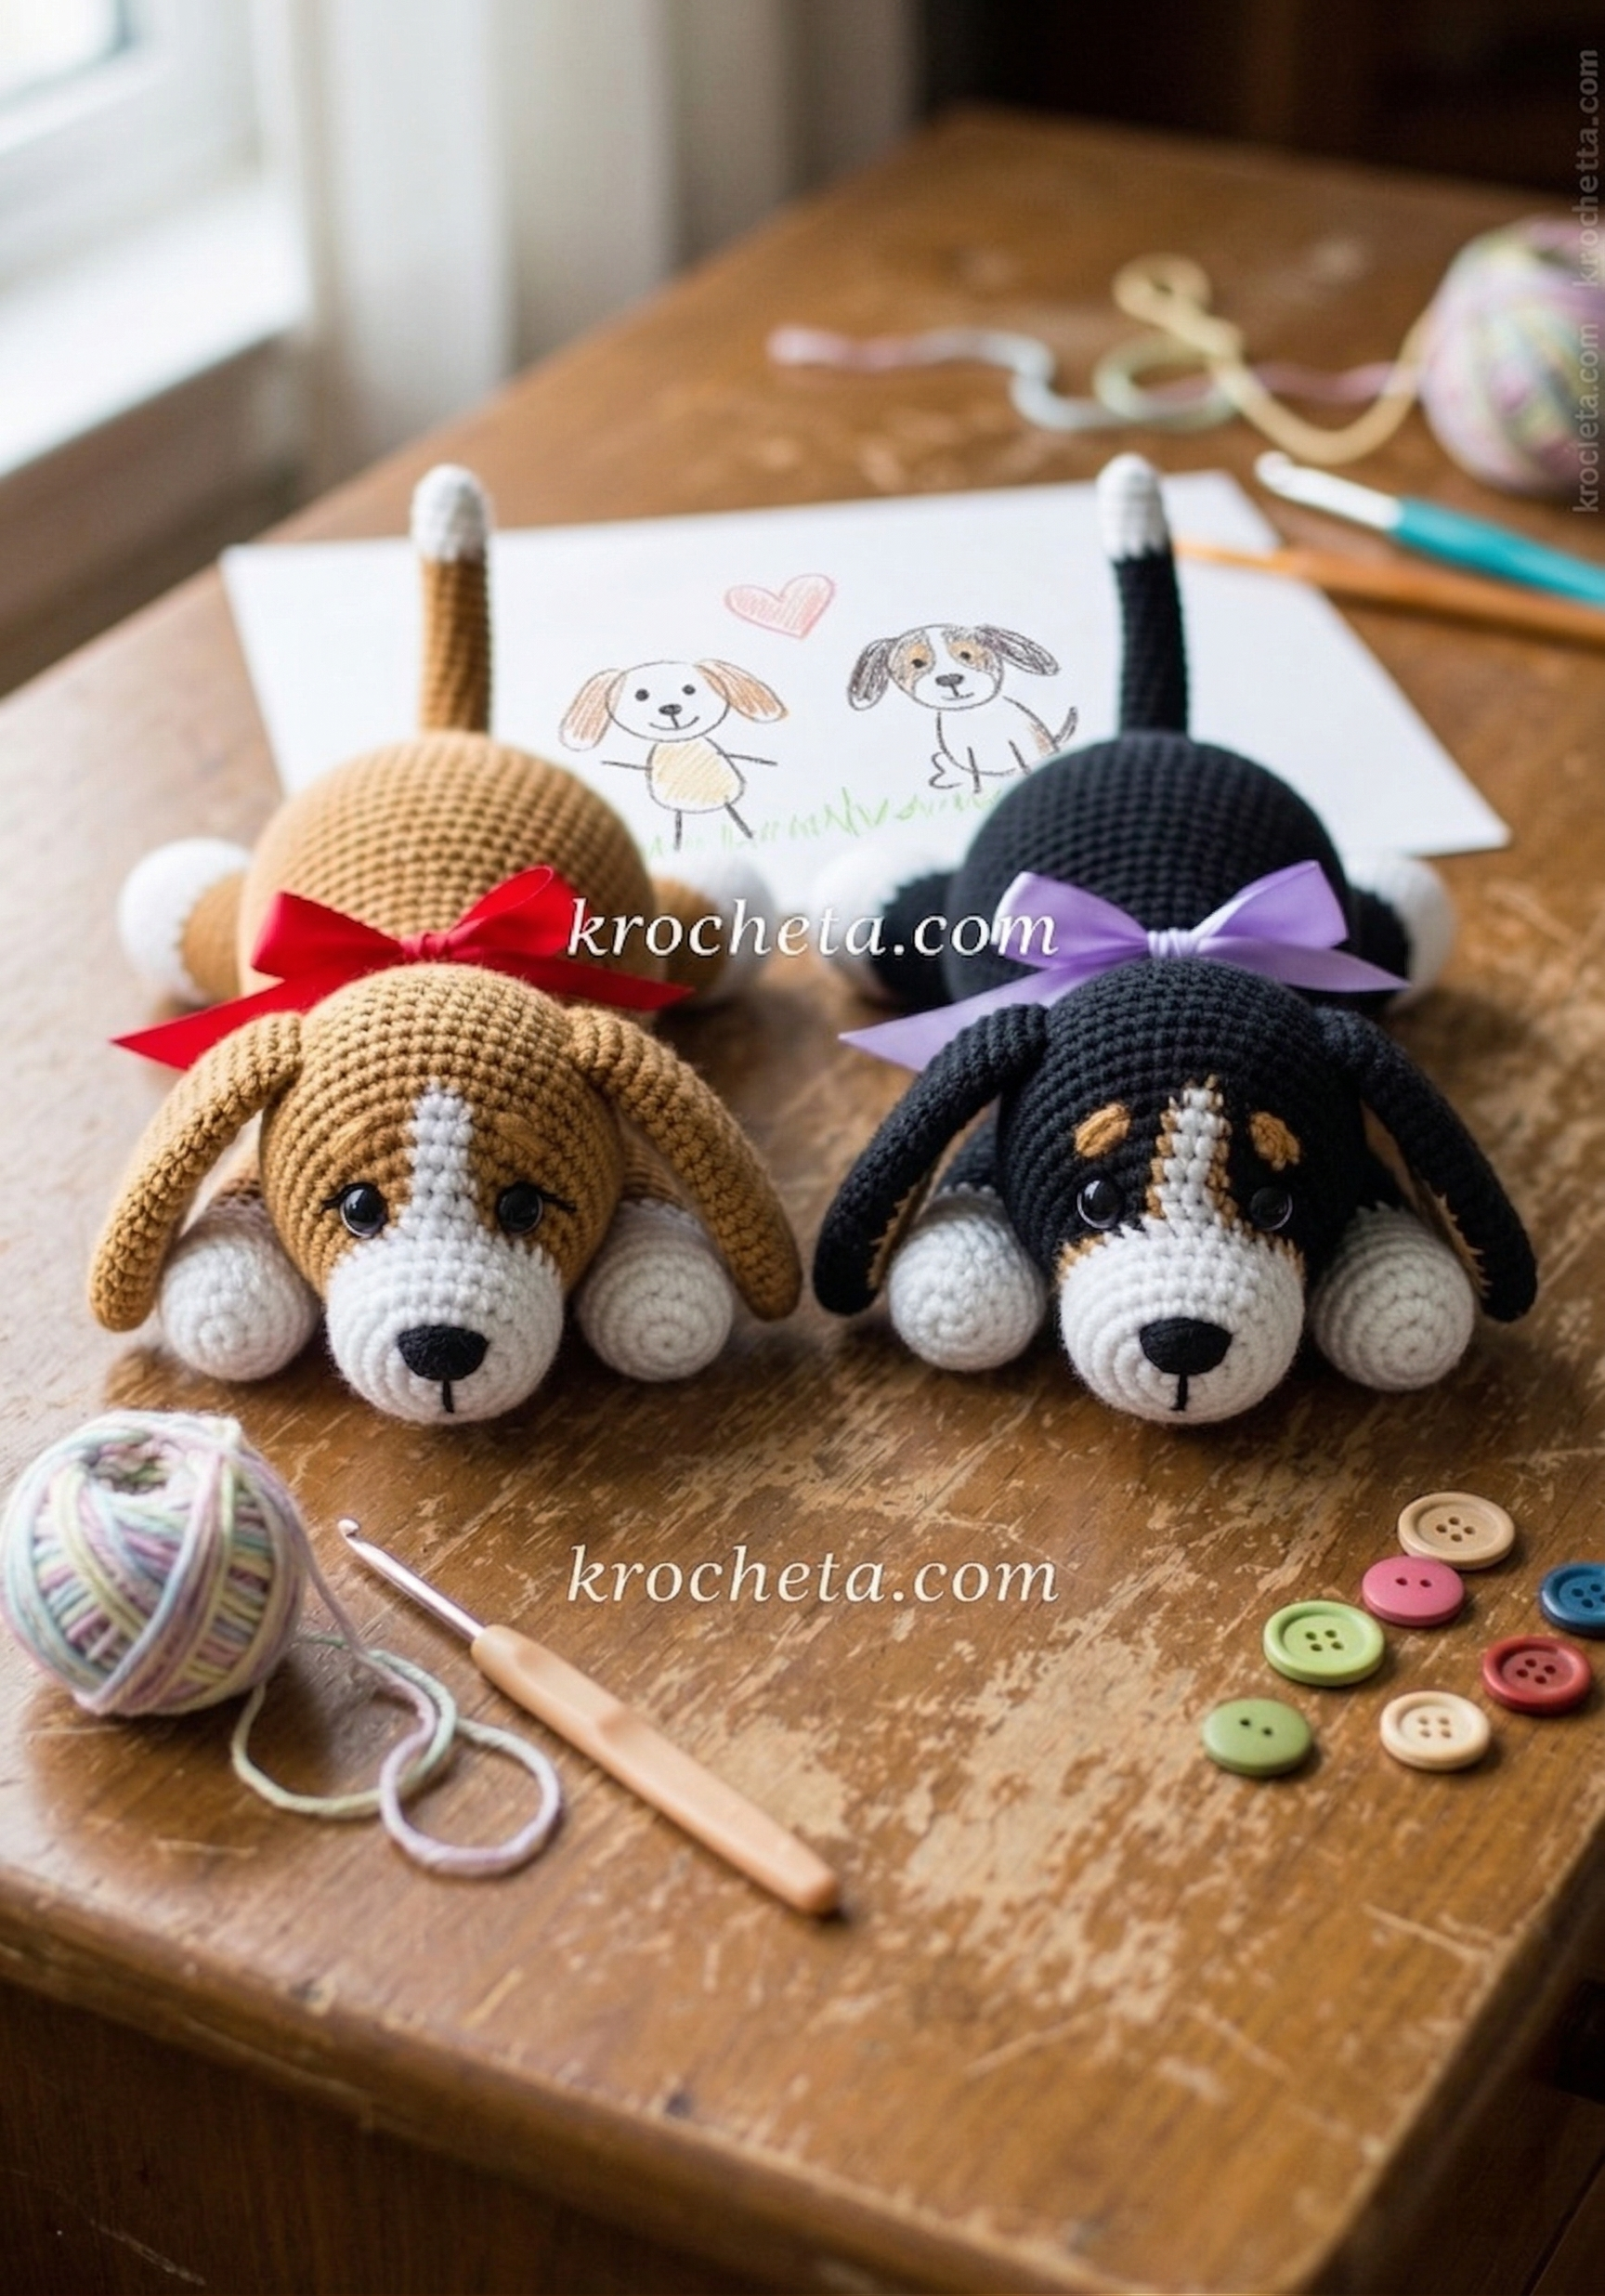
There is a distinct geometry to a resting animal. The weight settles, the limbs splay outward, and the spine lengthens. Capturing this in yarn requires deliberate shaping and strategic increases. These companions are engineered to lay completely flat on their bellies, making them excellent decorative accents or comforting tactile objects.
The design utilizes a modular construction approach. We will crochet the elongated body first to establish the foundation, followed by the head and heavy, oversized ears. Whether you choose the golden and white pathway or the stark contrast of the midnight and tan, the core mathematics remain the same. This pattern serves as an excellent introduction to colorwork for beginners while offering experienced artisans a highly satisfying structural project.
Project Snapshot
Difficulty: Intermediate
Est. Time: 8 – 10 Hours
Size: 22 cm long (from nose to tail base)
“The secret to a truly heavy-looking ear lies in the tension. Keep your stitches tight at the base, but allow them to relax slightly toward the tip to ensure a natural drape.”
Materials & Tools Needed
Yarn: Medium worsted weight cotton yarn. Golden version requires Light Brown, White, and Black. Midnight version requires Black, Tan, and White. Both require a scrap of Red.
Hook: 2.5 mm crochet hook (to ensure a tight, gapless fabric).
Other Materials: 10 mm safety eyes, fiberfill stuffing, stitch markers, yarn needle, a length of fabric ribbon.
Abbreviations & Stitches Used
ch: chain
sl st: slip stitch
sc: single crochet
inc: increase
dec: decrease
The Complete Slumbering Puppy Pattern
The Head Start in your Main Color (Light Brown or Black).
Rnd 1: 6 sc in a magic ring (6)
Rnd 2: 6 inc (12)
Rnd 3: (1 sc, inc) x 6 (18)
Rnd 4: (2 sc, inc) x 6 (24)
Rnd 5: (3 sc, inc) x 6 (30)
Rnd 6: (4 sc, inc) x 6 (36)
Rnd 7: (5 sc, inc) x 6 (42)
Rnd 8: (6 sc, inc) x 6 (48)
Rnd 9-15: 48 sc (48)
Artisan’s Note: For the golden version, integrate 6 stitches of white in the top center for rounds 9-15 to start the facial blaze.
Rnd 16: (7 sc, inc) x 6 (54)
Rnd 17-21: 54 sc (54)
Rnd 22: (7 sc, dec) x 6 (48)
Rnd 23: (6 sc, dec) x 6 (42)
Rnd 24: (5 sc, dec) x 6 (36)
Rnd 25: (4 sc, dec) x 6 (30)
Rnd 26: (3 sc, dec) x 6 (24)
Stuff the head firmly. Place safety eyes between rounds 15 and 16, approximately 10 stitches apart. Ensure they sit low on the face to maintain that innocent, baby-like aesthetic.
Rnd 27: (2 sc, dec) x 6 (18)
Rnd 28: (1 sc, dec) x 6 (12)
Rnd 29: 6 dec (6)
Fasten off and weave in the end.
The Muzzle Start in your Contrast Color (White or Tan).
Rnd 1: 6 sc in a magic ring (6)
Rnd 2: 6 inc (12)
Rnd 3: (1 sc, inc) x 6 (18)
Rnd 4: (2 sc, inc) x 6 (24)
Rnd 5: (3 sc, inc) x 6 (30)
Rnd 6: (4 sc, inc) x 6 (36)
Rnd 7-10: 36 sc (36)
Fasten off, leaving a long tail for sewing.
The Nose Start in Black yarn.
Rnd 1: 6 sc in a magic ring (6)
Rnd 2: (1 sc, inc) x 3 (9)
Fasten off, leaving a tail for sewing.
The Body Start in your Main Color.
Rnd 1: 6 sc in a magic ring (6)
Rnd 2: 6 inc (12)
Rnd 3: (1 sc, inc) x 6 (18)
Rnd 4: (2 sc, inc) x 6 (24)
Rnd 5: (3 sc, inc) x 6 (30)
Rnd 6: (4 sc, inc) x 6 (36)
Rnd 7: (5 sc, inc) x 6 (42)
Rnd 8-15: 42 sc (42)
Rnd 16: (5 sc, dec) x 6 (36)
Rnd 17-25: 36 sc (36)
Rnd 26: (4 sc, dec) x 6 (30)
Rnd 27-32: 30 sc (30)
Rnd 33: (3 sc, dec) x 6 (24)
Rnd 34: 24 sc (24)
Stuff the body. Keep the stuffing slightly soft to allow the body to lie flat without bulging.
Rnd 35: (2 sc, dec) x 6 (18)
Rnd 36: (1 sc, dec) x 6 (12)
Rnd 37: 6 dec (6)
Fasten off and weave in the end.
Floppy Ears (Make 2) Start in your Main Color.
Rnd 1: 6 sc in a magic ring (6)
Rnd 2: 6 inc (12)
Rnd 3: (1 sc, inc) x 6 (18)
Rnd 4: (2 sc, inc) x 6 (24)
Rnd 5: (3 sc, inc) x 6 (30)
Rnd 6-12: 30 sc (30)
Rnd 13: (3 sc, dec) x 6 (24)
Rnd 14-18: 24 sc (24)
Rnd 19: (2 sc, dec) x 6 (18)
Rnd 20-25: 18 sc (18)
Rnd 26: (1 sc, dec) x 6 (12)
Rnd 27-30: 12 sc (12)
Do not stuff the ears. Flatten the piece and sc 6 evenly across the top opening to close. Leave a long tail for sewing.
Front Legs (Make 2) Start in White yarn.
Rnd 1: 6 sc in a magic ring (6)
Rnd 2: 6 inc (12)
Rnd 3: (1 sc, inc) x 6 (18)
Rnd 4-6: 18 sc (18)
Change to your Main Color.
Rnd 7-15: 18 sc (18)
Stuff the white paw firmly, but leave the main color section completely empty to ensure it lays flat.
Rnd 16: (1 sc, dec) x 6 (12)
Flatten and sc 6 evenly across the opening to close. Leave a tail.
Back Legs (Make 2) Start in White yarn.
Rnd 1: 6 sc in a magic ring (6)
Rnd 2: 6 inc (12)
Rnd 3: (1 sc, inc) x 6 (18)
Rnd 4-6: 18 sc (18)
Change to your Main Color.
Rnd 7-12: 18 sc (18)
Stuff the white paw firmly. Leave the remainder of the leg empty.
Rnd 13: (1 sc, dec) x 6 (12)
Flatten and sc 6 evenly across the opening to close. Leave a tail.
The Tail Start in White yarn.
Rnd 1: 4 sc in a magic ring (4)
Rnd 2: (1 sc, inc) x 2 (6)
Rnd 3: (2 sc, inc) x 2 (8)
Change to your Main Color.
Rnd 4-8: 8 sc (8)
Fasten off, leave a tail for sewing. Do not stuff.
The Tongue Start in Red yarn.
Row 1: Ch 4, starting in the 2nd ch from hook, 3 sc (3)
Fasten off. Leave a short tail for sewing.
Assembly & Final Touches
1. Sew the muzzle to the lower front of the head, centered between rounds 16 and 25. Stuff the muzzle firmly with fiberfill right before closing the seam to maintain its round shape.
2. Sew the small black nose directly onto the top center tip of the muzzle.
3. Using a yarn needle and a strand of black yarn, embroider small, downward-slanting eyebrows and delicate cheek freckles onto the muzzle and head.
4. Sew the ears to the upper sides of the head. Begin the attachment at round 8 and end around round 12. Let them drape naturally downward.
5. Attach the head to the front tapered opening of the body. Angle the head slightly upward to give the puppy a sweet, looking-up expression while resting.
6. Sew the front legs completely flat under the front chest of the body. They should point straight ahead, parallel to each other.
7. Sew the back legs flat to the lower sides of the rear body (around rounds 6 through 9), splaying them outward to mimic a relaxed posture.
8. Attach the tail to the rear center of the body, anchoring it securely around round 5.
9. Sew the tiny red tongue just below the center of the muzzle, slightly overlapping the chin area.
10. Tie your fabric ribbon in a neat bow securely around the neck junction.
Tips & FAQs
Q: Why do my puppy’s legs curl upward instead of lying flat?
A: Curled limbs often result from overstuffing the upper section of the leg. Ensure you only firmly stuff the white paw. Keep the main color section completely empty before crocheting the top closed. This forces the limb to act as a hinge.
Q: The color changes on the golden puppy’s face look jagged. How do I fix this?
A: To achieve clean vertical lines on the facial blaze, make sure you perform the color change on the final yarn-over of the previous stitch. Always carry your unused yarn tightly across the back of your work to maintain consistent tension.
Q: Can I use bulky chenille yarn for this pattern?
A: Yes, bulky yarn works wonderfully for a larger, softer companion. You must increase your hook size to match the yarn (typically a 5.0 mm to 6.0 mm hook) and expect the final piece to at least double in size. The mathematics will not change.
A Final Word
Patience is the truest tool in your kit. Take your time shaping the face, and you will create a companion that brings joy for years to come. Until our next session at krocheta.com, keep your stitches even and your imagination bright.

