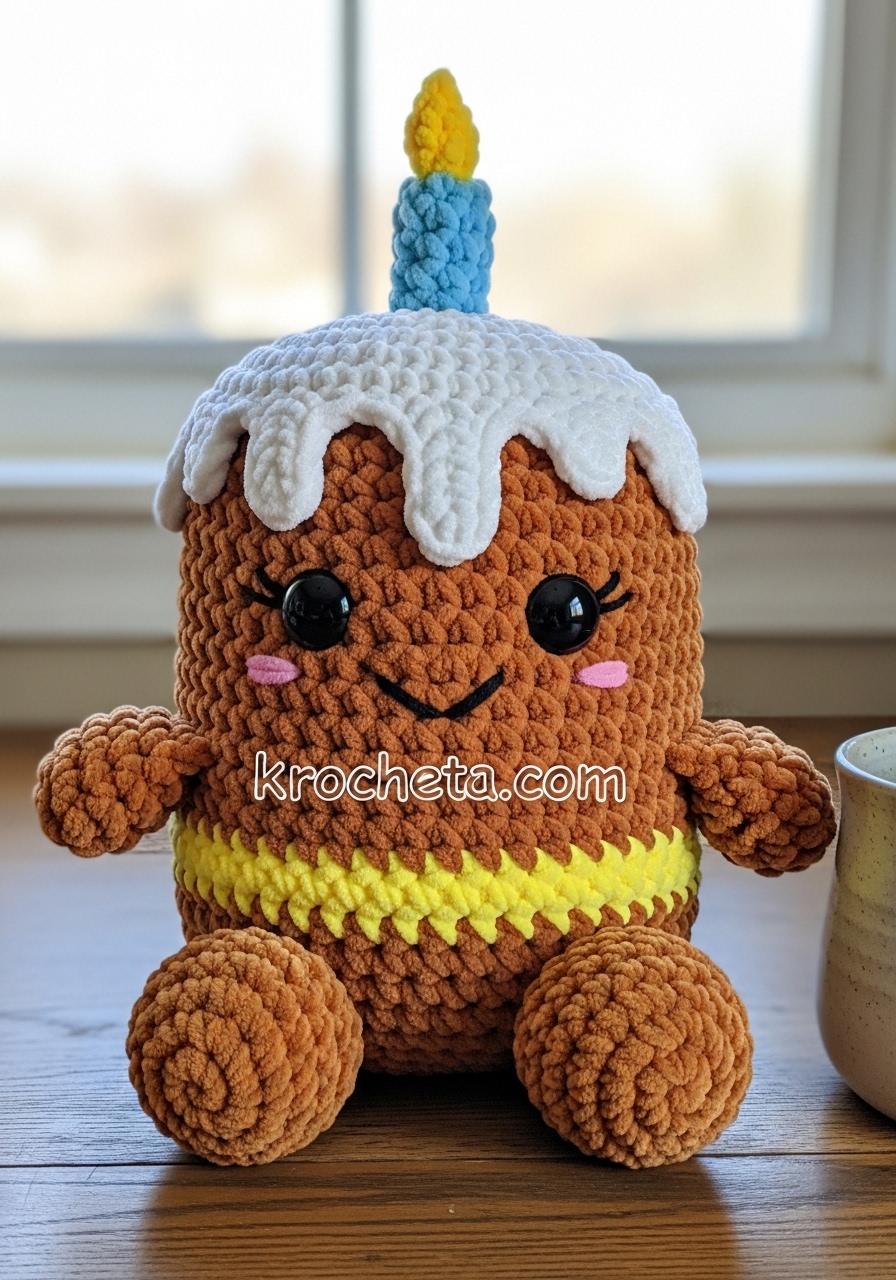
My dear creator, it brings me immense joy to guide your hands through this design. We are building a companion of pure comfort and celebration today. I recall your preference for creations around 14cm, and I have meticulously calculated our gauge and proportions to ensure this little cake stands at that exact, delightful height. The shaping relies on crisp foundational rounds to give the cake its structure, followed by rapid decreases in the limbs to achieve that signature, lovable chubbiness.
About This Creation This piece is a masterclass in combining geometric structure with organic softness. We utilize back-loop-only techniques to define the sharp top and bottom edges of the cake sponge, ensuring it sits perfectly flat. We then counter that structure with our frosting drips and exquisitely plump appendages, utilizing rapid increases to create an endearing, baby-like aesthetic.
Project Snapshot
✨ Size: 14cm tall (including the candle)
✨ Time: Approximately 3 to 4 hours of focused crafting
✨ Difficulty: Intermediate Artisan
Materials
🧶 Super bulky chenille yarn in Caramel Brown (approx. 40g)
🧶 Super bulky chenille yarn in Lemon Yellow (approx. 15g)
🧶 Super bulky chenille yarn in Vanilla White (approx. 20g)
🧶 Super bulky chenille yarn in Pastel Blue (approx. 5g)
🧶 DK weight cotton yarn in Sunshine Yellow (for the flame)
🪡 4.0mm crochet hook (to maintain tight, gapless stitches)
🪡 12mm black safety eyes
🪡 Tapestry needle and premium polyester fiberfill
Abbreviations (US Terms)
➡️ MR: Magic Ring
➡️ sc: single crochet
➡️ hdc: half double crochet
➡️ inc: increase (2 sc in one stitch)
➡️ dec: invisible decrease (sc 2 together)
➡️ BLO: back loops only
➡️ sl st: slip stitch
➡️ ch: chain
The Pattern
Main Body (Starting in Caramel Brown)
R1: 6 sc in MR (6)
R2: 6 inc (12)
R3: [1 sc, inc] x 6 (18)
R4: [2 sc, inc] x 6 (24)
R5: [3 sc, inc] x 6 (30)
R6: [4 sc, inc] x 6 (36)
R7: [5 sc, inc] x 6 (42)
R8: BLO 42 sc (42)
R9-11: 42 sc (42) – Three even rounds to build the base sponge.
Change to Lemon Yellow yarn.
R12-14: 42 sc (42) – Three even rounds for the sweet filling.
Change back to Caramel Brown yarn.
R15-18: 42 sc (42) – Four even rounds for the top sponge.
Place the 12mm safety eyes between Rounds 14 and 15, spacing them 9 stitches apart to achieve a wide, innocent gaze. Ensure they sit low on the face. Using the Caramel Brown yarn, embroider a soft nose by wrapping the yarn horizontally across 2 stitches directly centered between the eyes.
R19: BLO [5 sc, dec] x 6 (36) – This establishes the flat top edge.
R20: [4 sc, dec] x 6 (30)
R21: [3 sc, dec] x 6 (24)
Begin stuffing the body firmly, taking care to mold the flat bottom.
R22: [2 sc, dec] x 6 (18)
R23: [1 sc, dec] x 6 (12)
R24: 6 dec (6)
Fasten off and weave in the tail to close the center completely.
The Frosting Crown (In Vanilla White)
R1: 6 sc in MR (6)
R2: 6 inc (12)
R3: [1 sc, inc] x 6 (18)
R4: [2 sc, inc] x 6 (24)
R5: [3 sc, inc] x 6 (30)
R6: [4 sc, inc] x 6 (36)
R7: [5 sc, inc] x 6 (42)
R8: The Drip Round. We will repeat a sequence over the 42 stitches to create organic drips. [sl st in next st, ch 4, working back down the chain do 1 sc and 2 hdc. sl st into the 2nd st of the base. sl st in the 3rd st of the base. ch 6, working back down the chain do 1 sc and 4 hdc. sl st into the 4th st of the base. sl st in the 5th and 6th sts of the base]. Repeat this entire bracketed sequence 7 times. (This utilizes all 42 stitches of the base round).
Fasten off, leaving a very long tail for sewing.
The Candle (In Pastel Blue)
R1: 6 sc in MR (6)
R2: BLO 6 sc (6)
R3-6: 6 sc (6)
Fasten off, leaving a tail for sewing. Stuff very lightly.
The Flame (In Sunshine Yellow Cotton)
R1: 4 sc in MR (4)
R2: [1 sc, inc] x 2 (6)
R3: [1 sc, dec] x 2 (4)
Fasten off, leaving a thin tail for sewing.
The Arms – Make 2 (In Caramel Brown)
R1: 6 sc in MR (6)
R2: 6 inc (12)
R3-4: 12 sc (12) – This creates the chubby paws.
R5: 6 dec (6) – A sharp decrease to form the wrist.
R6-9: 6 sc (6)
Pinch the top opening flat and sc 3 across both layers to close. Fasten off, leaving a tail. (3)
The Legs – Make 2 (In Caramel Brown)
R1: 6 sc in MR (6)
R2: 6 inc (12)
R3: [1 sc, inc] x 6 (18)
R4: 18 sc (18) – This establishes the wide, rounded feet.
R5: [1 sc, dec] x 6 (12)
R6: 6 dec (6) – A sharp decrease to form the ankle.
R7-8: 6 sc (6)
Pinch the top opening flat and sc 3 across both layers to close. Fasten off, leaving a tail. (3)
Assembly
🪡 Position the Frosting Crown atop the Main Body. Sew it down securely around the inner perimeter, allowing the textured drips to hang freely over the top edge of the cake.
🪡 Sew the Flame to the top center of the Pastel Blue Candle.
🪡 Attach the completed Candle to the exact center of the Frosting Crown.
🪡 Pin the Arms to the sides of the Main Body, resting evenly on Round 13 (the yellow filling). Sew the flat tops securely.
🪡 Pin the Legs to the front bottom edge of the Main Body, just above the BLO line of Round 8. Sew the flat tops to the body, ensuring the chubby feet point forward and slightly upward.
Step 4A: Visual Media Prompt Generation (The Photographer’s Eye)

