A warm greeting to you from the atelier.
It is a true joy to see our blueprint approved. We are constructing more than just a toy; we are building a piece of character art through the careful manipulation of tension and geometry.
Barnaby requires focus. The asymmetrical shaping in his face is what gives him that specific, endearing gaze. Trust the math, count your stitches, and let us begin.
About This Creation
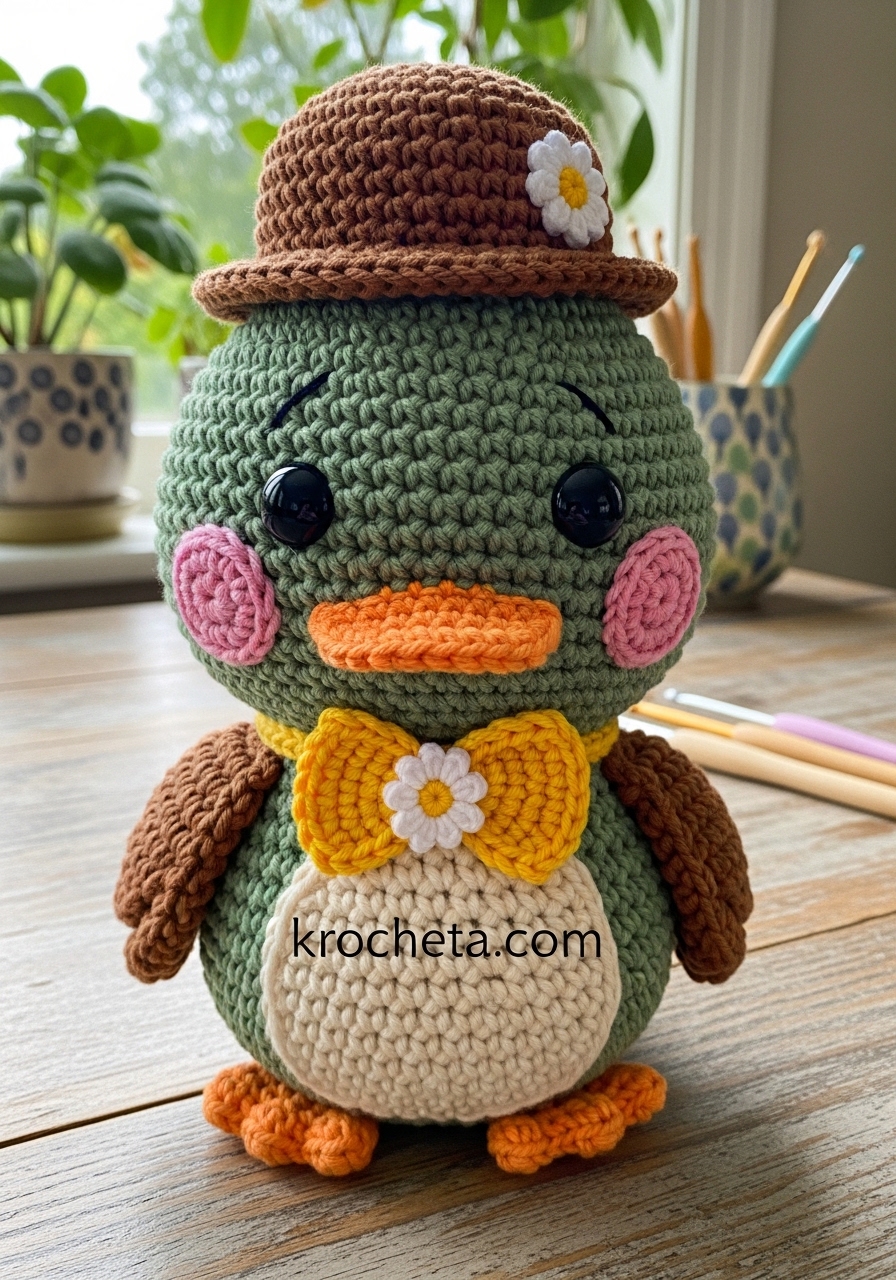
Barnaby is a study in the “Baby Schema” aesthetic. We are utilizing a strict 60/40 head-to-body ratio.
His oversized head rests upon a sturdy, teardrop-shaped base, ensuring he stands proudly on any surface.
The strategic increases in the lower hemisphere of his face create plump, rounded cheeks that perfectly frame his low-set eyes. He will measure approximately 14cm tall when completed with the recommended yarn weight.
Project Snapshot
✨ Skill Level: Intermediate
✨ Time Investment: 4 to 6 hours
✨ Finished Size: Approximately 14cm
Materials
🧶 Medium weight (Worsted/Aran) yarn in Sage Green, Cream, Warm Brown, Yellow-Orange, Bright Yellow, White, and Pink.
🧶 2.5mm crochet hook to ensure tight, gapless fabric.
🧶 10mm black safety eyes.
🧶 Premium polyester fiberfill.
🧶 Yarn needle for precise sewing.
🧶 Stitch marker.
Abbreviations
🪡 We will use standard US terms.
🪡 sc: single crochet (or ponto baixo, if you are practicing your Portuguese terminology!)
🪡 inc: increase (2 sc in the same stitch)
🪡 dec: invisible decrease (sc 2 stitches together through front loops only)
🪡 hdc: half double crochet
🪡 dc: double crochet
🪡 sl st: slip stitch
🪡 ch: chain
🪡 BLO: back loops only
🪡 FLO: front loops only
🪡 ( ) : total stitch count at the end of the round
The Pattern
Head (Sage Green)
We begin at the top of the head and work our way down.
Round 1: 6 sc in a magic ring (6)
Round 2: inc in each st around (12)
Round 3: [1 sc, inc] 6 times (18)
Round 4: [2 sc, inc] 6 times (24)
Round 5: [3 sc, inc] 6 times (30)
Round 6: [4 sc, inc] 6 times (36)
Round 7: [5 sc, inc] 6 times (42)
Round 8: [6 sc, inc] 6 times (48)
Rounds 9-12: sc in each st around for 4 rounds (48)
Now, we build the cheeks. The increases here are intentional and asymmetrical.
Round 13: 15 sc, [inc, 1 sc] 4 times, 2 sc, [1 sc, inc] 4 times, 15 sc (56)
Rounds 14-16: sc in each st around for 3 rounds (56)
Insert your 10mm safety eyes between Rounds 14 and 15. They must be placed exactly 9 stitches apart, centered perfectly over the 2 sc that sit between your cheek increase clusters. Secure the backings firmly.
Round 17: 15 sc, [dec, 1 sc] 4 times, 2 sc, [1 sc, dec] 4 times, 15 sc (48)
Round 18: [6 sc, dec] 6 times (42)
Round 19: [5 sc, dec] 6 times (36)
Stuff the head firmly. Pay special attention to the cheeks, molding the fiberfill into the pockets created by Rounds 13 and 17.
Round 20: [4 sc, dec] 6 times (30)
Round 21: [3 sc, dec] 6 times (24)
Fasten off. Leave a long 30cm tail for sewing.
Main Body (Cream)
We work from the base upwards to create a flat, heavy bottom.
Round 1: 6 sc in a magic ring (6)
Round 2: inc in each st around (12)
Round 3: [1 sc, inc] 6 times (18)
Round 4: [2 sc, inc] 6 times (24)
Round 5: [3 sc, inc] 6 times (30)
Round 6: [4 sc, inc] 6 times (36)
Rounds 7-10: sc in each st around for 4 rounds (36)
Round 11: [4 sc, dec] 6 times (30)
Rounds 12-13: sc in each st around for 2 rounds (30)
Round 14: [3 sc, dec] 6 times (24)
Round 15: sc in each st around (24)
Fasten off. Stuff the body firmly, ensuring the base remains relatively flat.
Beak (Yellow-Orange)
Round 1: ch 6. Starting in the 2nd ch from your hook, work 4 sc. Work 3 sc in the final chain. Rotating to work down the opposite side of the chain, work 3 sc, then 1 inc in the last chain (12)
Round 2: sc in each st around (12)
Fasten off. Leave a tail for sewing. Do not stuff.
Wings x 2 (Warm Brown)
Round 1: 6 sc in a magic ring (6)
Round 2: inc in each st around (12)
Round 3: [1 sc, inc] 6 times (18)
Round 4: [2 sc, inc] 6 times (24)
Fold the circle perfectly in half. Working through both thicknesses of the curved edge, sc 12 across to seal the wing closed (12).
Fasten off. Leave a tail for sewing.
Tail (Warm Brown)
Round 1: 4 sc in a magic ring (4)
Round 2: [1 sc, inc] 2 times (6)
Round 3: [1 sc, inc] 3 times (9)
Round 4: [2 sc, inc] 3 times (12)
Flatten the piece. Do not stuff. Fasten off and leave a tail for sewing.
Feet x 2 (Yellow-Orange)
Round 1: 6 sc in a magic ring (6)
Round 2: [1 sc, inc] 3 times (9)
Rounds 3-4: sc in each st around for 2 rounds (9)
Flatten the top edge. Work 4 sc across the top through both thicknesses to close. Fasten off.
Little Bowler Hat (Warm Brown)
Round 1: 6 sc in a magic ring (6)
Round 2: inc in each st around (12)
Round 3: [1 sc, inc] 6 times (18)
Round 4: In BLO, sc in each st around (18)
Rounds 5-6: In both loops, sc in each st around for 2 rounds (18)
Round 7: In FLO, [2 sc, inc] 6 times (24)
Round 8: In both loops, [3 sc, inc] 6 times (30)
Sl st into the next stitch. Fasten off and weave in the end.
Bow Tie (Bright Yellow)
In a magic ring, work the following sequence: [ch 3, 3 dc, ch 3, sl st into the ring] 2 times.
Pull the magic ring tightly closed. Wrap the yarn tail firmly around the center of the bow 3 or 4 times to create the knot. Fasten off, leaving a tail for sewing.
Daisy Appliqués x 2 (White and Yellow)
With Yellow yarn, work 5 sc in a magic ring. Sl st to the first sc and fasten off.
Attach White yarn to any stitch. Work the following sequence in each of the 5 stitches: [ch 2, 1 dc in the same stitch, ch 2, sl st into the next stitch] 5 times.
Fasten off. Leave a tail for sewing.
Cheek Patches x 2 (Pink)
Round 1: 6 sc in a magic ring (6). Sl st to the first sc.
Fasten off. Leave a tail for sewing.
Assembly
➡️ Pin the Head to the Main Body. Sew them together cleanly, stitch for stitch, around the 24-stitch opening. Add a final pinch of stuffing before closing the gap completely to support the neck.
➡️ Sew the Beak between the eyes, centered precisely across Rounds 14 and 15 of the head. It should sit flush against the face.
➡️ Attach the Pink Cheek Patches securely just below and slightly to the outside of each eye.
➡️ Position the Wings on either side of the body, just below the neck seam. Sew only the straight, flat edge to the body, allowing the curved wing to flap freely.
➡️ Sew the Tail to the lower back of the body so it points slightly upward.
➡️ Attach the Feet to the very bottom front of the body. They should point slightly outward to stabilize his stance.
➡️ Sew one Daisy Appliqué to the brim of the Bowler Hat. Sew the second Daisy Appliqué directly to the center of the Bright Yellow Bow Tie.
➡️ Affix the Bow Tie to the front of the neck seam. Place the hat atop his head at a rakish angle, securing it with a few hidden stitches.

