
Welcome back to the atelier, my dear friend. I am so glad you have returned to share this creative space with me. Today, we are bringing a basket of pure sunshine into the world, stitch by careful stitch.
About This Creation & The Spring Harvest Angle
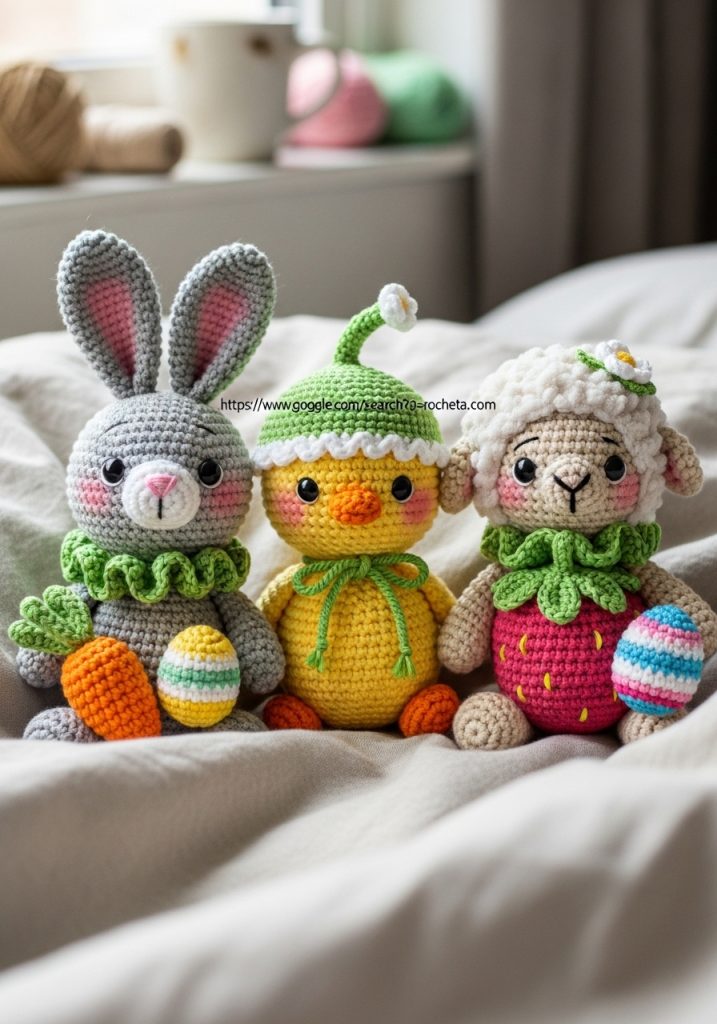
These three companions are a celebration of life and color. We are pairing the innocent, wide-set gaze of childhood with the rounded, comforting shapes that make amigurumi so deeply appealing. This collection is designed specifically as a premium seasonal decor project or an unforgettable handmade gift. By combining woodland animals with the bountiful shapes of fruits and vegetables, we create characters that hold a story in their very stitches. They are soft, they are joyful, and they are waiting for your hands to shape them.
Project Snapshot
➡️ Difficulty: Intermediate Artisan
➡️ Est. Time: 15 to 20 hours for the complete trio
➡️ Size: Approximately 15 centimeters tall each
“Patience in the craft yields a companion for life. Let your tension be even, and your heart be light.” — Patricia Poltera
Materials & Tools Needed
🧶 Yarn: Premium 100% Cotton Sport Weight (50g/125m)
🧶 Colors Needed: Soft Grey, Snow White, Vibrant Orange, Buttercup Yellow, Leaf Green, Berry Pink, Warm Beige, and Chocolate Brown
🪡 Hook: 2.5mm ergonomic crochet hook
✨ Stuffing: High-quality hypoallergenic polyester fiberfill
✨ Eyes: 6mm black safety eyes (three pairs)
✨ Embroidery Thread: Black and yellow for facial details and seeds
✨ Extras: A yarn needle, stitch markers, and a touch of soft pink pastel chalk for blushing the cheeks
Abbreviations & Stitches Used
ch: chain
sc: single crochet
inc: increase (two single crochet in one stitch)
dec: decrease (invisible decrease over two stitches)
hdc: half double crochet
dc: double crochet
sl st: slip stitch
BLO: back loops only
FLO: front loops only
The Complete Carrot Bunny Pattern
Bunny Head (Grey and White Yarn)
Round 1: With grey yarn, create a magic ring, 6 sc into the ring (6)
Round 2: 6 inc (12)
Round 3: [1 sc, 1 inc] repeat 6 times (18)
Round 4: [2 sc, 1 inc] repeat 6 times (24)
Round 5: [3 sc, 1 inc] repeat 6 times (30)
Round 6: [4 sc, 1 inc] repeat 6 times (36)
Round 7: [5 sc, 1 inc] repeat 6 times (42)
Round 8: [6 sc, 1 inc] repeat 6 times (48)
Rounds 9 to 15: 48 sc evenly around (48)
Round 16: [7 sc, 1 inc] repeat 6 times to shape the wider cheeks (54)
Rounds 17 to 20: 54 sc evenly around (54)
Artisan’s Note: Place safety eyes between rounds 14 and 15, spacing them 9 stitches apart to achieve that wide-set gaze of innocence.
Round 21: [7 sc, 1 dec] repeat 6 times (48)
Round 22: Change to white yarn for the muzzle base, [6 sc, 1 dec] repeat 6 times (42)
Round 23: [5 sc, 1 dec] repeat 6 times (36)
Round 24: [4 sc, 1 dec] repeat 6 times. Begin stuffing the head firmly (30)
Round 25: [3 sc, 1 dec] repeat 6 times (24)
Round 26: [2 sc, 1 dec] repeat 6 times (18)
Round 27: [1 sc, 1 dec] repeat 6 times (12)
Round 28: 6 dec. Fasten off and weave in the end (6)
Long Ears (Make 2 in Grey Yarn)
Round 1: 6 sc in magic ring (6)
Round 2: [1 sc, 1 inc] repeat 3 times (9)
Round 3: 9 sc (9)
Round 4: [2 sc, 1 inc] repeat 3 times (12)
Rounds 5 to 14: 12 sc evenly around (12)
Round 15: [2 sc, 1 dec] repeat 3 times. Flatten the ear, do not stuff, and sc through both layers to close. Leave a long tail for sewing (9)
Carrot Body (Orange Yarn)
Round 1: 6 sc in magic ring (6)
Round 2: 6 inc (12)
Round 3: [1 sc, 1 inc] repeat 6 times (18)
Round 4: 18 sc (18)
Round 5: [2 sc, 1 inc] repeat 6 times (24)
Round 6: 24 sc (24)
Round 7: [3 sc, 1 inc] repeat 6 times (30)
Round 8: 30 sc (30)
Round 9: [4 sc, 1 inc] repeat 6 times (36)
Rounds 10 to 18: 36 sc evenly around. Embroider small horizontal black lines randomly for carrot texture (36)
Round 19: [4 sc, 1 dec] repeat 6 times (30)
Round 20: 30 sc (30)
Round 21: [3 sc, 1 dec] repeat 6 times (24)
Rounds 22 to 24: 24 sc evenly around. Stuff firmly, shaping the base to be slightly pointed and the top rounded (24)
Round 25: [2 sc, 1 dec] repeat 6 times (18)
Round 26: 18 sc. Fasten off, leaving a tail for attaching the head (18)
Arms with Paws (Make 2, start with White)
Round 1: 6 sc in magic ring (6)
Round 2: [1 sc, 1 inc] repeat 3 times (9)
Rounds 3 to 4: 9 sc (9)
Round 5: Change to grey yarn. 9 sc (9)
Round 6: 4 sc, 1 inc to shape the elbow, 4 sc (10)
Rounds 7 to 11: 10 sc evenly around. Lightly stuff the paw, leave the arm empty. Flatten and sc closed (10)
Legs with Paws (Make 2, start with White)
Round 1: 6 sc in magic ring (6)
Round 2: 6 inc (12)
Rounds 3 to 4: 12 sc (12)
Round 5: 3 dec, 6 sc to shape the front of the foot (9)
Round 6: Change to grey yarn. 9 sc (9)
Round 7: 4 sc, 1 inc to shape the knee, 4 sc (10)
Rounds 8 to 12: 10 sc evenly around. Stuff the foot firmly. Flatten top and sc closed (10)
Leafy Ruffle Collar (Green Yarn)
Row 1: Ch 20, turn.
Row 2: 2 dc in every chain across. Fasten off, leaving a long tail to tie around the neck (40)
Ear Flower Accessory (White and Yellow)
Round 1: With yellow, 5 sc in magic ring. Sl st to join.
Round 2: Change to white. [Ch 2, 2 dc in same stitch, ch 2, sl st in next stitch] repeat 5 times to create petals. Fasten off.
Miniature Easter Egg (Yellow and White)
Round 1: With yellow, 6 sc in magic ring (6)
Round 2: [1 sc, 1 inc] repeat 3 times (9)
Round 3: Change to white, 9 sc (9)
Round 4: Change to yellow, [1 sc, 1 dec] repeat 3 times. Stuff lightly, close hole (6)
The Complete Blossom Chick Pattern
Chick Head (Yellow Yarn)
Round 1: 6 sc in magic ring (6)
Round 2: 6 inc (12)
Round 3: [1 sc, 1 inc] repeat 6 times (18)
Round 4: [2 sc, 1 inc] repeat 6 times (24)
Round 5: [3 sc, 1 inc] repeat 6 times (30)
Round 6: [4 sc, 1 inc] repeat 6 times (36)
Round 7: [5 sc, 1 inc] repeat 6 times (42)
Rounds 8 to 15: 42 sc evenly around (42)
Round 16: [6 sc, 1 inc] repeat 6 times to emphasize the lower cheek width (48)
Rounds 17 to 20: 48 sc evenly around. Place safety eyes between rounds 14 and 15, 8 stitches apart. (48)
Round 21: [6 sc, 1 dec] repeat 6 times (42)
Round 22: [5 sc, 1 dec] repeat 6 times. Stuff head firmly (36)
Round 23: [4 sc, 1 dec] repeat 6 times (30)
Round 24: [3 sc, 1 dec] repeat 6 times. Fasten off, leave tail (24)
Egg Body (Yellow Yarn)
Round 1: 6 sc in magic ring (6)
Round 2: 6 inc (12)
Round 3: [1 sc, 1 inc] repeat 6 times (18)
Round 4: [2 sc, 1 inc] repeat 6 times (24)
Round 5: [3 sc, 1 inc] repeat 6 times (30)
Round 6: [4 sc, 1 inc] repeat 6 times (36)
Round 7: [5 sc, 1 inc] repeat 6 times (42)
Rounds 8 to 15: 42 sc evenly around (42)
Round 16: [5 sc, 1 dec] repeat 6 times (36)
Rounds 17 to 18: 36 sc evenly around (36)
Round 19: [4 sc, 1 dec] repeat 6 times (30)
Rounds 20 to 21: 30 sc evenly around. Stuff firmly in an egg shape (30)
Round 22: [3 sc, 1 dec] repeat 6 times. Fasten off (24)
Blossom Hat (Green and White Yarn)
Round 1: With green, ch 8 for the stem. Sc in 2nd ch from hook and down the chain (7). At the base, create a magic ring, work 6 sc into it.
Round 2: 6 inc (12)
Round 3: [1 sc, 1 inc] repeat 6 times (18)
Round 4: [2 sc, 1 inc] repeat 6 times (24)
Round 5: [3 sc, 1 inc] repeat 6 times (30)
Round 6: [4 sc, 1 inc] repeat 6 times (36)
Round 7: [5 sc, 1 inc] repeat 6 times (42)
Rounds 8 to 13: 42 sc evenly around (42)
Round 14: Change to white yarn. Working in FLO, [sc in next st, skip 1 st, 5 dc in next st, skip 1 st] repeat around to create scalloped petals. Fasten off. Attach green yarn to sides and ch 20 for tie strings.
Wings (Make 2, Yellow Yarn)
Round 1: 6 sc in magic ring (6)
Round 2: [1 sc, 1 inc] repeat 3 times (9)
Round 3: [2 sc, 1 inc] repeat 3 times (12)
Rounds 4 to 8: 12 sc evenly around. Flatten and sc closed (12)
Bird Feet (Make 2, Orange Yarn)
Row 1: Ch 4, sl st in 2nd ch from hook and next 2 chs (first toe). Ch 4, sl st down (second toe). Ch 4, sl st down (third toe). Gather tops of toes with a sl st, ch 4 for the leg. Fasten off.
Small Beak (Orange Yarn)
Round 1: 4 sc in magic ring, sl st to join. Fasten off, leave tail.
The Complete Strawberry Lamb Pattern
Lamb Face and Head (Beige Yarn)
Round 1: 6 sc in magic ring (6)
Round 2: 6 inc (12)
Round 3: [1 sc, 1 inc] repeat 6 times (18)
Round 4: [2 sc, 1 inc] repeat 6 times (24)
Round 5: [3 sc, 1 inc] repeat 6 times (30)
Round 6: [4 sc, 1 inc] repeat 6 times (36)
Rounds 7 to 14: 36 sc evenly around (36)
Round 15: [5 sc, 1 inc] repeat 6 times to form cheeks (42)
Rounds 16 to 19: 42 sc evenly around. Place eyes between rounds 13 and 14, 8 stitches apart. (42)
Round 20: [5 sc, 1 dec] repeat 6 times (36)
Round 21: [4 sc, 1 dec] repeat 6 times. Stuff head firmly (30)
Round 22: [3 sc, 1 dec] repeat 6 times (24)
Round 23: [2 sc, 1 dec] repeat 6 times (18)
Round 24: [1 sc, 1 dec] repeat 6 times (12)
Round 25: 6 dec. Fasten off (6)
Fluffy Wool Cap (Textured White Yarn)
Round 1: 6 sc in magic ring (6)
Round 2: 6 inc (12)
Round 3: [1 sc, 1 inc] repeat 6 times (18)
Round 4: [2 sc, 1 inc] repeat 6 times (24)
Round 5: [3 sc, 1 inc] repeat 6 times (30)
Round 6: [4 sc, 1 inc] repeat 6 times (36)
Round 7: [5 sc, 1 inc] repeat 6 times (42)
Rounds 8 to 15: 42 sc evenly around. Fasten off, leaving a very long tail to sew onto the head (42)
Drooping Ears (Make 2, Beige Yarn)
Round 1: 6 sc in magic ring (6)
Round 2: [1 sc, 1 inc] repeat 3 times (9)
Round 3: [2 sc, 1 inc] repeat 3 times (12)
Rounds 4 to 10: 12 sc evenly around. Flatten, do not stuff, sc closed (12)
Strawberry Body (Pinkish-Red Yarn)
Round 1: 6 sc in magic ring (6)
Round 2: 6 inc (12)
Round 3: [1 sc, 1 inc] repeat 6 times (18)
Round 4: 18 sc (18)
Round 5: [2 sc, 1 inc] repeat 6 times (24)
Round 6: 24 sc (24)
Round 7: [3 sc, 1 inc] repeat 6 times (30)
Round 8: 30 sc (30)
Round 9: [4 sc, 1 inc] repeat 6 times (36)
Rounds 10 to 12: 36 sc evenly around (36)
Round 13: [5 sc, 1 inc] repeat 6 times (42)
Rounds 14 to 20: 42 sc evenly around. Use yellow thread to embroider seeds randomly (42)
Round 21: [5 sc, 1 dec] repeat 6 times (36)
Round 22: [4 sc, 1 dec] repeat 6 times (30)
Round 23: [3 sc, 1 dec] repeat 6 times. Stuff firmly (24)
Round 24: [2 sc, 1 dec] repeat 6 times (18)
Round 25: 18 sc. Fasten off, leave tail (18)
Arms with Hooves (Make 2, start with Brown)
Round 1: 6 sc in magic ring (6)
Round 2: [1 sc, 1 inc] repeat 3 times (9)
Round 3: 9 sc (9)
Round 4: Change to beige yarn. Working in BLO, 9 sc (9)
Rounds 5 to 12: 9 sc evenly around. Lightly stuff, flatten top, sc closed (9)
Legs with Hooves (Make 2, start with Brown)
Round 1: 6 sc in magic ring (6)
Round 2: 6 inc (12)
Round 3: 12 sc (12)
Round 4: Change to beige. Working in BLO, 3 dec, 6 sc (9)
Rounds 5 to 13: 9 sc evenly around. Stuff foot firmly, flatten top, sc closed (9)
Leafy Ruffle Collar (Green Yarn)
Row 1: Ch 20.
Row 2: 2 hdc in each chain across. Fasten off, leave tail to tie (40)
Hair Flower Accessory
(Follow the exact same instructions as the Bunny’s Ear Flower)
Miniature Striped Easter Egg
Round 1: With pink, 6 sc in magic ring (6)
Round 2: [1 sc, 1 inc] repeat 3 times (9)
Round 3: Change to blue, 9 sc (9)
Round 4: Change to white, [1 sc, 1 dec] repeat 3 times. Stuff, close hole (6)
Assembly & Final Touches
Careful assembly brings the spirit into the stitches. Pin your pieces securely before committing with your yarn needle.
➡️ Attach the heads to the bodies, ensuring the faces point forward, directly over the center of the carrot, egg, and strawberry bellies.
➡️ Sew the arms exactly one round below the neck seam.
➡️ Attach the legs to the bottom front of the bodies so the figures can comfortably sit upright.
➡️ Tie the green leafy collars around each neck.
➡️ For the Bunny: Sew ears to the top sides of the head. Attach the flower to one ear and stitch the egg into the arms.
➡️ For the Chick: Place the hat on the head and tie securely under the chin. Sew wings to the sides and attach feet to the base. Sew the beak directly between the eyes.
➡️ For the Lamb: Sew the wool cap completely over the top of the head. Attach ears just below the cap line. Stitch the hair flower onto the cap and sew the striped egg into the arms.
➡️ Final Polish: Use a soft brush and pink pastel chalk to gently blush the cheeks directly under the outer corners of the eyes on all three characters. Add a small vertical pink line for the bunny’s nose, and a black “Y” shape for the lamb’s nose.
Tips & FAQs
Q: My stitches look open, and I can see the stuffing. How do I fix this? A: You must maintain a tight tension, my dear. I always recommend using a hook that is one or two sizes smaller than what the yarn label suggests. This ensures a dense, flawless fabric.
Q: Can I use acrylic yarn instead of cotton? A: You certainly may, though cotton provides that crisp, clean stitch definition you see in the photographs. Acrylic will yield a slightly fuzzier, warmer companion.
A Final Word
You have brought something beautiful into the world today. Your hands have turned simple thread into characters overflowing with charm and personality. Display them proudly, gift them warmly, and always remember the joy found in the steady rhythm of your craft.

