
Welcome back to my table, dear friend. I am overjoyed to begin this journey with you. There is a profound magic in taking a simple skein of velvet yarn and coaxing it into a shape so full of life and tenderness.
About This Creation & Angle
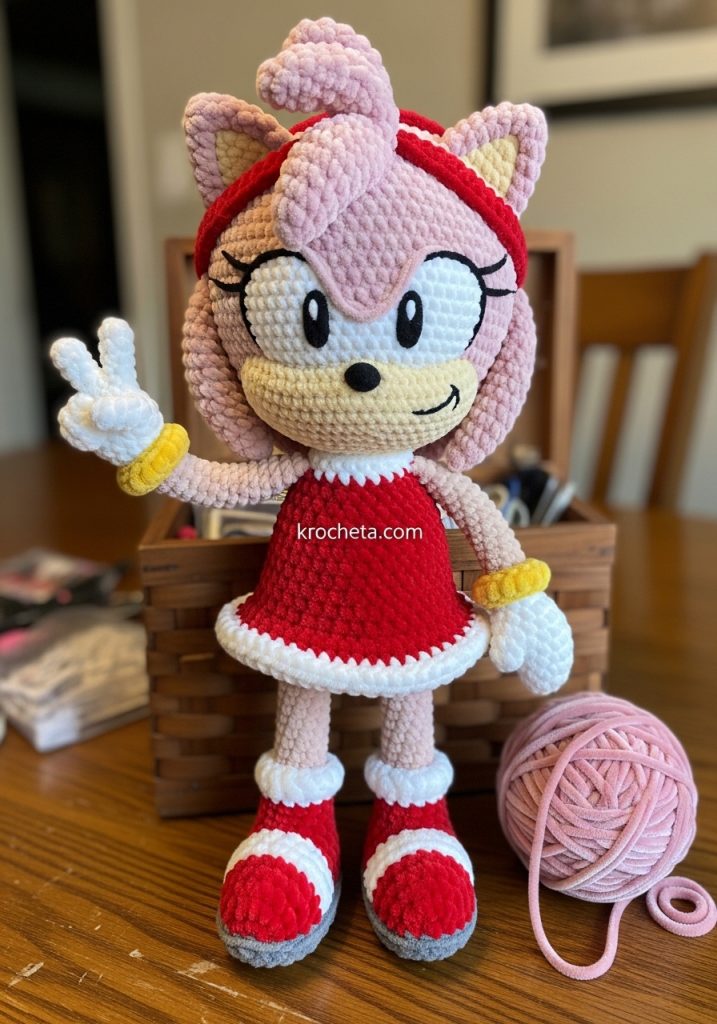
This adorable pink rascal captures the very essence of childhood joy. We are using velvet yarn specifically for its luxurious, cloud-like texture. It demands patience, but the result is a toy that simply begs to be held. The rounded, chubby shapes and wide-set features give her a gaze of true innocence. Everything about her design, from her tiny boots to her oversized gloves, tells a story. We proudly present this premium project exclusively for our krocheta.com community.
Project Snapshot:
📊 Difficulty: Intermediate
⏰ Est. Time: 8 to 10 hours
📏 Size: Approximately 22cm tall (when using bulky velvet yarn)
“True beauty in our craft comes from the slow, deliberate shaping of every single stitch. We do not rush art.” – Patricia Poltera
Materials & Tools Needed
🧶 Bulky velvet yarn in Bubblegum Pink, Cherry Red, Snow White, Soft Beige, Golden Yellow, and Charcoal Grey
🧶 Small amount of black cotton yarn for facial embroidery
🪡 4.5mm crochet hook (adjust to ensure tight, gapless stitches)
✨ 12mm black safety eyes (if not embroidering the eyes entirely)
✨ Premium polyester fiberfill stuffing
✨ Long yarn needle for assembly
✨ Stitch markers and sewing pins
Abbreviations & Stitches Used
➡️ ch: chain
➡️ sl st: slip stitch
➡️ sc: single crochet
➡️ hdc: half double crochet
➡️ dc: double crochet
➡️ inc: single crochet increase (two stitches in one)
➡️ dec: single crochet decrease (invisible decrease preferred)
➡️ FLO: front loops only
➡️ BLO: back loops only
The Complete Pink Rascal Pattern
The Head Artisan’s Note: We shape the cheeks by clustering our increases on the sides of the face. Stuff the head firmly as you go, pushing the fiberfill outward to accentuate her chubby cheeks. The head must be large to preserve that sweet, youthful echo.
Rnd 1: 6 sc in a magic ring (6)
Rnd 2: 6 inc (12)
Rnd 3: (1 sc, inc) x 6 (18)
Rnd 4: (2 sc, inc) x 6 (24)
Rnd 5: (3 sc, inc) x 6 (30)
Rnd 6: (4 sc, inc) x 6 (36)
Rnd 7: (5 sc, inc) x 6 (42)
Rnd 8: (6 sc, inc) x 6 (48)
Rnd 9-14: 1 sc in each st around (48)
Rnd 15 (Cheek Shaping): 12 sc, (1 sc, inc) x 6, 12 sc, (1 sc, inc) x 6 (60)
Rnd 16-22: 1 sc in each st around (60)
Rnd 23: 12 sc, (1 sc, dec) x 6, 12 sc, (1 sc, dec) x 6 (48)
Rnd 24: (6 sc, dec) x 6 (42)
Rnd 25: (5 sc, dec) x 6 (36)
Rnd 26: (4 sc, dec) x 6 (30)
Rnd 27: (3 sc, dec) x 6 (24)
Rnd 28: (2 sc, dec) x 6 (18)
Rnd 29: (1 sc, dec) x 6 (12)
Fasten off, leaving a long tail for attaching to the body.
The Muzzle (Soft Beige)
Rnd 1: Ch 6. Starting in 2nd ch from hook: 4 sc, 3 sc in last ch. Continue on the other side of the ch: 3 sc, 2 sc in last ch (12)
Rnd 2: inc, 3 sc, 3 inc, 3 sc, 2 inc (18)
Rnd 3: 1 sc, inc, 3 sc, (1 sc, inc) x 3, 3 sc, (1 sc, inc) x 2 (24)
Rnd 4-5: 1 sc in each st around (24)
Fasten off. Leave a tail for sewing. Stuff lightly before attaching.
The Eye Mask (Snow White)
Rnd 1: Ch 10. Starting in 2nd ch from hook: 8 sc, 3 sc in last ch. Opposite side: 7 sc, 2 sc in last ch (20)
Rnd 2: inc, 7 sc, 3 inc, 7 sc, 2 inc (26)
Rnd 3: 1 sc, inc, 7 sc, (1 sc, inc) x 3, 7 sc, (1 sc, inc) x 2 (32)
Rnd 4: Form the heart shape for the eyes. Sl st 2, (hdc, dc, hdc) in next st, sl st 12, (hdc, dc, hdc) in next st, sl st to end.
Fasten off. Pin carefully above the muzzle before sewing.
Quills/Hair (Make 5 – Pink)
Rnd 1: 4 sc in a magic ring (4)
Rnd 2: (1 sc, inc) x 2 (6)
Rnd 3: (2 sc, inc) x 2 (8)
Rnd 4: (3 sc, inc) x 2 (10)
Rnd 5: (4 sc, inc) x 2 (12)
Rnd 6: (5 sc, inc) x 2 (14)
Rnd 7: (6 sc, inc) x 2 (16)
Rnd 8-12: 1 sc in each st around (16)
Fasten off, leaving a tail. Flatten the pieces; do not stuff them.
Ears (Make 2 – Pink & Beige)
Inner Ear (Beige): Ch 5, turn, 4 sc. Fasten off.
Outer Ear (Pink): Ch 5, turn, 4 sc. Do not fasten off. Place the beige piece over the pink piece.
Next row: Ch 1, single crochet the two pieces together around the edges, placing 3 sc in the top corner to turn. Fasten off, leaving a tail.
Headband (Cherry Red)
Row 1: Ch 40 (or enough to stretch across the top of the head).
Row 2: Starting in 2nd ch from hook, sc in each st across. Fasten off.
The Body & Dress Bodice Artisan’s Note: We begin at the bottom in pink to form the lower body, then switch to red for her charming dress. The neck shaping ensures her large head is fully supported.
Rnd 1: In Pink, 6 sc in a magic ring (6)
Rnd 2: 6 inc (12)
Rnd 3: (1 sc, inc) x 6 (18)
Rnd 4: (2 sc, inc) x 6 (24)
Rnd 5: (3 sc, inc) x 6 (30)
Rnd 6: (4 sc, inc) x 6 (36)
Rnd 7-9: 1 sc in each st around (36)
Rnd 10: Change to Cherry Red. 1 sc in each st around (36)
Rnd 11: BLO 1 sc in each st around (36) – The unworked front loops will hold the skirt.
Rnd 12-14: 1 sc in each st around (36)
Rnd 15: (4 sc, dec) x 6 (30)
Rnd 16-17: 1 sc in each st around (30)
Rnd 18: (3 sc, dec) x 6 (24)
Rnd 19-20: 1 sc in each st around (24)
Rnd 21: (2 sc, dec) x 6 (18)
Rnd 22: Change to Soft Beige (for the neck). BLO (1 sc, dec) x 6 (12)
Rnd 23: 1 sc in each st around (12)
Fasten off. Stuff the body firmly.
The Skirt (Cherry Red & Snow White)
Attach Cherry Red yarn to the front loops of Rnd 11 of the body, pointing the neck away from you.
Rnd 1: (2 sc in each st) around (72)
Rnd 2-5: 1 sc in each st around (72)
Rnd 6: Change to Snow White. (1 sc, inc) around (108)
Rnd 7: 1 sc in each st around (108). Fasten off and weave in ends.
Arms (Make 2 – Soft Beige)
Rnd 1: 6 sc in a magic ring (6)
Rnd 2-14: 1 sc in each st around (6)
Fasten off. Do not stuff fully, leave the top flat to sit flush against the body under the dress.
Bracelets (Make 2 – Golden Yellow)
Rnd 1: Ch 12, join with sl st to form a ring.
Rnd 2: 1 sc in each ch around (12)
Rnd 3: 1 sc in each st around. Fasten off. Slip over the arms before attaching the gloves.
Gloves (Make 2 – Snow White) Artisan’s Note: Plump fingers are crucial to her youthful design.
Fingers (Make 3 per hand): 4 sc in magic ring, 1 sc around for 3 rnds. Fasten off two, keep the third on the hook.
Hand assembly: Join fingers together with sc across the bases (12 sts total).
Next 2 Rnds: 1 sc in each st around (12)
Next Rnd: (1 sc, dec) x 4 (8)
Cuff: FLO (2 sc in each st) around (16). Fasten off. Stuff the hand portion lightly. Sew the beige arm into the opening of the glove.
Legs (Make 2 – Soft Beige)
Rnd 1: 8 sc in a magic ring (8)
Rnd 2-16: 1 sc in each st around (8)
Fasten off. Leave a tail for sewing to the body.
Boots (Make 2 – Charcoal Grey, Cherry Red, Snow White)
Rnd 1: In Charcoal Grey, Ch 7. Starting in 2nd ch from hook: 5 sc, 3 sc in last ch. Opposite side: 4 sc, 2 sc in last ch (14)
Rnd 2: inc, 4 sc, 3 inc, 4 sc, 2 inc (20)
Rnd 3: Change to Cherry Red. BLO 1 sc in each st around (20)
Rnd 4-5: 1 sc in each st around (20)
Rnd 6: 5 sc, 5 dec, 5 sc (15)
Rnd 7: 5 sc, 3 dec, 4 sc (12)
Rnd 8: 1 sc in each st around (12)
Rnd 9 (Cuff): Change to Snow White. FLO (1 sc, inc) x 6 (18)
Rnd 10: 1 sc in each st around. Fasten off.
White Boot Stripe: Using Snow White yarn, surface slip stitch a line down the center front of the boot, extending to the toe.
Assembly & Final Touches
➡️ Sew the muzzle to the lower center of the face.
➡️ Attach the white eye mask directly above the muzzle.
➡️ Embroider the black oval eyes onto the white mask. Add white catchlights for life.
➡️ Sew a small black nose to the tip of the muzzle.
➡️ Pin the 5 pink quills symmetrically around the back and sides of the head, then sew securely.
➡️ Attach the ears just in front of the side quills. Secure the red headband between the ears.
➡️ Sew the head to the body’s neck opening.
➡️ Attach the legs to the bottom of the pink body. Sew the boots onto the ends of the legs.
➡️ Slide the golden bracelets onto the arms, then sew the arms to the sides of the body, just below the neck.
Tips & FAQs
Q: My velvet yarn keeps shedding when I cut it. What should I do? A: This is the nature of the beast. Carefully melt the very tip of the cut yarn with a lighter, or dab it with a tiny bit of fabric glue to lock the fibers before you sew.
Q: Can I use acrylic yarn instead? A: You certainly can, though she will lose that specific cloud-like softness. If using worsted weight acrylic, remember to step down your hook size to a 3.0mm or 3.5mm to keep your stitches tight.
A Final Word
Your dedication to your craft is truly inspiring. With every stitch, you pour a piece of your heart into your work. I cannot wait to see your little pink friend come to life on krocheta.com. Keep creating, keep shaping, and above all, keep loving what you do.

