
Let the magic begin, my dear creator. Below is the full blueprint for our Winter Wood Whisperer. Take your time with every stitch.
About This Creation & The Artisan’s Angle
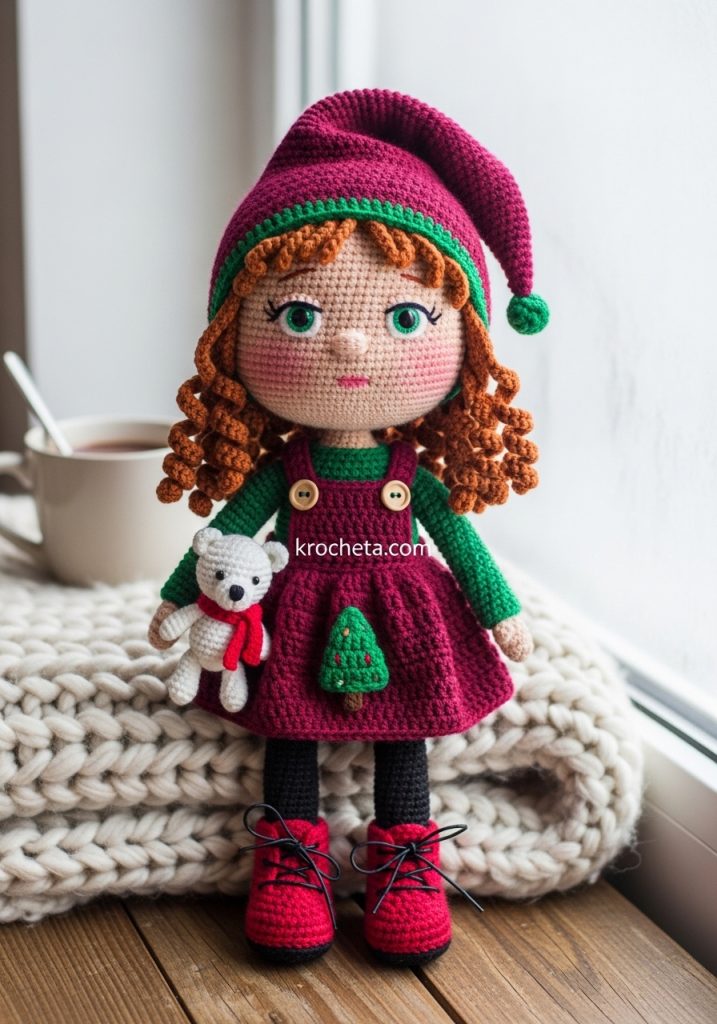
The Winter Wood Whisperer is a celebration of quiet joy. She embodies the stillness of a snowy morning and the warmth of a crackling hearth. Many crafters struggle to find the right balance between a structured doll and soft, appealing features. This project solves that. By using fine sport weight cotton and a tight tension, we create a durable companion that retains her charming, chubby silhouette. This guide will teach you how to shape expressive cheeks and master simple colorwork without losing the softness of her form.
Project Snapshot
📊 Difficulty: Intermediate
⏰ Est. Time: 12 to 15 hours
📏 Size: Approximately 8.5 inches tall
“Patience is the invisible thread that holds every masterpiece together. Breathe life into her, one loop at a time.” — Patricia Poltera
Materials & Tools Needed
🧶 Yarn: Fine sport weight cotton yarn. Colors: Beige, Black, Dark Green, Burgundy, Auburn, and White.
🪡 Hook: 2.0mm crochet hook.
✨ Other Materials: 6mm safety eyes.
✨ Soft polyester fiberfill.
✨ Tapestry needle for sewing.
✨ Stitch markers.
✨ Two small wooden buttons.
✨ Black embroidery thread.
✨ Pink blush for the cheeks.
[📸 PASTE IMAGE 2 HERE: Side Angle/Variation]
Abbreviations & Stitches Used
ch: chain
sl st: slip stitch
sc: single crochet
inc: single crochet increase (two stitches in one)
dec: single crochet decrease (invisible decrease recommended)
hdc: half double crochet
BLO: back loops only
FLO: front loops only
The Complete Winter Wood Whisperer Pattern
The Head
We begin with the face. The shaping here is vital for her youthful, innocent expression. Pay close attention to the cheek increases. Use Beige yarn.
Round 1: 6 sc in a magic ring (6)
Round 2: 6 inc (12)
Round 3: (sc, inc) 6 times (18)
Round 4: (2 sc, inc) 6 times (24)
Round 5: (3 sc, inc) 6 times (30)
Round 6: (4 sc, inc) 6 times (36)
Round 7: (5 sc, inc) 6 times (42)
Round 8: (6 sc, inc) 6 times (48)
Round 9: (7 sc, inc) 6 times (54)
Rounds 10 to 22: 54 sc (54)
Place the 6mm safety eyes between Round 16 and Round 17. Leave exactly 10 stitches between them. Ensure they are seated low on the face.
Round 23: 16 sc, (inc, sc) 4 times, 6 sc, (sc, inc) 4 times, 16 sc (62)
Rounds 24 to 27: 62 sc (62)
Round 28: 16 sc, (dec, sc) 4 times, 6 sc, (sc, dec) 4 times, 16 sc (54)
Round 29: (7 sc, dec) 6 times (48)
Round 30: (6 sc, dec) 6 times (42)
Round 31: (5 sc, dec) 6 times (36)
Round 32: (4 sc, dec) 6 times (30)
Round 33: (3 sc, dec) 6 times (24)
Stuff the head firmly. Use small pinches of fiberfill to push out the cheeks you shaped in Round 23.
Round 34: (2 sc, dec) 6 times (18)
Fasten off. Leave a long tail for sewing.
The Legs & Body
The legs and body are worked as one continuous piece. We start with the feet and work our way up to the neckline.
Leg 1 (Use Black yarn):
Round 1: 6 sc in a magic ring (6)
Round 2: 6 inc (12)
Rounds 3 to 18: 12 sc (12)
Fasten off Leg 1. Set aside.
Leg 2 (Use Black yarn):
Repeat Rounds 1 to 18 for the second leg. Do not fasten off.
Round 19: Chain 3. Join to the last stitch of Leg 1 with a sc. Sc in the remaining 11 stitches of Leg 1. Sc 3 along one side of the chain. Sc 12 around Leg 2. Sc 3 along the other side of the chain. (30)
Rounds 20 to 25: 30 sc (30)
Change to Dark Green yarn to begin the bodice.
Rounds 26 to 35: 30 sc (30)
Round 36: (3 sc, dec) 6 times (24)
Rounds 37 to 38: 24 sc (24)
Round 39: (2 sc, dec) 6 times (18)
Stuff the body firmly, paying attention to the hips and shoulders. Fasten off and weave in the end.
The Arms
Make two identical arms. They remain unstuffed to sit flat against the body.
Start with Beige yarn:
Round 1: 5 sc in a magic ring (5)
Round 2: 5 inc (10)
Rounds 3 to 4: 10 sc (10)
Change to Dark Green yarn.
Rounds 5 to 20: 10 sc (10)
Pinch the top flat and crochet 5 sc through both layers to close. Fasten off, leaving a tail for sewing.
The Hair
The hair consists of a fitted cap and long, bouncy corkscrew curls. Use Auburn yarn.
Round 1: 6 sc in a magic ring (6)
Round 2: 6 inc (12)
Round 3: (sc, inc) 6 times (18)
Round 4: (2 sc, inc) 6 times (24)
Round 5: (3 sc, inc) 6 times (30)
Round 6: (4 sc, inc) 6 times (36)
Round 7: (5 sc, inc) 6 times (42)
Round 8: (6 sc, inc) 6 times (48)
Round 9: (7 sc, inc) 6 times (54)
Rounds 10 to 15: 54 sc (54)
Now we create the curls. Do not fasten off.
Curl Sequence: Chain 45. Starting in the second chain from the hook, place 2 sc in every chain back to the cap (88 sc). Slip stitch into the next stitch on the cap rim. Repeat this sequence until you have 15 curls bordering the back and sides of the head. Fasten off, leaving a very long tail to sew the cap to the head.
The Pinafore Dress
Work this piece flat in rows, then join later. Use Burgundy yarn.
Row 1: Chain 43. Starting in the second chain from the hook, 42 sc. Chain 1, turn. (42)
Rows 2 to 5: 42 sc. Chain 1, turn. (42)
Row 6: (6 sc, inc) 6 times. Chain 1, turn. (48)
Rows 7 to 10: 48 sc. Chain 1, turn. (48)
Row 11: (7 sc, inc) 6 times. Chain 1, turn. (54)
Rows 12 to 20: 54 sc. Chain 1, turn. (54)
For the Pine Tree Motif: Use a tapestry needle and Green yarn to cross-stitch a small triangle onto the front bottom center of the dress.
Straps (Make 2): Attach Burgundy yarn to the top edge of the dress. Chain 16. Sc in the second chain from the hook and all the way down. Fasten off.
The Pixie Hood
This hat is worked from the point downwards. Use Burgundy yarn.
Round 1: 4 sc in a magic ring (4)
Round 2: (sc, inc) 2 times (6)
Round 3: (2 sc, inc) 2 times (8)
Round 4: (3 sc, inc) 2 times (10)
Increase gently by adding 2 stitches per round until you reach a total of 54 stitches.
Border: Change to Green yarn. Work 1 hdc in every stitch around the bottom rim. Fasten off.
Ties: Cut three long strands of Burgundy and Green yarn. Pull them through the bottom corner of the hood, braid them tightly, and knot the end. Repeat on the other side.
The Shoes
Work these over the black tights. Use Burgundy yarn.
Round 1: Chain 6. Starting in the second chain from the hook: 4 sc, 3 sc in the last chain. Work down the other side of the chain: 3 sc, 2 sc in the last chain. (12)
Round 2: (inc, 3 sc, 3 inc, 3 sc, 2 inc) (18)
Round 3: BLO 18 sc (18)
Rounds 4 to 5: 18 sc (18)
Fasten off. Use black embroidery thread to stitch two small X shapes on the front for laces.
The Companion Teddy Bear
Use White yarn for this tiny friend.
Head: 6 sc in magic ring. Increase to 18 sc. Work 3 straight rounds. Decrease back to 6 sc. Stuff slightly.
Body: Join to head. Increase to 12 sc. Work 4 straight rounds. Decrease to 6. Stuff and close.
Ears (Make 2): 4 sc in magic ring. Sew to top of head.
Arms & Legs (Make 4): Chain 5. Sc back down. Sew to body.
Scarf: Use Red yarn. Chain 35. Tie around the bear’s neck.
Assembly & Final Touches
➡️ Position the head onto the dark green neck. Sew firmly through all 18 stitches.
➡️ Pin the flat arms to the sides of the body, just below the neckline. Sew them securely.
➡️ Fit the hair cap onto the head. Ensure the curls sit comfortably around the shoulders. Sew the perimeter of the cap to the head.
➡️ Slide the pinafore dress up the body. Sew the back seam closed. Bring the straps over the shoulders to the front. Secure each strap with a small wooden button.
➡️ Embroider a tiny nose using beige yarn, centered directly between the eyes, one row down.
➡️ Apply a soft dusting of pink blush to her rounded cheeks.
➡️ Place the pixie hood on her head and tuck the teddy bear under her arm.
Tips & FAQs
How do I keep the neck from wobbling? Always stuff the body firmly right up to the very last round. When sewing the head on, pass your needle through the actual posts of the stitches, not just the loops. This locks the head in place.
My dress is too tight! Tension varies between crafters. If your dress feels tight, try going up half a hook size (2.5mm) just for the dress portion.
A Final Word
You have brought a beautiful soul into existence. Feel proud of your patience and the care you poured into every loop. May she bring a touch of woodland peace to your home.

