
My dearest friends, welcome back to the crafting table. Today, we breathe life into a darling little soul named Mel. She is a gentle reminder of the buzzing beauty found in a sunlit garden. Pick up your favorite hook. Let us begin this beautiful work together.
About This Creation & Angle
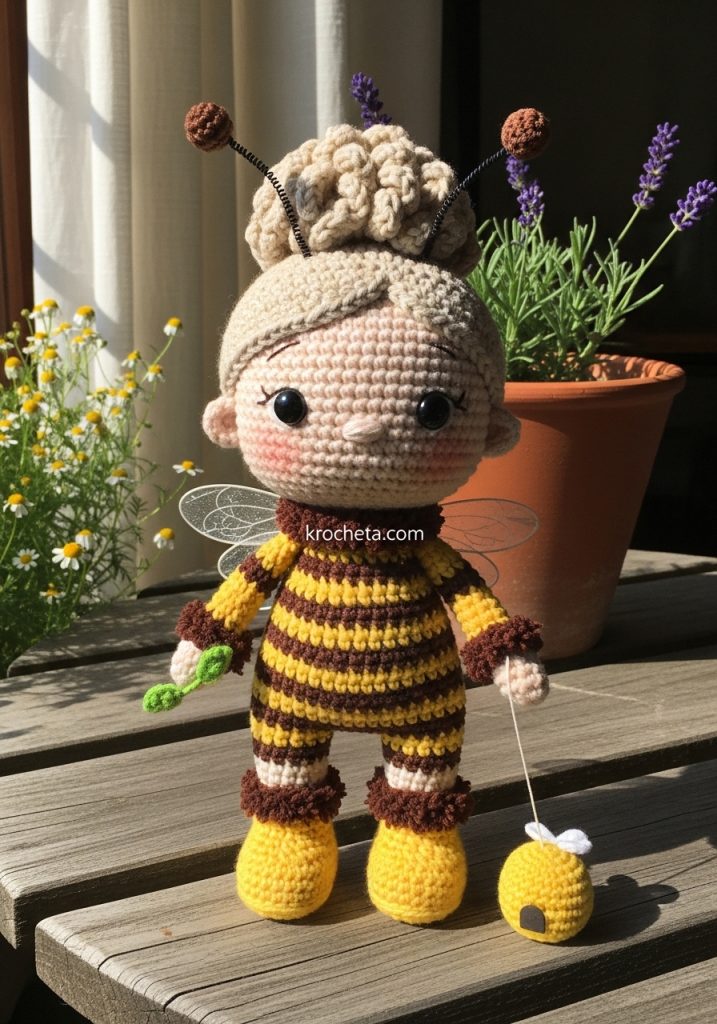
Mel is a true testament to the art of shaping and character design. We focus heavily on creating soft, youthful proportions. Her large, expressive head and wide-set eyes invite an immediate connection. By blending smooth cotton yarns with fluffy textures, we achieve a tactile experience that elevates a simple crochet project into an heirloom. This pattern focuses heavily on mastering crisp color changes and achieving distinct facial sculpting through mindful tension.
Project Snapshot
📊 Difficulty: Intermediate to Advanced
⏰ Est. Time: 12 to 15 hours
📏 Size: Approximately 18 cm tall
“True beauty in amigurumi lies in the patience of your stitches and the gentle tension of your yarn.”
Materials & Tools Needed
🧶 Yarn: Sport weight cotton in Skin Tone, Honey Yellow, Espresso Brown, and Soft Beige
🧶 Accent Yarn: Fluffy eyelash yarn in Dark Brown
🧶 Wing Yarn: Fine lace weight in Pale Blue or Translucent White
🪡 Hook: 2.0 mm for cotton, 2.5 mm for fluffy yarn
✨ Other Materials: 6mm safety eyes, craft wire, soft blush, premium toy stuffing, stitch marker, and tapestry needle
Abbreviations & Stitches Used
ch: chain
sl st: slip stitch
sc: single crochet
inc: increase (2 sc in one stitch)
dec: invisible decrease
BLO: back loops only
FLO: front loops only
The Complete Mel Pattern
The Head
We begin with the face, establishing a gentle curve. Stuff firmly as you go, paying special attention to the cheeks.
Rnd 1: 6 sc in a magic ring (6)
Rnd 2: 6 inc (12)
Rnd 3: (1 sc, inc) x 6 (18)
Rnd 4: (2 sc, inc) x 6 (24)
Rnd 5: (3 sc, inc) x 6 (30)
Rnd 6: (4 sc, inc) x 6 (36)
Rnd 7: (5 sc, inc) x 6 (42)
Rnd 8: (6 sc, inc) x 6 (48)
Rnd 9-16: 48 sc (48)
Rnd 17: 12 sc, (1 sc, inc) x 6 for the right cheek, 6 sc across the nose, (inc, 1 sc) x 6 for the left cheek, 6 sc (60)
Rnd 18-23: 60 sc (60)
Artisan’s Note: Place the safety eyes between Rnds 15 and 16, exactly 9 stitches apart, resting low on the face to capture the gaze of innocence. Embroider a tiny nose over Rnd 16, centered between the eyes.
Rnd 24: 12 sc, (1 sc, dec) x 6, 6 sc, (dec, 1 sc) x 6, 6 sc (48)
Rnd 25: (6 sc, dec) x 6 (42)
Rnd 26: (5 sc, dec) x 6 (36)
Rnd 27: (4 sc, dec) x 6 (30)
Rnd 28: (3 sc, dec) x 6 (24)
Rnd 29: (2 sc, dec) x 6 (18)
Rnd 30: (1 sc, dec) x 6 (12)
Fasten off. Leave a long tail for sewing.
Hair Base & Curly Bun
Use the Soft Beige yarn. The bun is created by chaining loops into the base cap to mimic thick curls.
Rnd 1: 8 sc in a magic ring (8)
Rnd 2: 8 inc (16)
Rnd 3: (1 sc, inc) x 8 (24)
Rnd 4: (2 sc, inc) x 8 (32)
Rnd 5: (3 sc, inc) x 8 (40)
Rnd 6: (4 sc, inc) x 8 (48)
Rnd 7-15: 48 sc (48)
Rnd 16: Working in FLO to frame the face, sl st across the first 20 sts, ch 2, dc in next 8 sts for the bangs, sl st in remaining sts.
For the bun, reattach yarn to the top of the cap.
Rnd 17-25: In spiral rows across the top, sc, ch 10, sl st back into the same stitch, repeating to create dense curls until the crown is fully covered. Fasten off and leave a tail to attach to the head.
Antennae
Cut a 10 cm piece of craft wire. Bend it gently into a U-shape. Wrap the wire tightly with Espresso Brown yarn, securing the ends with a dab of fabric glue. Roll two tiny balls of brown yarn or use small felt beads for the tips.
Body (Romper)
Start with Honey Yellow. We will alternate colors every two rounds to build the bee stripes.
Rnd 1: 6 sc in a magic ring (6)
Rnd 2: 6 inc (12)
Rnd 3: (1 sc, inc) x 6 (18)
Rnd 4: (2 sc, inc) x 6 (24)
Rnd 5: (3 sc, inc) x 6 (30)
Rnd 6: (4 sc, inc) x 6 (36)
Rnd 7: Change to Espresso Brown. (5 sc, inc) x 6 (42)
Rnd 8: 42 sc (42)
Rnd 9: Change to Honey Yellow. (6 sc, inc) x 6 (48)
Rnd 10: 48 sc (48)
Rnd 11: Change to Espresso Brown. 48 sc (48)
Rnd 12: (6 sc, dec) x 6 (42)
Rnd 13: Change to Honey Yellow. 42 sc (42)
Rnd 14: (5 sc, dec) x 6 (36)
Rnd 15: Change to Espresso Brown. 36 sc (36)
Rnd 16: (4 sc, dec) x 6 (30)
Rnd 17: Change to Honey Yellow. 30 sc (30)
Rnd 18: (3 sc, dec) x 6 (24)
Rnd 19: Change to Espresso Brown. 24 sc (24)
Rnd 20: (2 sc, dec) x 6 (18)
Rnd 21: Change to Skin Tone for the neck. Working in BLO, 18 sc (18)
Rnd 22: (1 sc, dec) x 6 (12)
Fasten off. Stuff the body firmly, ensuring a plump, rounded base that tapers tightly to a small neck.
Arms
Make two using Skin Tone yarn.
Rnd 1: 5 sc in a magic ring (5)
Rnd 2: 5 inc (10)
Rnd 3-4: 10 sc (10)
Rnd 5: 3-dc bobble stitch for the thumb, 9 sc (10)
Rnd 6: (3 sc, dec) x 2 (8)
Rnd 7-10: 8 sc (8)
Rnd 11: 4 sl st for the inside elbow bend, 4 sc (8)
Rnd 12-18: 8 sc (8)
Fasten off. Stuff only the hands lightly, leaving the upper arm flat.
Legs
Make two using Skin Tone yarn. We will shape the knees for a lifelike posture.
Rnd 1: 6 sc in a magic ring (6)
Rnd 2: 6 inc (12)
Rnd 3-6: 12 sc (12)
Rnd 7: 3 dec for the back of the knee, 6 inc for the front of the knee (15)
Rnd 8: 3 inc for the calf back, 6 dec for the knee front (12)
Rnd 9-16: 12 sc (12)
Fasten off. Stuff firmly.
Boots
Start with Espresso Brown for the sole.
Rnd 1: ch 6, sc in 2nd ch from hook, 3 sc, 3 sc in last ch. Work down the other side: 3 sc, 2 sc in last ch (12)
Rnd 2: inc, 3 sc, 3 inc, 3 sc, 2 inc (18)
Rnd 3: 1 sc, inc, 3 sc, (1 sc, inc) x 3, 3 sc, (1 sc, inc) x 2 (24)
Rnd 4: Change to Honey Yellow. Working in BLO, 24 sc (24)
Rnd 5-6: 24 sc (24)
Rnd 7: 6 sc, 6 dec across the toe, 6 sc (18)
Rnd 8: 6 sc, 3 dec, 6 sc (15)
Rnd 9-11: 15 sc (15)
Rnd 12: Change to fluffy Dark Brown yarn. 15 sc (15)
Fasten off.
Neck Collar
Using fluffy Dark Brown yarn and a 2.5 mm hook.
Rnd 1: ch 16, sl st to first ch to form a ring (16)
Rnd 2: ch 1, 16 sc around, sl st to join (16)
Fasten off. We will slip this over her head before sewing the body.
Wings
Make two using fine translucent or Pale Blue yarn.
Rnd 1: 6 sc in a magic ring (6)
Rnd 2: 6 inc (12)
Rnd 3: (1 sc, inc) x 6 (18)
Rnd 4: (2 sc, inc) x 6 (24)
Rnd 5: (3 sc, inc) x 6 (30)
Fasten off. Gently pinch one end and sew a few stitches to create an elongated teardrop shape.
Accessories: Miniature Beehive Pull-Toy & Stem
Using Honey Yellow.
Rnd 1: 6 sc in a magic ring (6)
Rnd 2: Working in BLO, 6 inc (12)
Rnd 3: Working in BLO, (1 sc, inc) x 6 (18)
Rnd 4-6: Working in BLO, 18 sc (18)
Rnd 7: Working in BLO, (1 sc, dec) x 6 (12)
Fasten off and stuff lightly. Add a strand of Espresso Brown yarn for the pulling tether. For the stem, use a 10cm wire wrapped in green yarn with a tiny chain-stitched leaf at the top.
Assembly & Final Touches
Sew the hair base securely to the head, aligning the bangs just above the eyes. Insert the antennae through the hair cap before securing the final stitches. Slip the neck collar onto the body, then attach the head to the body neck opening, ensuring the chin aligns with the front stripes. Sew the arms to round 20 of the body. Insert the legs firmly into the boots and sew them in place, then attach the legs to the base of the romper. Pin the wings to the back, positioning them evenly over the brown stripes, and sew them flat against the body. Apply a very soft dusting of blush to her pronounced cheeks.
Tips & FAQs
Q: How do I manage the tension with the fluffy yarn?
A: Fluffy yarn can be challenging because the stitches disappear into the texture. Feel for your stitches rather than looking for them, and use a slightly larger hook to keep the fabric loose and airy.
Q: My doll’s head leans forward. How can I fix this?
A: A firm neck is crucial for our baby proportions. Roll a small piece of excess craft wire in batting and insert it deeply between the body and the head during assembly for structural support.
A Final Word
My dear creator, you have poured your time and talent into making Mel, and she is beautiful. Remember that every stitch carries a piece of your spirit. Take a moment to admire your craftsmanship.

