
My dearest creator, the time has come to bring this beautiful family to life. I have spent countless hours perfecting the gentle curves and endearing expressions of these velvet companions. Gather your softest yarns, and let us begin this magnificent journey together.
About This Creation & The Velvet Technique
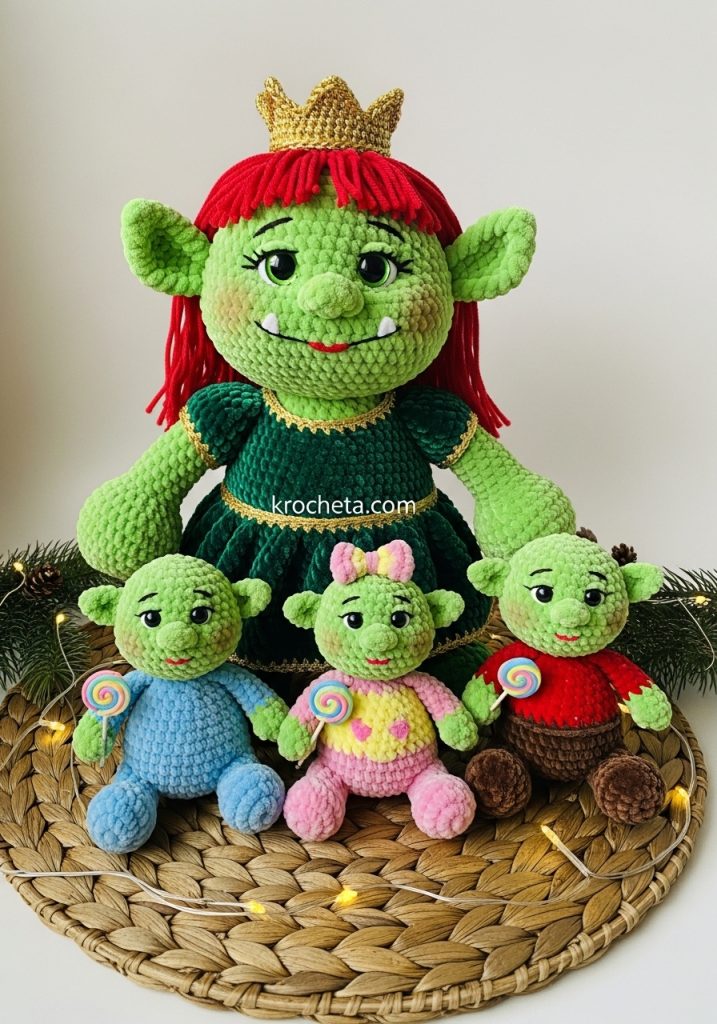
Working with thick, plush chenille yarn requires a gentle but firm hand. This project is a masterclass in achieving those perfectly rounded, huggable forms that make amigurumi so endearing. The secret lies in the tension and the placement of the features. By keeping the eyes low and wide-set, we capture that undeniable gaze of innocence. Our goal is to craft a collection that feels safe and soft, with absolutely no sharp angles to interrupt the gentle curves. Every baby ogre reflects the echo of youth with their beautifully oversized heads and plump little bodies.
Project Snapshot
📊 Difficulty: Intermediate to Advanced
⏰ Est. Time: 15–20 hours for the entire family
📏 Size: Mama Ogre is approximately 25cm tall; Babies are 14cm tall.
“A handmade family holds the warmth of the hands that shaped it.” — Patricia
Materials & Tools Needed
🧶 Yarn: Bulky weight chenille/velvet yarn (size 6). Colors: Pistachio Green, Forest Green, Deep Red, Gold, Sky Blue, Soft Pink, Lemon Yellow, Chestnut Brown, and Tan.
🪡 Hook: 4.5mm crochet hook (or size appropriate to keep stitches perfectly tight).
✨ Other Materials: 14mm safety eyes for Mama, 10mm safety eyes for babies.
✨ Premium fiberfill stuffing.
✨ Yarn needle with a large eye for thick yarn.
✨ Stitch markers to track your rounds.
✨ Small crafting lollipops or polymer clay accessories.
✨ Fluffy textured yarn for baby hair tufts.
Abbreviations & Stitches Used
ch: chain
sc: single crochet
inc: increase (two single crochet in one stitch)
dec: decrease (invisible decrease preferred)
sl st: slip stitch
BLO: back loops only
The Complete Ogre Family Pattern
The Matriarch (Mama Ogre) – Head (Green)
Round 1: 6 sc in magic ring (6)
Round 2: 6 inc (12)
Round 3: [1 sc, inc] 6 times (18)
Round 4: [2 sc, inc] 6 times (24)
Round 5: [3 sc, inc] 6 times (30)
Round 6: [4 sc, inc] 6 times (36)
Round 7: [5 sc, inc] 6 times (42)
Round 8: [6 sc, inc] 6 times (48)
Rounds 9-15: sc in all 48 sts (48)
Round 16: [7 sc, inc] 6 times (54) Artisan’s Note: This crucial expansion builds the foundation for her beautifully chubby cheeks.
Rounds 17-21: sc in all 54 sts (54)
Round 22: [7 sc, dec] 6 times (48)
Round 23: [6 sc, dec] 6 times (42)
Round 24: [5 sc, dec] 6 times (36)
Round 25: [4 sc, dec] 6 times (30)
Round 26: [3 sc, dec] 6 times (24)
Round 27: [2 sc, dec] 6 times (18)
Round 28: [1 sc, dec] 6 times (12)
Round 29: 6 dec (6). Fasten off and weave in the end securely.
Mama Ogre – Nose & Ears (Green)
Nose: Round 1: 5 sc in magic ring (5) Round 2: 5 inc (10) Round 3: sc in all 10 sts (10). Fasten off, leaving a tail for sewing.
Ears (Make 2): Round 1: 5 sc in magic ring (5) Round 2: 5 inc (10) Rounds 3-6: sc in all 10 sts (10) Round 7: 5 dec (5). Fasten off, leaving a tail. Pinch flat before sewing.
Mama Ogre – Hair (Thick Red Yarn)
Round 1: 6 sc in magic ring (6)
Round 2: 6 inc (12)
Round 3: [1 sc, inc] 6 times (18)
Round 4: [2 sc, inc] 6 times (24)
Round 5: [3 sc, inc] 6 times (30)
Hair Strands: ch 28. Skip the first ch, sc down the remaining 27 chains. Slip stitch into the next stitch on the base cap. Repeat this process around the entire base to create thick, flowing locks.
Mama Ogre – Crown (Gold)
Chain 24, slip stitch to join into a ring.
Round 1: sc in all 24 chains (24)
Round 2: [Chain 4, slip stitch into the next 4 stitches of the base] 6 times. Fasten off and leave a long tail.
Mama Ogre – Body & Dress (Dark Emerald Green)
Round 1: 6 sc in magic ring (6)
Round 2: 6 inc (12)
Round 3: [1 sc, inc] 6 times (18)
Round 4: [2 sc, inc] 6 times (24)
Round 5: [3 sc, inc] 6 times (30)
Round 6: [4 sc, inc] 6 times (36)
Round 7: [5 sc, inc] 6 times (42)
Round 8: [6 sc, inc] 6 times (48)
Rounds 9-14: sc in all 48 sts (48)
Round 15: BLO sc in all 48 sts. (48) Artisan’s Note: Working in the back loops creates a crisp ridge where the skirt gathers.
Round 16: [6 sc, dec] 6 times (42)
Rounds 17-19: sc in all 42 sts (42)
Round 20: [5 sc, dec] 6 times (36)
Rounds 21-23: sc in all 36 sts (36)
Round 24: [4 sc, dec] 6 times (30)
Rounds 25-26: sc in all 30 sts (30)
Round 27: [3 sc, dec] 6 times (24)
Round 28: sc in all 24 sts (24). Fasten off and stuff firmly. Using gold yarn, surface slip stitch around the exposed front loops of Round 15 to create the belt.
Mama Ogre – Arms (Dark Green & Light Green)
Start with Light Green yarn.
Round 1: 6 sc in magic ring (6)
Round 2: 6 inc (12)
Rounds 3-5: sc in all 12 sts (12)
Change to Dark Green yarn.
Round 6: BLO sc in all 12 sts (12)
Rounds 7-16: sc in all 12 sts (12). Stuff the hands firmly, leaving the upper arms lightly stuffed. Fasten off.
Mama Ogre – Legs (Dark Green)
Round 1: 6 sc in magic ring (6)
Round 2: 6 inc (12)
Round 3: [1 sc, inc] 6 times (18)
Rounds 4-8: sc in all 18 sts (18)
Round 9: [1 sc, dec] 6 times (12)
Rounds 10-14: sc in all 12 sts (12). Fasten off. Stuff firmly at the base.
Baby Ogre 1 (The Blue Onesie) – Head & Nose (Green)
Round 1: 6 sc in magic ring (6)
Round 2: 6 inc (12)
Round 3: [1 sc, inc] 6 times (18)
Round 4: [2 sc, inc] 6 times (24)
Round 5: [3 sc, inc] 6 times (30)
Round 6: [4 sc, inc] 6 times (36)
Rounds 7-11: sc in all 36 sts (36)
Round 12: [8 sc, inc] 4 times (40)
Rounds 13-16: sc in all 40 sts (40)
Round 17: [8 sc, dec] 4 times (36)
Round 18: [4 sc, dec] 6 times (30)
Round 19: [3 sc, dec] 6 times (24)
Round 20: [2 sc, dec] 6 times (18). Fasten off.
Nose: 4 sc in magic ring. Pull tight and fasten off.
Baby Ogre 1 – Ears (Green)
Make 2.
Round 1: 4 sc in magic ring (4)
Round 2: 4 inc (8)
Rounds 3-4: sc in all 8 sts (8). Fasten off.
Baby Ogre 1 – Hair Tuft (Brown Fluffy)
Attach the textured brown yarn directly to the top center of the baby’s head. Chain 5, slip stitch back into the exact same space. Fasten off and trim neatly.
Baby Ogre 1 – Body (Light Blue Onesie)
Round 1: 6 sc in magic ring (6)
Round 2: 6 inc (12)
Round 3: [1 sc, inc] 6 times (18)
Round 4: [2 sc, inc] 6 times (24)
Round 5: [3 sc, inc] 6 times (30)
Rounds 6-11: sc in all 30 sts (30)
Round 12: [3 sc, dec] 6 times (24)
Rounds 13-15: sc in all 24 sts (24)
Round 16: [2 sc, dec] 6 times (18). Fasten off.
Baby Ogre 1 – Arms & Legs (Green)
Arms (Make 2): Round 1: 5 sc in magic ring (5) Round 2: 5 inc (10) Rounds 3-9: sc in all 10 sts (10). Fasten off.
Legs (Make 2): Round 1: 6 sc in magic ring (6) Round 2: 6 inc (12) Rounds 3-6: sc in all 12 sts (12). Fasten off.
Baby Ogre 1 – Accessory (Lollipop)
Twist thin strips of pink and white yarn together tightly. Apply a tiny dot of fabric glue and coil the twist into a flat circle. Attach this circle to a miniature wooden craft stick.
Baby Ogre 2 (The Pink & Yellow Onesie)
Head, Nose, Ears, Arms: Follow the exact pattern for Baby Ogre 1.
Legs: Follow the pattern for Baby 1, but use Tan yarn for the feet.
Hair Tuft: Use fluffy pink yarn instead of brown.
Hair Bow (Pink): Chain 6. Single crochet in the 2nd chain from the hook and across (5 sts). Single crochet evenly around the entire rectangle. Pinch the center tightly and wrap with yarn 5 times. Secure and sew to the head.
Body (Pink & Yellow): Work Rounds 1-5 in Pink. Switch to Yellow for Rounds 6-8. Switch back to Pink for Rounds 9-16. Follow the identical stitch counts as Baby 1.
Accessory: Create a second lollipop as described above.
Baby Ogre 3 (The Brown & Red Outfit)
Head, Nose, Ears, Arms: Follow the exact pattern for Baby Ogre 1.
Legs: Follow the pattern for Baby 1 using Tan yarn.
Hair Tuft: Use fluffy tan yarn.
Body (Brown & Red): Work Rounds 1-9 in Brown yarn to form the shorts. Switch to Deep Red yarn for Rounds 10-16 to form the shirt. Follow the identical stitch counts as Baby 1.
Accessory: Create a third lollipop as described above.
Assembly & Final Touches
➡️ Position the safety eyes between rounds 16 and 17 on the Mama (12 and 13 on the babies), leaving a wide, 8-stitch gap between them to capture that pure innocence.
➡️ Sew the heads to the bodies with absolute care, ensuring they face perfectly forward.
➡️ Attach the trumpet ears just slightly below the horizontal eye line. This creates the illusion of heavier, chubbier cheeks.
➡️ Position the arms so they rest naturally at the sides, stitching through the flattened top loops.
➡️ Sew the legs flat against the base of the body so the dolls sit securely on their own.
➡️ Apply a soft brush of pink blush directly beneath the eyes using real cosmetics or soft pastels.
Tips & FAQs
Q: My stitches look loose with velvet yarn. What should I do? A: Always drop down half a hook size. Velvet yarn easily shows gaps if tension falters. Tight, rhythmic stitches are your best friend here.
Q: How do I get the eyes to sink in beautifully? A: Thread a long needle with strong cotton thread. Run the thread from the back of the neck to the back of the safety eye, pull it tight to indent the face, and knot it securely at the neck base before attaching the head to the body.
A Final Word
Your beautiful family is complete. Stand back and admire the life you have shaped from simple thread. Every stitch carries your dedication and your spirit. I am so deeply proud of your work today, my dear artisan.

