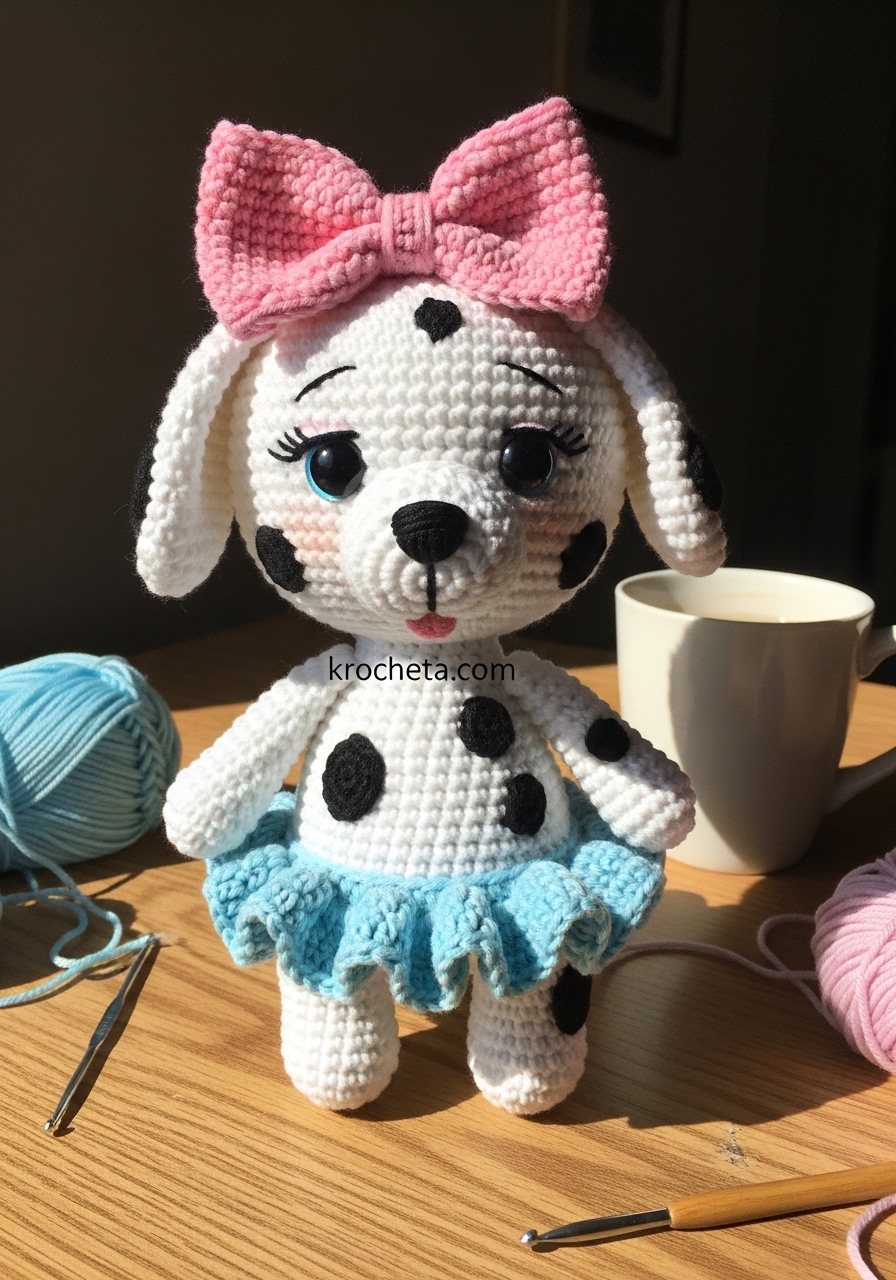
Today, we are bringing an absolute vision of innocence to life with Dottie the Dalmatian.
Her oversized head and pastel accessories will melt the hardest of hearts.
About This Creation & Angle
Dottie is more than just a toy. She is a masterclass in the art of the baby schema proportion.
By intentionally crafting an oversized head that rests upon a petite, rounded body, we create an irresistible charm that speaks directly to the soul.
This project is perfect for those looking to master facial shaping and structural accessory work, like her voluminous pastel blue skirt and statement pink bow.
The scattered spots add a delightful layer of personality, making every single Dottie entirely unique.
Project Snapshot:
➡️ Difficulty: Intermediate
➡️ Est. Time: 8 to 10 hours
➡️ Size: Approximately 20cm (8 inches) tall
“True artistry lies in the gentlest curves and the softest expressions.” – Patricia Poltera
Materials & Tools Needed
🧶 Yarn: Fingering weight cotton yarn in White, Pastel Blue, Pink, and Black
🪡 Hook: 2.0mm crochet hook
✨ Other Materials: 8mm black safety eyes, black embroidery floss, toy stuffing, yarn needle, stitch markers, pins

Abbreviations & Stitches Used
➡️ ch: chain
➡️ sc: single crochet
➡️ inc: increase (2 sc in one stitch)
➡️ dec: invisible decrease (sc 2 together)
➡️ hdc: half double crochet
➡️ dc: double crochet
➡️ sl st: slip stitch
➡️ FLO: front loops only
➡️ BLO: back loops only
The Complete Dottie Pattern
The Head
Artisan’s Note: Remember to stuff firmly as you go, especially in the neck area to support her lovely, large head. For the spots, we will embroider them at the end to ensure perfect placement.
Rnd 1: 6 sc in magic ring (6)
Rnd 2: 6 inc (12)
Rnd 3: (1 sc, inc) x 6 (18)
Rnd 4: (2 sc, inc) x 6 (24)
Rnd 5: (3 sc, inc) x 6 (30)
Rnd 6: (4 sc, inc) x 6 (36)
Rnd 7: (5 sc, inc) x 6 (42)
Rnd 8: (6 sc, inc) x 6 (48)
Rnd 9: (7 sc, inc) x 6 (54)
Rnd 10: (8 sc, inc) x 6 (60)
Rnd 11-18: 60 sc (60) [8 rounds total]
Artisan’s Note: We will now shape the cheeks to give her that lovely, youthful width.
Rnd 19: 15 sc, (inc, 1 sc) x 6, 6 sc, (1 sc, inc) x 6, 15 sc (72)
Rnd 20-25: 72 sc (72) [6 rounds total]
Rnd 26: 15 sc, (dec, 1 sc) x 6, 6 sc, (1 sc, dec) x 6, 15 sc (60)
Rnd 27: (8 sc, dec) x 6 (54)
Rnd 28: (7 sc, dec) x 6 (48)
Artisan’s Note: Insert 8mm safety eyes between rounds 18 and 19, about 10 stitches apart. Ensure they sit exactly above the cheek curve increases.
Rnd 29: (6 sc, dec) x 6 (42)
Rnd 30: (5 sc, dec) x 6 (36)
Rnd 31: (4 sc, dec) x 6 (30)
Rnd 32: (3 sc, dec) x 6 (24)
Rnd 33: (2 sc, dec) x 6 (18)
Fasten off, leaving a long tail for sewing. Stuff the head very firmly, pushing stuffing into the cheeks to maintain the wide shape.
The Snout
Rnd 1: 6 sc in magic ring (6)
Rnd 2: 6 inc (12)
Rnd 3: (1 sc, inc) x 6 (18)
Rnd 4: (2 sc, inc) x 6 (24)
Rnd 5-7: 24 sc (24) [3 rounds total]
Fasten off, leaving a long tail. Stuff the snout lightly before attaching.
The Body
Rnd 1: 6 sc in magic ring (6)
Rnd 2: 6 inc (12)
Rnd 3: (1 sc, inc) x 6 (18)
Rnd 4: (2 sc, inc) x 6 (24)
Rnd 5: (3 sc, inc) x 6 (30)
Rnd 6: (4 sc, inc) x 6 (36)
Rnd 7: (5 sc, inc) x 6 (42)
Rnd 8-12: 42 sc (42) [5 rounds total]
Rnd 13: (5 sc, dec) x 6 (36)
Rnd 14-16: 36 sc (36) [3 rounds total]
Rnd 17: (4 sc, dec) x 6 (30)
Rnd 18-20: 30 sc (30) [3 rounds total]
Rnd 21: (3 sc, dec) x 6 (24)
Rnd 22: Working in BLO for this round only: 24 sc (24).
Artisan’s Note: Round 22 creates the structural ridge where we will later attach her lovely skirt.
Rnd 23-25: 24 sc (24) [3 rounds total]
Rnd 26: (2 sc, dec) x 6 (18)
Rnd 27-28: 18 sc (18) [2 rounds total]
Fasten off and stuff the body firmly.
The Pastel Blue Skirt
Artisan’s Note: Hold the body upside down. Attach your Pastel Blue yarn to the front loops left unworked in Round 22 of the body.
Rnd 1: (FLO) ch 2, 2 dc in each stitch around, sl st to first dc (48)
Rnd 2: ch 2, (1 dc, 2 dc in next st) around, sl st (72)
Rnd 3: ch 2, (2 dc, 2 dc in next st) around, sl st (96)
Rnd 4: ch 1, 96 sc, sl st.
Fasten off beautifully and weave in all ends.
The Legs (Make 2)
Rnd 1: 6 sc in magic ring (6)
Rnd 2: 6 inc (12)
Rnd 3: (1 sc, inc) x 6 (18)
Rnd 4: (2 sc, inc) x 6 (24)
Rnd 5-7: 24 sc (24) [3 rounds total]
Artisan’s Note: The following decreases will create the top of her chubby little paw.
Rnd 8: 6 dec, 12 sc (18)
Rnd 9: 3 dec, 12 sc (15)
Rnd 10-14: 15 sc (15) [5 rounds total]
Rnd 15: (3 sc, dec) x 3 (12)
Rnd 16-22: 12 sc (12) [7 rounds total]
Stuff the bottom paw firmly, but leave the top half unstuffed so she can sit naturally without stiffness. Pinch the top flat and crochet 6 sc across both layers to close. Fasten off.
The Arms (Make 2)
Rnd 1: 6 sc in magic ring (6)
Rnd 2: 6 inc (12)
Rnd 3: (3 sc, inc) x 3 (15)
Rnd 4-5: 15 sc (15) [2 rounds total]
Rnd 6: 3 dec, 9 sc (12)
Rnd 7-20: 12 sc (12) [14 rounds total]
Stuff the hand firmly, leaving the long part of the arm extremely lightly stuffed. Pinch the top flat, crochet 6 sc across to close. Fasten off.
The Floppy Ears (Make 2)
Rnd 1: 6 sc in magic ring (6)
Rnd 2: 6 inc (12)
Rnd 3: (1 sc, inc) x 6 (18)
Rnd 4: (2 sc, inc) x 6 (24)
Rnd 5-9: 24 sc (24) [5 rounds total]
Rnd 10: (10 sc, dec) x 2 (22)
Rnd 11-12: 22 sc (22) [2 rounds total]
Rnd 13: (9 sc, dec) x 2 (20)
Rnd 14-15: 20 sc (20) [2 rounds total]
Rnd 16: (8 sc, dec) x 2 (18)
Rnd 17-18: 18 sc (18) [2 rounds total]
Rnd 19: (7 sc, dec) x 2 (16)
Rnd 20: 16 sc (16)
Do not stuff. The ears must remain entirely flat to drape gracefully. Pinch flat and crochet 8 sc across to close. Fasten off.
The Tail
Rnd 1: 5 sc in magic ring (5)
Rnd 2-15: 5 sc (5) [14 rounds total]
Do not stuff. Fasten off, leaving a tail for sewing.
The Pink Bow
Row 1: ch 15, starting in 2nd ch from hook, 14 hdc. Turn.
Row 2-8: ch 1, 14 hdc. Turn.
Fasten off and weave in ends.
Artisan’s Note for the Center Tie: ch 25. Wrap this chain tightly around the exact center of your crocheted rectangle several times to cinch it into a beautiful, structured bow shape. Tie securely at the back, leaving long tails to sew onto the head.
The Tiny Tongue
Row 1: Using Pink yarn, ch 4. Starting in the 2nd ch from the hook, 1 sc, 1 hdc, 3 hdc in the last ch. Working down the opposite side of the chain: 1 hdc, 1 sc.
Fasten off, leaving a small tail for sewing.
Assembly & Final Touches
➡️ Sew the snout to the direct center of the face, resting just slightly below the eyes.
➡️ Embroider a soft, wide triangular black nose onto the snout.
➡️ Attach the tiny pink tongue right underneath the snout, slightly off to one side for charm.
➡️ Embroider delicate, downward-slanting eyebrows above the eyes to establish her innocent expression.
➡️ Sew the head securely to the body. Take your time here; a loose head breaks the illusion of life.
➡️ Attach the ears to the upper sides of the head, allowing them to fold naturally downward.
➡️ Sew the arms flat against the sides of the body, placed directly beneath the neck seam.
➡️ Attach the legs to the flat base of the body, angling them slightly forward so she sits up perfectly.
➡️ Sew the slim tail to the lower back, just underneath the skirt line.
➡️ Secure the statement pink bow slightly off-center near her left ear.
➡️ Finally, take your black embroidery floss and stitch small, organic spots all over her head, ears, body, arms, and legs. Do not make them perfect circles; natural irregularity is key here.
Tips & FAQs
➡️ Q: How do I ensure the heavy head doesn’t droop over time?
➡️ A: Firm stuffing is critical. I always recommend inserting a tight cylinder of scrap yarn or a craft stick wrapped in batting deep inside the neck column for permanent structural support.
➡️ Q: Can I use acrylic or bulky yarn instead of fingering weight cotton?
➡️ A: Absolutely. Just remember to use a crochet hook size at least one size smaller than your yarn label recommends to keep your stitches impeccably tight. Your final Dottie will simply be delightfully larger!
A Final Word
This marks the end of our current project, but the true beginning of Dottie’s story in your hands.
May she bring a smile to everyone who crosses her path.
I am so deeply proud of the careful stitches and the immense love you poured into this creation.

