A warm welcome back to the atelier, my dear friend. Today, we bring to life two of the sweetest souls to ever grace a crochet hook. Their wide, innocent eyes and soft, chubby cheeks will melt your heart with every stitch you make. Let us begin.
About This Creation & The Pastoral Angle
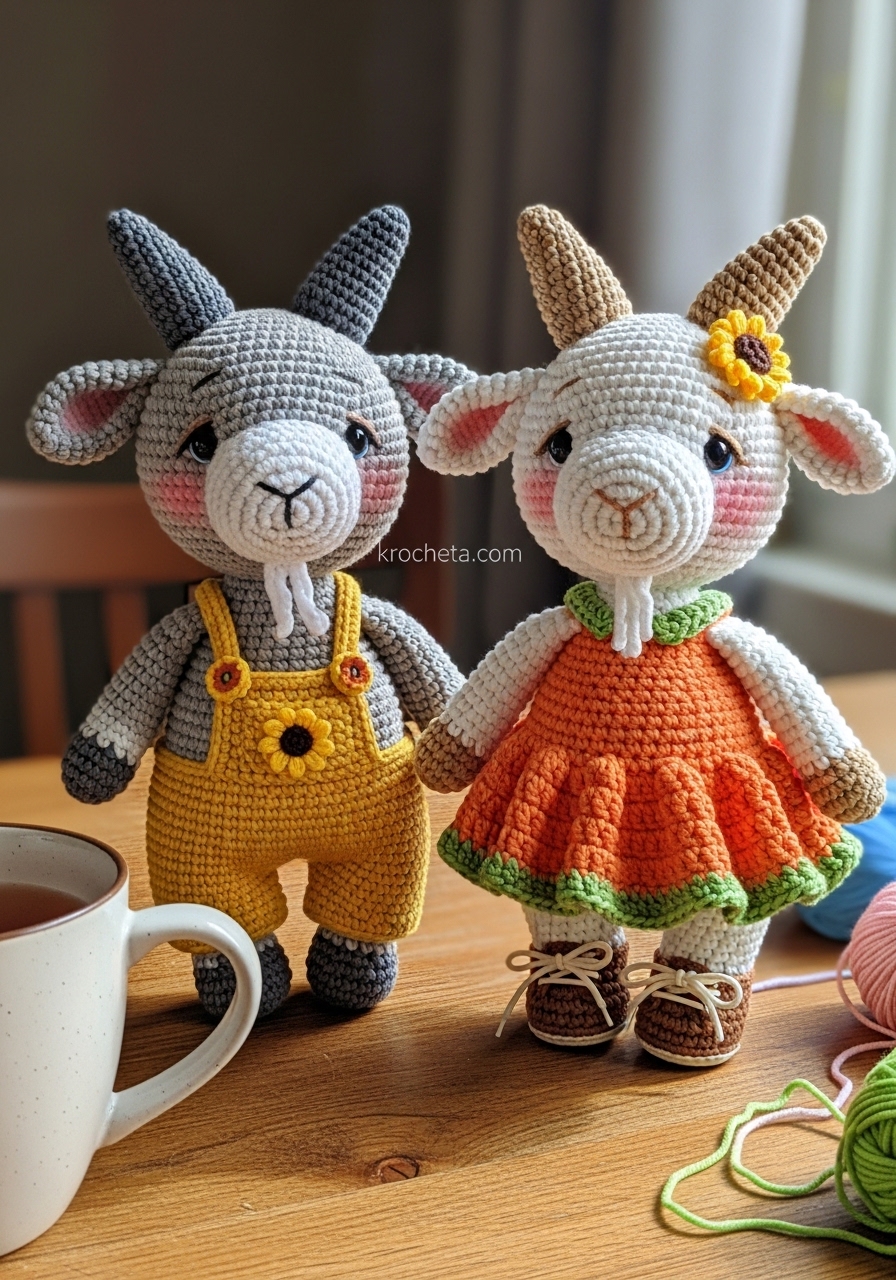
There is something deeply grounding about crafting farmyard friends. These little goats, lovingly named the Meadow Kids, represent the pure joy of childhood. I designed them with the absolute essence of innocence in mind. Notice their beautifully large heads and tiny, rounded bodies. We use gentle, pastel tones and rich textures to elevate this project from a simple toy to a true heirloom.
The true magic lies in the shaping. We will sculpt soft, pronounced cheeks and gentle curves to ensure they look delightfully plump from every angle. By detailing their garments—the rustic yellow overalls and the delicate, open-work orange dress—we introduce tactile variety that makes them utterly captivating.
Project Snapshot
📊 Difficulty: Intermediate
⏰ Est. Time: 12-15 hours for the pair
📏 Size: Approximately 18 cm (7 inches) tall, using sport-weight yarn
“Patience is the truest thread in any artisan’s toolkit. Take your time with their faces, for that is where their little souls live.”
Materials & Tools Needed
🧶 Yarn: Sport weight cotton-acrylic blend. Colors: Pure White, Soft Gray, Dark Gray, Light Tan, Chestnut Brown, Mustard Yellow, Clementine Orange, Leafy Green.
🪡 Hook: 2.0 mm crochet hook (to ensure tight, flawless stitches).
✨ Other Materials: 8mm safety eyes, black embroidery floss for the nose and eyebrows, soft pink pastel chalk for blushing those chubby cheeks, fiberfill stuffing, stitch markers, and a long tapestry needle.

Abbreviations & Stitches Used
ch: chain
sl st: slip stitch
sc: single crochet
inc: increase (2 sc in one stitch)
dec: invisible decrease (sc 2 together through front loops)
hdc: half double crochet
dc: double crochet
BLO: back loop only
The Complete Meadow Kids Pattern
The Sculpted Head (Make 2)
Artisan’s Note: For the Meadow Boy, begin with Pure White and switch to Soft Gray at Round 15. For the Sunshine Girl, use Pure White throughout. We will pack the cheeks firmly to ensure that signature, wide-set innocent gaze.
Round 1: 6 sc in a magic ring (6)
Round 2: 6 inc (12)
Round 3: (1 sc, inc) x 6 (18)
Round 4: (2 sc, inc) x 6 (24)
Round 5: (3 sc, inc) x 6 (30)
Round 6: (4 sc, inc) x 6 (36)
Round 7: (5 sc, inc) x 6 (42)
Round 8: (6 sc, inc) x 6 (48)
Rounds 9-16: sc in each st around (48) – 8 rounds. (Boy color change at R15)
Artisan’s Note: We will now create the pronounced cheeks. Keep your tension even.
Round 17: 12 sc, (inc) x 6, 12 sc, (inc) x 6, 12 sc (60)
Rounds 18-23: sc in each st around (60) – 6 rounds
Place 8mm safety eyes between Rounds 16 and 17, spacing them wide apart—about 11 stitches between them. This low, wide placement is the secret to their adorable charm.
Round 24: 12 sc, (dec) x 6, 12 sc, (dec) x 6, 12 sc (48)
Round 25: (6 sc, dec) x 6 (42)
Round 26: (5 sc, dec) x 6 (36)
Round 27: (4 sc, dec) x 6 (30)
Round 28: (3 sc, dec) x 6 (24)
Stuff the head firmly, taking care to push stuffing into the cheek expansions.
Round 29: (2 sc, dec) x 6 (18)
Round 30: (1 sc, dec) x 6 (12)
Round 31: 6 dec (6)
Fasten off, weave the yarn tail through the front loops of the final 6 stitches, and pull tight to close.
The Plump Torso (Make 2)
Artisan’s Note: Use Soft Gray for the Boy and Pure White for the Girl. We build a pear shape to emphasize their youth.
Round 1: 6 sc in a magic ring (6)
Round 2: 6 inc (12)
Round 3: (1 sc, inc) x 6 (18)
Round 4: (2 sc, inc) x 6 (24)
Round 5: (3 sc, inc) x 6 (30)
Round 6: (4 sc, inc) x 6 (36)
Round 7: (5 sc, inc) x 6 (42)
Rounds 8-14: sc in each st around (42) – 7 rounds
Round 15: (5 sc, dec) x 6 (36)
Rounds 16-17: sc in each st around (36)
Round 18: (4 sc, dec) x 6 (30)
Rounds 19-20: sc in each st around (30)
Round 21: (3 sc, dec) x 6 (24)
Rounds 22-23: sc in each st around (24)
Stuff the lower body heavily for a rounded, chubby belly.
Round 24: (2 sc, dec) x 6 (18)
Round 25: sc in each st around (18)
Fasten off, leaving a long tail for sewing. Finish stuffing the neck area firmly.
The Chubby Arms (Make 4)
Artisan’s Note: For the Girl, start with Light Tan, changing to Pure White at Round 5. For the Boy, use Soft Gray entirely.
Round 1: 6 sc in a magic ring (6)
Round 2: (1 sc, inc) x 3 (9)
Round 3: (2 sc, inc) x 3 (12)
Round 4: sc in each st around (12)
Rounds 5-15: sc in each st around (12) – 11 rounds
Stuff only the bottom half of the arm lightly. Flatten the top opening and crochet 6 sc through both layers to close. Leave a tail for sewing.
The Sturdy Legs (Make 4)
Artisan’s Note: For the Girl, begin with Chestnut Brown for the shoes, changing to Pure White at Round 8. For the Boy, use Soft Gray entirely.
Round 1: 6 sc in magic ring (6)
Round 2: 6 inc (12)
Round 3: (1 sc, inc) x 6 (18)
Round 4: BLO sc in each st around (18)
Rounds 5-6: sc in each st around (18)
Round 7: 6 sc, 3 dec, 6 sc (15)
Round 8: 5 sc, 2 dec, 6 sc (13)
Rounds 9-18: sc in each st around (13) – 10 rounds
Stuff the foot firmly and the leg lightly. Flatten the top and crochet 6 sc across both layers to close.
The Ears (Make 4)
Artisan’s Note: Make 2 in Soft Gray and 2 in Pure White.
Round 1: 4 sc in magic ring (4)
Round 2: (1 sc, inc) x 2 (6)
Round 3: (1 sc, inc) x 3 (9)
Round 4: (2 sc, inc) x 3 (12)
Round 5: (3 sc, inc) x 3 (15)
Rounds 6-9: sc in each st around (15) – 4 rounds
Round 10: (3 sc, dec) x 3 (12)
Flatten the ear. Do not stuff. Fold the flattened piece in half lengthwise and sew the base stitches together to create that gentle pinch.
The Little Horns (Make 4)
Artisan’s Note: Make 2 in Dark Gray and 2 in Light Tan.
Round 1: 4 sc in magic ring (4)
Round 2: (1 sc, inc) x 2 (6)
Round 3: (2 sc, inc) x 2 (8)
Rounds 4-5: sc in each st around (8)
Fasten off, leaving a tail for sewing. Stuff very lightly.
The Boy’s Mustard Overalls
Row 1: Chain 43. Join to first ch with a sl st to form a circle. (42)
Rounds 2-6: sc in each st around (42)
Now we create the pant legs.
Round 7: Count 21 stitches, join with a sl st to the opposite side to divide the circle in half.
Round 8: sc around the 21 stitches of the first leg opening.
Rounds 9-11: sc in each st around (21). Fasten off.
Attach yarn to the other side and repeat Rounds 8-11 for the second leg.
The Bib: Attach yarn to the front center of the waistband.
Row 1: 10 sc, ch 1, turn. (10)
Rows 2-5: 10 sc, ch 1, turn. (10)
Fasten off. Attach yarn to the corners of the bib, chain 20 for the suspenders, cross them over the back, and sew them to the rear waistband.
The Girl’s Clementine Dress
Artisan’s Note: We begin from the top down.
Row 1: ch 25, starting in 2nd ch from hook, 24 sc, ch 1, turn (24)
Row 2: (3 sc, inc) x 6, ch 1, turn (30)
Row 3: 5 sc, ch 5, skip 5 sts (armhole), 10 sc, ch 5, skip 5 sts (armhole), 5 sc, ch 1, turn
Row 4: sc in each st and ch across (30)
Row 5: 30 inc using hdc stitches, ch 2, turn (60)
Row 6: (1 dc, ch 1, skip 1) repeat across to create an open mesh pattern.
Rows 7-10: Continue the mesh pattern (dc in dc, ch 1 over ch 1) until desired length. Fasten off.
The Leafy Ruffle: Attach Leafy Green yarn to the front loops of Row 4. (sc, ch 3, sc in same stitch) in every front loop across. Fasten off and weave in ends.
The Sunflower Accents (Make 2)
Using Chestnut Brown, 6 sc in a magic ring. Sl st to close. Change to Mustard Yellow.
Petals: (ch 3, dc in same st, ch 3, sl st in next st) repeat 6 times. Fasten off.
Assembly & Final Touches
First, attach the plump head to the torso. Whipstitch around the neck opening twice to ensure a sturdy hold.
Pin the gently pinched ears on either side of the head, roughly between rounds 12 and 14.
Position the small horns just above and slightly forward from the ears. Sew them securely.
Sew the arms directly below the neckline. Position the legs at the base of the torso, slightly angled forward so your goats can sit up properly.
Using black embroidery floss, stitch a tiny ‘Y’ shape for the nose directly between the eyes. Add small, expressive eyebrows just above the eyes.
Dress your sweet companions. Sew a sunflower to the Boy’s overall bib and the other to the base of the Girl’s right horn.
Finally, use a soft blush brush and pink pastel chalk to lovingly dust the cheek expansions you sculpted earlier.
Tips & FAQs
🧶 Q: How do I get the cheeks to look so round?
➡️ A: The secret is in the stuffing. Push the fiberfill specifically into the areas where we worked our increases (Round 17 of the head) before closing the top.
🧶 Q: My mesh dress looks too tight. What should I do?
➡️ A: Tension is key. If you crochet tightly, switch to a slightly larger hook just for the Clementine Dress to allow the skirt to drape beautifully over her chubby body.
A Final Word
Your Meadow Kids are now ready to bring a touch of gentle innocence into your home. Cherish the time you spent bringing them to life, piece by piece, stitch by stitch. Every creation holds a piece of our heart.

