Hello, my dear creators. It is always a joy to welcome you back to my studio. Today, we are bringing a profoundly sweet, chubby little piglet to life.
About This Creation & Angle
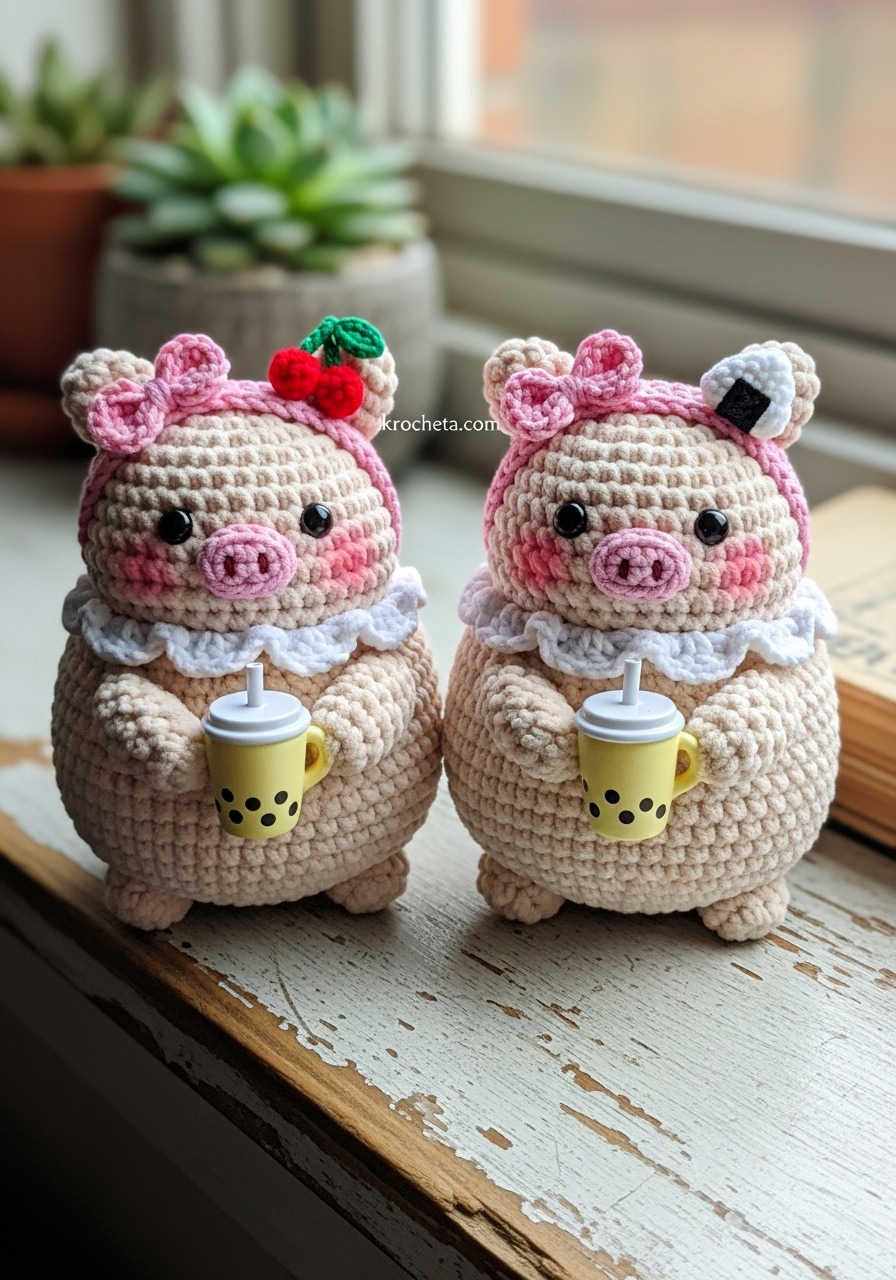
We all need a pocket-sized friend who shares our love for sweet treats. Pippa is exactly that. Her ultra-chubby design is highly sought after in the handmade market, making her an excellent project for your upcoming craft fairs or online boutique. We will focus heavily on achieving that perfect “baby schema”—large, wide-set eyes and a low, tiny snout. Crafting these features with precision transforms a simple shape into an irresistible character.
Project Snapshot:
📊 Difficulty: Intermediate
⏰ Est. Time: 4 to 6 hours
📏 Size: Approximately 10 cm tall (excluding top accessories)
“The secret to a soul-captivating amigurumi lies in the placement of the eyes and the generosity of the blush. Never rush the final expressions.” — Patricia
Materials & Tools Needed
🧶 Yarn: Chunky chenille or velvet yarn (Weight 6) in Creamy Off-White, Pastel Pink, Pastel Yellow, and White. Scraps of dark brown for embroidery.
🪡 Hook: 4.0mm ergonomic crochet hook.
✨ Other Materials: 8mm safety eyes, small two-hole pink button (for snout), stiff white craft wire or thick yarn (for straw), soft pink blush and a brush, polyester fiberfill, yarn needle, and a stitch marker.

Abbreviations & Stitches Used
➡️ ch: chain
➡️ sl st: slip stitch
➡️ sc: single crochet
➡️ inc: increase (2 sc in one stitch)
➡️ dec: invisible decrease (sc 2 together)
➡️ hdc: half double crochet
➡️ dc: double crochet
➡️ BLO: back loops only
➡️ rnd: round
➡️ st: stitch
The Complete Pippa the Boba Piglet Pattern
Body & Legs
Leg 1:
Rnd 1: 6 sc in a magic ring (6)
Rnd 2: [1 sc, inc] 3 times (9)
Rnd 3: 9 sc (9)
Fasten off.
Leg 2:
Rnd 1-3: Repeat Leg 1. Do not fasten off.
Joining Legs & Body:
Rnd 4: ch 2, 9 sc around Leg 1, 2 sc in the chains, 9 sc around Leg 2, 2 sc in the opposite side of the chains (22)
Rnd 5: [10 sc, inc] 2 times (24)
Rnd 6: [3 sc, inc] 6 times (30)
Rnd 7: [4 sc, inc] 6 times (36)
Rnd 8-12: 36 sc around (36) – 5 rounds total
Rnd 13: [4 sc, dec] 6 times (30)
Rnd 14: 30 sc (30)
Rnd 15: [3 sc, dec] 6 times (24)
Rnd 16: 24 sc (24)
Rnd 17: [2 sc, dec] 6 times (18)
Stuff the body firmly, paying attention to filling out the little legs.
Rnd 18: [1 sc, dec] 6 times (12)
Fasten off, leaving a long tail for sewing.
Head
Rnd 1: 8 sc in a magic ring (8)
Rnd 2: 8 inc (16)
Rnd 3: [1 sc, inc] 8 times (24)
Rnd 4: [2 sc, inc] 8 times (32)
Rnd 5: [3 sc, inc] 8 times (40)
Rnd 6: [4 sc, inc] 8 times (48)
Rnd 7: [7 sc, inc] 6 times (54)
Rnd 8-16: 54 sc around (54) – 9 rounds total
Rnd 17: [8 sc, inc] 6 times (60) – Creating the chubby lower cheeks.
Rnd 18-21: 60 sc around (60) – 4 rounds total
Rnd 22: [8 sc, dec] 6 times (54)
Rnd 23: [7 sc, dec] 6 times (48)
Rnd 24: [6 sc, dec] 6 times (42)
Rnd 25: [5 sc, dec] 6 times (36)
Artisan’s Note: Place safety eyes between rounds 16 and 17, with 9 visible stitches between them. Sew the pink button snout centered below the eyes, between rounds 18 and 19.
Rnd 26: [4 sc, dec] 6 times (30)
Rnd 27: [3 sc, dec] 6 times (24)
Start stuffing the head generously. Focus on pushing the stuffing out into the cheeks created in rounds 17-21.
Rnd 28: [2 sc, dec] 6 times (18)
Rnd 29: [1 sc, dec] 6 times (12)
Rnd 30: 6 dec (6)
Fasten off and close the hole completely.
Ears (Make 2)
Rnd 1: 4 sc in a magic ring (4)
Rnd 2: [1 sc, inc] 2 times (6)
Rnd 3: [2 sc, inc] 2 times (8)
Rnd 4: [3 sc, inc] 2 times (10)
Fasten off, leaving a tail for sewing. Do not stuff. Flatten before attaching to the head.
Arms (Make 2)
Rnd 1: 5 sc in a magic ring (5)
Rnd 2-5: 5 sc around (5) – 4 rounds total
Fasten off, leaving a tail. Stuff very lightly, leaving the top half empty so they rest flat against the body.
Headband
Row 1: ch 46. Starting in the 2nd ch from the hook, 45 hdc across (45)
Fasten off, leaving a long tail to sew the ends together around the head.
Headband Bow
Row 1: ch 10, start in 2nd ch, 9 sc across (9)
Row 2-3: ch 1, turn, 9 sc across (9)
Fasten off. Wrap a long strand of yarn tightly around the center of this small rectangle to form the pinched bow shape. Knot securely at the back.
Neck Ruffle
Row 1: ch 20 (or exactly enough to wrap around the neck of your specific piece). Starting in 2nd ch, [sc, 2 dc in next st] repeat across to the end.
Fasten off, leaving a tail to join the collar at the back of the neck.
Boba Cup Base
Rnd 1: 6 sc in a magic ring (6)
Rnd 2: 6 inc (12)
Rnd 3: BLO 12 sc (12)
Rnd 4-6: 12 sc around (12) – 3 rounds total
Fasten off.
Boba Cup Lid/Foam
Rnd 1: 6 sc in magic ring (6)
Rnd 2: 6 inc (12)
Fasten off, leaving a tail to sew to the Base. Stuff the cup slightly before sewing the lid securely closed.
Boba Pearls
Thread a yarn needle with dark brown yarn. Embroider tiny French knots or horizontal stitches around the lower half of the yellow cup.
Boba Straw
Insert the stiff white yarn or craft wire firmly into the top center of the white lid. Secure with a dot of fabric glue if needed.
Top Accessory (Cherry or Onigiri)
Cherry: Work 4 sc in a magic ring with red yarn. Close tightly and fasten off. Sew a tiny strand of green yarn to the top for a stem.
Onigiri: Work 4 sc in a magic ring with white yarn. Rnd 2: [inc, 1 sc] 2 times (6). Fasten off. Sew or glue a tiny black felt square to the bottom edge for the seaweed wrap.
Facial Details
Your button snout and eyes should already be secure. Now, apply a generous dusting of soft pink blush directly beneath the eyes, extending outward across the wide cheeks you shaped earlier
Assembly & Final Touches
Sew the head to the body securely, ensuring the snout points straight forward.
Wrap the headband around the top of the head, resting just above the eyes, and seam it at the back.
Sew the bow directly to the front center of the headband.
Attach the flattened ears slightly angled on the upper sides of the head, sitting just behind the headband.
Wrap the neck ruffle around the seam where the head meets the body and secure it at the back.
Sew the arms to the sides of the body, pointing them slightly inward toward the belly.
Tack the completed boba cup between her hands with a few hidden stitches.
Attach the top accessory (cherry or onigiri) slightly off-center on the very top of her head.
Tips & FAQs
Q: Why is my piglet’s face not looking wide and chubby?
A: Amigurumi relies heavily on your stuffing technique. Take your time adding small pieces of fiberfill, pushing them firmly against the edges to shape the lower cheeks outward where we added the increases.
Q: Can I use acrylic yarn instead of chenille?
A: You certainly can. Keep in mind that acrylic will yield a much smaller and firmer piglet. Adjust your hook size down accordingly to maintain tight stitches without gaps.
A Final Word
You have brought something truly precious into the world today. I hope this creation brings a bright smile to your face and to whoever receives her. Keep your tension even and your heart open to the joy of making.

