
Oh, my dear friend, the joy of bringing such pure innocence to life is truly unparalleled. I am so pleased we are embarking on this beautiful journey together today. Grab your favorite hook, pour a warm cup of tea, and let us begin.
About This Creation & Angle
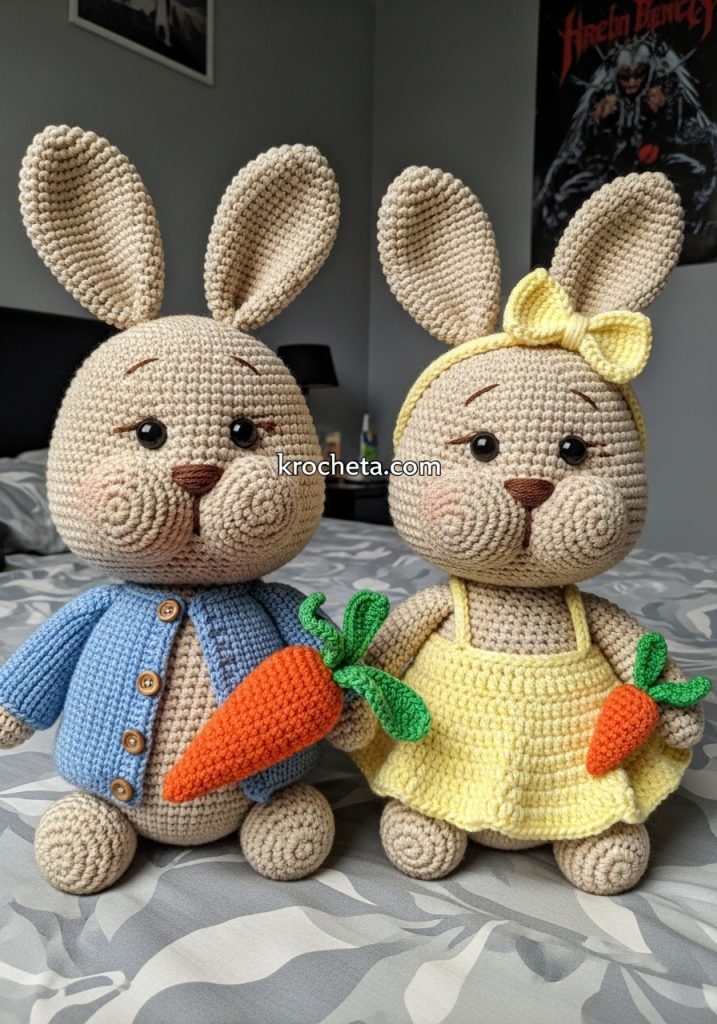
There is a profound comfort in classic storybook characters. With Peter and Penny, we capture that quiet, nostalgic magic through deliberate design. Notice how their eyes sit low and wide on their oversized heads, creating a gaze of pure innocence. Their bodies are delightfully soft and plump, avoiding any harsh angles. This specific proportion is what elevates a simple toy into a cherished companion. As we craft these pieces for your collection at krocheta.com, we are not just making toys; we are creating heirlooms.
Project Snapshot
📊 Difficulty: Intermediate Artisan
⏰ Est. Time: 12-15 hours for the pair
📏 Size: Approximately 22cm tall (excluding ears)
“In every stitch, we weave a silent story of comfort and care.” — Patricia Poltera
Materials & Tools Needed
🧶 Yarn: Soft Cotton or Premium Acrylic (DK weight). Colors: Warm Beige (Main), Powder Blue, Pastel Yellow, Bright Orange, Leaf Green, Soft White.
🪡 Hook: 2.5mm precision hook
✨ Safety Eyes: 10mm solid black
✨ Stuffing: High-loft polyfill
✨ Stitch marker, yarn needle, and pins
✨ Optional: A tiny button for Peter’s jacket
Abbreviations & Stitches Used
➡️ ch: chain
➡️ sc: single crochet
➡️ hdc: half double crochet
➡️ dc: double crochet
➡️ inc: single crochet increase
➡️ dec: invisible single crochet decrease
➡️ sl st: slip stitch
➡️ FLO/BLO: front loop only / back loop only
The Complete Peter & Penny Pattern
The Oversized Head (Make 2 – Warm Beige)
Our signature innocent look requires a beautifully shaped, large head with distinct, chubby cheeks.
Rnd 1: 6 sc in a magic ring (6)
Rnd 2: 6 inc (12)
Rnd 3: (sc 1, inc) x 6 (18)
Rnd 4: (sc 2, inc) x 6 (24)
Rnd 5: (sc 3, inc) x 6 (30)
Rnd 6: (sc 4, inc) x 6 (36)
Rnd 7: (sc 5, inc) x 6 (42)
Rnd 8: (sc 6, inc) x 6 (48)
Rnd 9: (sc 7, inc) x 6 (54)
Rnd 10: (sc 8, inc) x 6 (60)
Rnds 11-18: sc in all 60 sts (60)
Artisan’s Note: Now we shape those perfectly plump cheeks.
Rnd 19: sc 15, (inc, sc 1) x 6, sc 6, (sc 1, inc) x 6, sc 15 (72)
Rnds 20-25: sc in all 72 sts (72)
Artisan’s Note: Insert safety eyes firmly between rounds 17 and 18. Leave 14 stitches of space between them for that wide-set, gentle expression.
Rnd 26: sc 15, (dec, sc 1) x 6, sc 6, (sc 1, dec) x 6, sc 15 (60)
Rnd 27: (sc 8, dec) x 6 (54)
Rnd 28: (sc 7, dec) x 6 (48)
Rnd 29: (sc 6, dec) x 6 (42)
Rnd 30: (sc 5, dec) x 6 (36)
Rnd 31: (sc 4, dec) x 6 (30)
Rnd 32: (sc 3, dec) x 6 (24)
Rnd 33: (sc 2, dec) x 6 (18)
Fasten off, leaving a very long tail for secure sewing. Stuff firmly, concentrating on pushing the stuffing outward into the cheek increases.
The Pear-Shaped Body (Make 2 – Warm Beige)
We build from a wide, stable base up to a narrow neck to support the oversized head.
Rnd 1: 8 sc in a magic ring (8)
Rnd 2: 8 inc (16)
Rnd 3: (sc 1, inc) x 8 (24)
Rnd 4: (sc 2, inc) x 8 (32)
Rnd 5: (sc 3, inc) x 8 (40)
Rnd 6: (sc 4, inc) x 8 (48)
Rnd 7: (sc 5, inc) x 8 (56)
Rnds 8-15: sc in all 56 sts (56)
Rnd 16: (sc 12, dec) x 4 (52)
Rnds 17-18: sc in all 52 sts (52)
Rnd 19: (sc 11, dec) x 4 (48)
Rnds 20-21: sc in all 48 sts (48)
Rnd 22: (sc 6, dec) x 6 (42)
Rnds 23-24: sc in all 42 sts (42)
Rnd 25: (sc 5, dec) x 6 (36)
Rnds 26-27: sc in all 36 sts (36)
Rnd 28: (sc 4, dec) x 6 (30)
Rnd 29: sc in all 30 sts (30)
Rnd 30: (sc 3, dec) x 6 (24)
Rnd 31: sc in all 24 sts (24)
Rnd 32: (sc 2, dec) x 6 (18)
Fasten off. Stuff the body firmly, ensuring the bottom is round and heavy.
The Gentle Long Ears (Make 4 – 2 for Peter, 2 for Penny – Warm Beige & Soft White)
Make an inner ear in white, and an outer ear in beige for each.
Row 1: ch 16. Starting in 2nd ch from hook: sc 1, hdc 2, dc 9, hdc 2, sc 1.
Artisan’s Note: For the outer beige ear, do not fasten off. Place the white inner ear against the beige outer ear and sc around the edges through both pieces to join them seamlessly.
The Chubby Arms with Elbow Shaping (Make 4 – Warm Beige)
Rnd 1: 6 sc in a magic ring (6)
Rnd 2: 6 inc (12)
Rnd 3: (sc 3, inc) x 3 (15)
Rnds 4-8: sc in all 15 sts (15)
Artisan’s Note: Shaping the gentle bend of the elbow.
Rnd 9: dec x 3, sc 9 (12)
Rnd 10: inc x 3, sc 9 (15)
Rnds 11-16: sc in all 15 sts (15)
Rnd 17: (sc 3, dec) x 3 (12)
Rnd 18: (sc 2, dec) x 3 (9)
Stuff the hands firmly, but leave the upper arms very lightly stuffed so they rest naturally against the body. Pinch the top closed and sc across.
The Sturdy Legs with Knee Shaping (Make 4 – Warm Beige)
Rnd 1: 6 sc in a magic ring (6)
Rnd 2: 6 inc (12)
Rnd 3: (sc 1, inc) x 6 (18)
Rnd 4: (sc 2, inc) x 6 (24)
Rnds 5-7: sc in all 24 sts (24)
Rnd 8: dec x 6, sc 12 (18)
Rnd 9: sc in all 18 sts (18)
Artisan’s Note: Shaping the knee for character.
Rnd 10: dec x 2, sc 14 (16)
Rnd 11: inc x 2, sc 14 (18)
Rnds 12-16: sc in all 18 sts (18)
Rnd 17: (sc 1, dec) x 6 (12)
Stuff the feet firmly, lighten the stuffing near the top. Pinch flat and sc across to close.
The Fluffy Tails (Make 2 – Soft White)
Using a small pom-pom maker, create two dense, soft pom-poms from your white yarn. Trim them into perfect, tight spheres.
Peter’s Blue Jacket (Powder Blue)
Worked in rows.
Row 1: ch 31, start in 2nd ch from hook: sc 30, ch 1, turn (30)
Row 2: (sc 4, inc) x 6, ch 1, turn (36)
Row 3: sc 5, ch 6, skip 6 sts, sc 14, ch 6, skip 6 sts, sc 5, ch 1, turn (36)
Rows 4-12: sc across all 36 sts, ch 1, turn (36)
Fasten off. Reattach yarn at the armholes and sc 12 evenly around to create small sleeves. Work 4 rounds for each sleeve.
Penny’s Sun Dress (Pastel Yellow)
Worked from the top down.
Row 1: ch 31, start in 2nd ch from hook: sc 30, ch 1, turn (30)
Row 2: sc 4, ch 6, skip 6 sts, sc 10, ch 6, skip 6 sts, sc 4, ch 1, turn (30)
Rows 3-6: sc across all 30 sts, ch 1, turn (30)
Rnd 7: Join to work in the round. sl st to first sc. ch 2, 3 dc in every stitch around (90).
Rnds 8-12: dc in all 90 sts.
Fasten off and weave in ends.
Penny’s Headband (Pastel Yellow)
Row 1: ch 60. Fasten off.
For the bow: ch 15. Join to form a ring. Work 5 rounds of sc (15). Cinch the middle tightly with a long tail of yarn and attach to the headband.
The Harvest Carrots (Make 1 Large for Peter, 1 Small for Penny – Bright Orange)
Large Carrot: Start 6 sc in mr. Increase gradually by 3 stitches every alternate round until you reach 24 stitches. Work 15 rounds straight. Decrease rapidly to close.
Small Carrot: Start 6 sc in mr. Increase gradually to 18 stitches. Work 10 rounds straight. Decrease rapidly to close.
Fronds (Green): Attach to the top of the carrot, ch 12, sl st back down the chain. Repeat 5 times.
Assembly & Final Touches
➡️ Pin the oversized head to the narrow neck. Sew securely, passing the needle through the stitches of both pieces multiple times to support the weight.
➡️ Attach the ears to the top of the head, curving them slightly downwards for a gentle look.
➡️ Sew the arms exactly one round below the neck seam.
➡️ Attach the legs to the bottom sides of the body so the bunnies can sit beautifully.
➡️ Sew the white pom-pom tails securely to the lower back.
➡️ Using a strand of black yarn, embroider a tiny, delicate “Y” shape for the nose between the eyes.
➡️ Dress Peter in his jacket and slip Penny’s dress on from the bottom up. Tie her headband softly.
Tips & FAQs
➡️ My bunny’s head wobbles. How do I fix this? A wobbly head means the neck needs more support. Before completely closing the seam between the head and body, push extra stuffing firmly into the neck cavity.
➡️ Can I change the yarn weight? Absolutely! Just ensure you adjust your hook size accordingly. Using a chunky yarn will create magnificent, giant, huggable bunnies perfect for krocheta.com!
A Final Word
You have poured your time, patience, and love into these stitches. Look into the soft eyes of Peter and Penny; they are a reflection of your wonderful dedication to the craft. May they bring immense joy to wherever they are placed.

