Greetings, fellow artisan. The air grows warmer, and it is time we challenge our hands with a project worthy of the season. Clementine requires patience, but the heirloom you hold at the end will be worth every stitch.
About This Creation & Angle
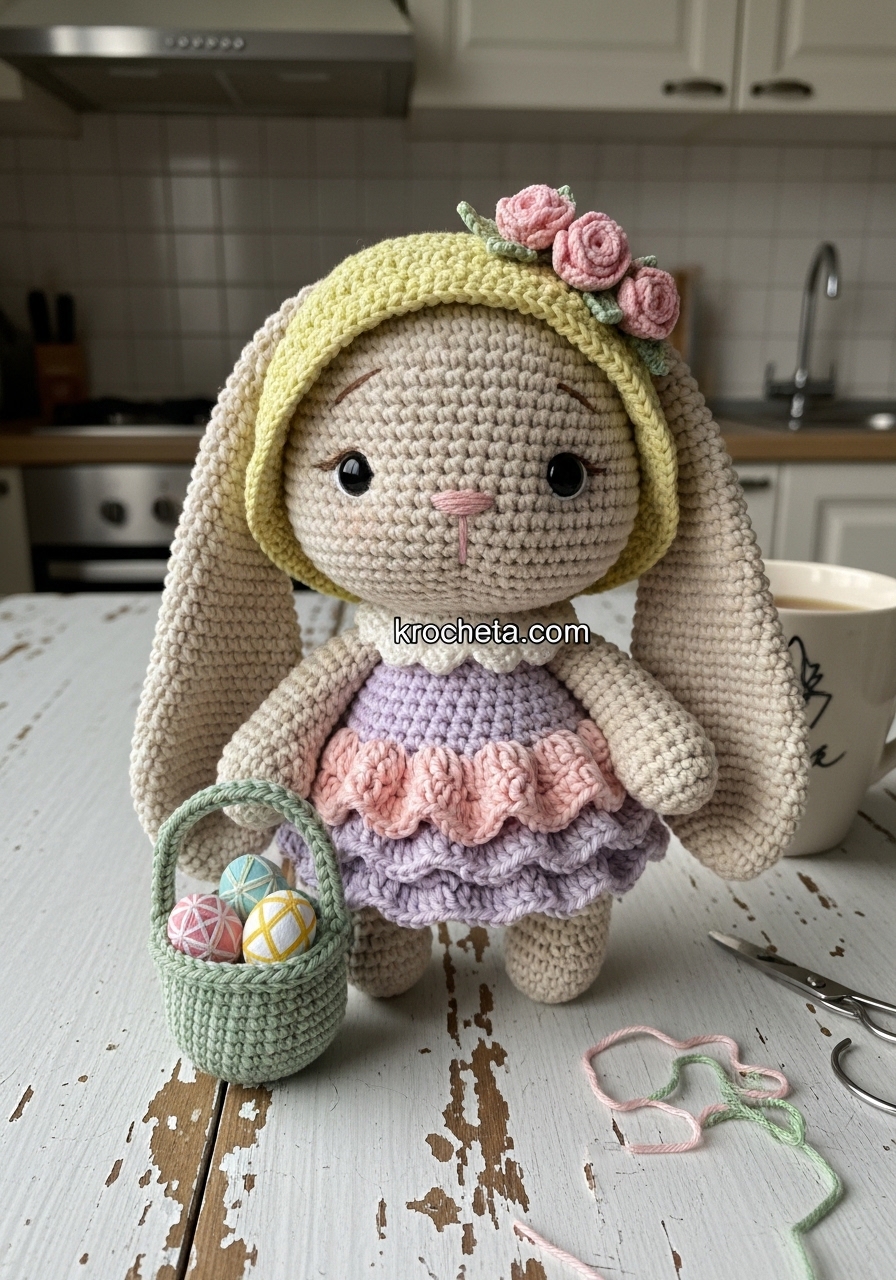
Creating a true heirloom demands more than basic rounds. We are pushing the boundaries of holiday amigurumi today. Clementine is not just a seasonal project. She is a masterclass in advanced shaping and micro-accessories. By working through her petal dress and woven basket, you will elevate your understanding of stitch tension and structural design. This guide proves that plush art can sit proudly alongside the finest traditional crafts.
Project Snapshot
📊 Difficulty: Advanced
⏰ Est. Time: 12 to 15 Hours
📏 Size: 14cm tall
“True beauty in our craft is born in the quiet moments of complex shaping.” – Patricia
Materials & Tools Needed
🧶 Yarn: Fingering weight cotton in Soft Beige, Blush Pink, Lilac, Sage Green, and Pastel Yellow.
🪡 Hook: 2.0mm crochet hook (or size needed for tight tension).
✨ Other Materials: High-quality fiberfill stuffing.
✨ 6mm safety eyes (or black embroidery thread for a classic, innocent gaze).
✨ Fine tapestry needle.
✨ Stitch markers.
✨ Optional: Thin craft wire for gentle ear shaping.

Abbreviations & Stitches Used
ch: chain
sc: single crochet
inc: increase (2 sc in one stitch)
dec: invisible decrease
hdc: half double crochet
dc: double crochet
fpdc: front post double crochet
bpdc: back post double crochet
sl st: slip stitch
BLO: back loop only
FLO: front loop only
The Complete Clementine Pattern
Head (Advanced Cheek & Chin Shaping)
Rnd 1: 6 sc in a magic ring (6)
Rnd 2: 6 inc (12)
Rnd 3: [1 sc, 1 inc] 6 times (18)
Rnd 4: [2 sc, 1 inc] 6 times (24)
Rnd 5: [3 sc, 1 inc] 6 times (30)
Rnd 6: [4 sc, 1 inc] 6 times (36)
Rnd 7: [5 sc, 1 inc] 6 times (42)
Rnd 8: [6 sc, 1 inc] 6 times (48)
Rnd 9: [7 sc, 1 inc] 6 times (54)
Rnd 10 to Rnd 19: sc in all 54 sts (54)
Rnd 20: [Cheek shaping begins] 15 sc, [1 inc, 1 sc] 6 times, 6 sc, [1 sc, 1 inc] 6 times, 9 sc (66)
Rnd 21 to Rnd 25: sc in all 66 sts (66)
Rnd 26: [Chin shaping] 15 sc, [1 dec, 1 sc] 6 times, 6 sc, [1 sc, 1 dec] 6 times, 9 sc (54)
Rnd 27: [7 sc, 1 dec] 6 times (48)
Rnd 28: [6 sc, 1 dec] 6 times (42)
Rnd 29: [5 sc, 1 dec] 6 times (36)
Rnd 30: [4 sc, 1 dec] 6 times (30)
Rnd 31: [3 sc, 1 dec] 6 times (24)
Rnd 32: [2 sc, 1 dec] 6 times (18)
Rnd 33: [1 sc, 1 dec] 6 times (12)
Rnd 34: 6 dec (6)
Fasten off and weave in the end.
Artisan’s Note: Place the eyes between rounds 18 and 19, spacing them 12 stitches apart to achieve the wide, low gaze of innocence. Stuff the cheeks firmly before closing to maintain the rounded, chubby shape.
Body (With Built-in Ruffled Undergarments)
Rnd 1: In Blush Pink, 6 sc in a magic ring (6)
Rnd 2: 6 inc (12)
Rnd 3: [1 sc, 1 inc] 6 times (18)
Rnd 4: [2 sc, 1 inc] 6 times (24)
Rnd 5: [3 sc, 1 inc] 6 times (30)
Rnd 6: [4 sc, 1 inc] 6 times (36)
Rnd 7: [5 sc, 1 inc] 6 times (42)
Rnd 8 to Rnd 12: sc in all 42 sts (42)
Rnd 13: BLO sc in all 42 sts (42)
Rnd 14: [5 sc, 1 dec] 6 times (36)
Rnd 15 to Rnd 17: sc in all 36 sts (36)
Rnd 18: Change to Soft Beige. BLO sc in all 36 sts (36)
Rnd 19: [4 sc, 1 dec] 6 times (30)
Rnd 20 to Rnd 22: sc in all 30 sts (30)
Rnd 23: [3 sc, 1 dec] 6 times (24)
Rnd 24 to Rnd 26: sc in all 24 sts (24)
Rnd 27: [2 sc, 1 dec] 6 times (18)
Rnd 28: sc in all 18 sts (18)
Fasten off, leaving a long tail for sewing.
Artisan’s Note: To create the undergarment ruffle, attach Blush Pink yarn to the FLO of Rnd 13. Crochet [1 sc, ch 2, 1 sc] in each front loop around.
Two Arms (With Elbow Shaping)
Rnd 1: In Soft Beige, 5 sc in a magic ring (5)
Rnd 2: 5 inc (10)
Rnd 3 to Rnd 5: sc in all 10 sts (10)
Rnd 6: 1 dec, 8 sc (9)
Rnd 7 to Rnd 10: sc in all 9 sts (9)
Rnd 11: [Elbow] 4 sl st, 5 hdc (9)
Rnd 12 to Rnd 18: sc in all 9 sts (9)
Fasten off, leaving a tail for sewing. Lightly stuff only the bottom half of the arm.
Two Legs (Rounded Paws)
Rnd 1: In Soft Beige, 6 sc in a magic ring (6)
Rnd 2: 6 inc (12)
Rnd 3: [1 sc, 1 inc] 6 times (18)
Rnd 4 to Rnd 6: sc in all 18 sts (18)
Rnd 7: 6 dec, 6 sc (12)
Rnd 8 to Rnd 14: sc in all 12 sts (12)
Fasten off, leaving a tail for sewing. Stuff firmly at the paw, lightly at the top.
Two Long Ears (With Natural Fold)
Rnd 1: In Soft Beige, 6 sc in a magic ring (6)
Rnd 2: [1 sc, 1 inc] 3 times (9)
Rnd 3: [2 sc, 1 inc] 3 times (12)
Rnd 4: [3 sc, 1 inc] 3 times (15)
Rnd 5 to Rnd 25: sc in all 15 sts (15)
Rnd 26: [3 sc, 1 dec] 3 times (12)
Rnd 27: [2 sc, 1 dec] 3 times (9)
Fasten off, leaving a long tail. Do not stuff. Fold the base in half and stitch closed before attaching to the head.
The Petal Dress
Rnd 1: In Lilac, ch 24, join with sl st to form a ring. ch 1, 24 sc around (24)
Rnd 2: [3 sc, 1 inc] 6 times (30)
Rnd 3: [4 sc, 1 inc] 6 times (36)
Rnd 4: [5 sc, 1 inc] 6 times (42)
Rnd 5: [Petal arches] [skip 2 sts, 5 dc in next st, skip 2 sts, 1 sl st] repeat around.
Fasten off and weave in ends.
The Spring Bonnet
Rnd 1: In Pastel Yellow, 6 sc in a magic ring (6)
Rnd 2: 6 inc (12)
Rnd 3: [1 sc, 1 inc] 6 times (18)
Rnd 4: [2 sc, 1 inc] 6 times (24)
Rnd 5: BLO sc in all 24 sts (24)
Rnd 6 to Rnd 8: sc in all 24 sts (24)
Rnd 9: FLO [1 hdc, 1 dc in same st, 1 dc, 1 hdc in next st] repeat around for a ruffled brim.
Fasten off.
Micro-Roses (Make 3 for Bonnet)
Row 1: In Blush Pink, ch 7.
Row 2: 2 sc in the second ch from hook and each ch across. Fasten off, roll into a rose shape, and stitch tightly.
The Artisan Basket
Rnd 1: In Sage Green, 6 sc in a magic ring (6)
Rnd 2: 6 inc (12)
Rnd 3: [1 sc, 1 inc] 6 times (18)
Rnd 4: BLO sc in all 18 sts (18)
Rnd 5: [1 fpdc, 1 bpdc] repeat around (18)
Rnd 6: [1 bpdc, 1 fpdc] repeat around (18)
Rnd 7: sc in all 18 sts (18).
Handle: ch 12, skip 8 sts, sl st into opposite side. Fasten off.
Three Miniature Easter Eggs
Rnd 1: In contrasting pastel colors, 4 sc in a magic ring (4)
Rnd 2: [1 sc, 1 inc] 2 times (6)
Rnd 3: [1 sc, 1 inc] 3 times (9)
Rnd 4 to Rnd 5: sc in all 9 sts (9)
Rnd 6: [1 sc, 1 dec] 3 times (6)
Stuff lightly, fasten off, and sew closed.
Assembly & Final Touches
➡️ Position the ears exactly at the top center of the head, allowing them to drape downward organically.
➡️ Attach the head to the body securely, ensuring the blush pink undergarment ruffle sits evenly at the waist.
➡️ Sew the arms exactly one round below the neck seam. Ensure the elbow bends face forward.
➡️ Attach the legs to the bottom of the body so Clementine sits perfectly balanced.
➡️ Dress Clementine in her petal dress and secure the bonnet. Place the eggs inside the woven basket and tack the basket to one of her paws.
Tips & FAQs
Q: How do I ensure the cheeks look plump and even?
A: Over-stuffing the cheek sections right before closing the head is crucial. Use the back of your crochet hook to push the fiberfill outward into the shaping increases.
Q: Can I substitute the yarn weight?
A: You may, but remember that moving to a worsted or bulky yarn will drastically change her 14cm size and may compromise the delicate look of the micro-accessories.
A Final Word
You have poured your time and talent into bringing Clementine to life. She stands as a testament to your growing expertise and your love for the craft. May she bring light and beauty to your spring celebrations. Keep creating, and never underestimate the power of your own two hands.

