
Welcome back to the workbench, my friend. Today, we bring Oliver and Hazel to life, stitch by careful stitch. Let us begin this beautiful work.
About This Creation & Angle
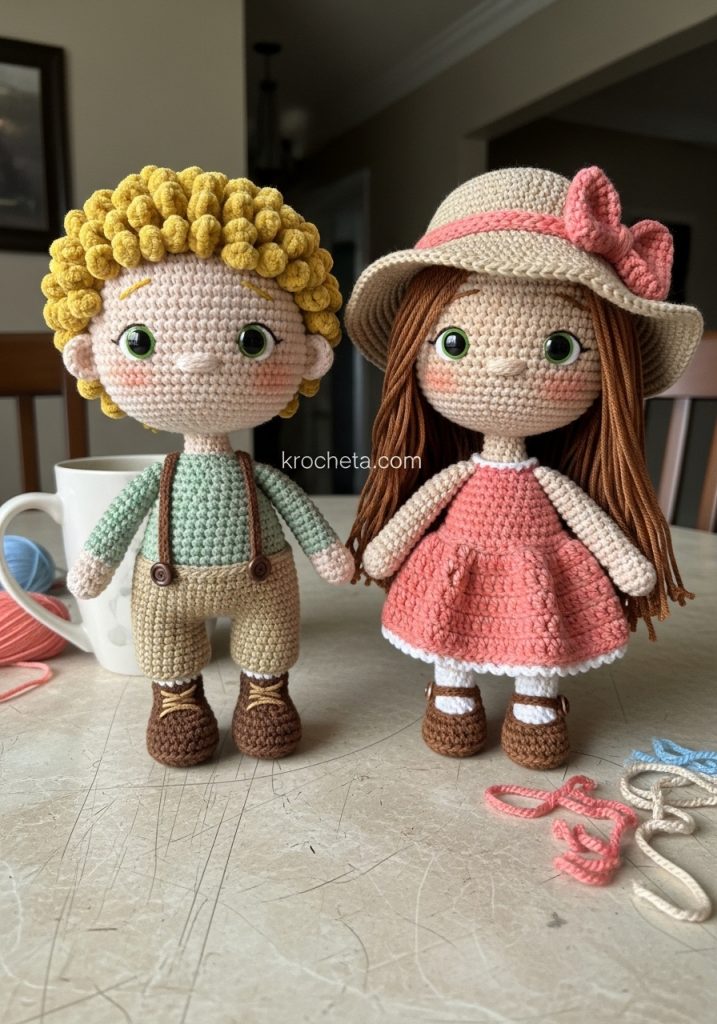
Oliver and Hazel represent the pure, unspoken bond of childhood friendship. I designed them with exaggerated, tender proportions. Notice their delightfully oversized heads and sweet, chubby cheeks. These specific design choices trigger our natural affection. They look innocent, gentle, and utterly soft.
For this project, a premium cotton-acrylic blend is paramount. It gives the stitches remarkable definition while maintaining a plush, huggable texture. This elevates the final piece from a simple craft to a true heirloom.
Project Snapshot
📊 Difficulty: Intermediate
⏰ Est. Time: 15 hours per doll
📏 Size: Approximately 22cm tall
“Patience in the shaping yields a soul in the stitches.” – Patricia
Materials & Tools Needed
🧶 Yarn: Fine sport weight (Size 2) cotton-acrylic blend in Cream, Sage Green, Chestnut Brown, Coral Pink, Golden Yellow, Tan, and Deep Brown.
🪡 Hook: 2.25mm (Size B)
✨ 8mm black safety eyes
✨ Premium fiberfill stuffing
✨ Stitch markers and a long yarn needle
✨ Small piece of flat plastic (for boot and shoe soles)
Abbreviations & Stitches Used
➡️ ch: chain
➡️ sl st: slip stitch
➡️ sc: single crochet
➡️ inc: single crochet increase
➡️ dec: invisible decrease
➡️ hdc: half double crochet
➡️ dc: double crochet
➡️ FLO/BLO: front loop only / back loop only
The Complete Oliver and Hazel Pattern
The Head (Make 2: One for Oliver, One for Hazel)
Round 1: 6 sc in magic ring (6)
Round 2: 6 inc (12)
Round 3: (1 sc, inc) repeat 6 times (18)
Round 4: (2 sc, inc) repeat 6 times (24)
Round 5: (3 sc, inc) repeat 6 times (30)
Round 6: (4 sc, inc) repeat 6 times (36)
Round 7: (5 sc, inc) repeat 6 times (42)
Round 8: (6 sc, inc) repeat 6 times (48)
Round 9: (7 sc, inc) repeat 6 times (54)
Rounds 10 to 19 (10 rounds): 54 sc around (54)
Artisan’s Note: Place 8mm safety eyes between rounds 17 and 18, exactly 11 stitches apart. We want them wide-set and low for that innocent gaze.
Round 20 (Cheek shaping): 18 sc, (inc, 1 sc) repeat 4 times, 2 sc, (1 sc, inc) repeat 4 times, 18 sc (62)
Rounds 21 to 24 (4 rounds): 62 sc around (62)
Round 25 (Cheek reduction): 18 sc, (dec, 1 sc) repeat 4 times, 2 sc, (1 sc, dec) repeat 4 times, 18 sc (54)
Round 26: (7 sc, dec) repeat 6 times (48)
Round 27: (6 sc, dec) repeat 6 times (42)
Round 28: (5 sc, dec) repeat 6 times (36)
Round 29: (4 sc, dec) repeat 6 times (30)
Round 30: (3 sc, dec) repeat 6 times (24)
Artisan’s Note: Begin stuffing the head firmly. Pay special attention to the cheeks to ensure they stay perfectly plump and rounded.
Round 31: (2 sc, dec) repeat 6 times (18)
Round 32: (1 sc, dec) repeat 6 times (12)
Round 33 (Neck shaping): 12 sc around (12)
Fasten off, leaving a long tail for sewing.
The Body (Make 2)
Round 1: 6 sc in magic ring (6)
Round 2: 6 inc (12)
Round 3: (1 sc, inc) repeat 6 times (18)
Round 4: (2 sc, inc) repeat 6 times (24)
Round 5: (3 sc, inc) repeat 6 times (30)
Round 6: (4 sc, inc) repeat 6 times (36)
Rounds 7 to 12 (6 rounds): 36 sc around (36)
Round 13: (4 sc, dec) repeat 6 times (30)
Rounds 14 to 16 (3 rounds): 30 sc around (30)
Round 17: (3 sc, dec) repeat 6 times (24)
Rounds 18 to 20 (3 rounds): 24 sc around (24)
Round 21: (2 sc, dec) repeat 6 times (18)
Rounds 22 to 24 (3 rounds): 18 sc around (18)
Round 25: (1 sc, dec) repeat 6 times (12)
Stuff the body firmly, ensuring the base is wide and the shoulders remain narrow to emphasize the oversized head. Fasten off.
The Legs (Make 4)
Round 1: 6 sc in magic ring (6)
Round 2: 6 inc (12)
Round 3: (1 sc, inc) repeat 6 times (18)
Rounds 4 to 6 (3 rounds): 18 sc around (18)
Round 7: 6 sc, 3 dec, 6 sc (15)
Round 8: 6 sc, 2 dec, 5 sc (13)
Rounds 9 to 13 (5 rounds): 13 sc around (13)
Round 14 (Knee shaping): 5 sc, 3 inc (front of knee), 5 sc (16)
Round 15: 5 sc, 3 dec, 5 sc (13)
Rounds 16 to 22 (7 rounds): 13 sc around (13)
Stuff firmly at the bottom, lighter at the top. Fasten off, leaving a tail for attaching to the body.
The Arms (Make 4)
Round 1: 6 sc in magic ring (6)
Round 2: (1 sc, inc) repeat 3 times (9)
Rounds 3 to 5 (3 rounds): 9 sc around (9)
Round 6 (Thumb): 4-dc bobble stitch in next st, 8 sc (9)
Rounds 7 to 10 (4 rounds): 9 sc around (9)
Round 11 (Elbow shaping): 4 sc, 2 inc, 3 sc (11)
Round 12: 4 sc, 2 dec, 3 sc (9)
Rounds 13 to 18 (6 rounds): 9 sc around (9)
Stuff hands firmly, leave the upper arm empty so it rests flat against the body. Fasten off.
Oliver’s Textured Hair Cap
Round 1: Using Golden Yellow, 6 sc in magic ring (6)
Round 2: 6 inc (12)
Round 3: (1 sc, inc) repeat 6 times (18)
Round 4: (2 sc, inc) repeat 6 times (24)
Round 5: (3 sc, inc) repeat 6 times (30)
Round 6: (4 sc, inc) repeat 6 times (36)
Round 7: (5 sc, inc) repeat 6 times (42)
Round 8: (6 sc, inc) repeat 6 times (48)
Rounds 9 to 14: 48 sc around (48)
Round 15: We will now create the textured loops. (Ch 10, sl st in next stitch) repeat around the entire edge.
Fasten off, leaving a very long tail to sew onto the head.
Oliver’s Sage Shirt
Round 1: Chain 25. Join to first ch to form a circle. Ch 1, 24 sc around (24)
Rounds 2 to 6: 24 sc around (24)
Round 7: (3 sc, inc) repeat 6 times (30)
Rounds 8 to 12: 30 sc around (30)
Fasten off. Put onto the body before attaching the head.
Oliver’s Trousers and Suspenders
Round 1 (Make 2 pant legs): Chain 16, join. Ch 1, 16 sc around (16)
Rounds 2 to 8: 16 sc around (16). Fasten off the first leg. Do not fasten off the second.
Round 9: Join both legs together with a sc. Crochet 32 sc around both legs (32)
Rounds 10 to 14: 32 sc around (32)
Fasten off.
Suspenders: Attach Deep Brown yarn to the front waist. Ch 20, cross over the back, attach to the back waist. Repeat for the second suspender.
Oliver’s Sturdy Brown Boots (Make 2)
Round 1: Ch 6. Starting in second ch from hook: 4 sc, 3 sc in last ch. Work down opposite side: 3 sc, inc (12)
Round 2: inc, 3 sc, 3 inc, 3 sc, 2 inc (18)
Round 3: BLO 18 sc (18). Insert cut plastic sole here.
Rounds 4 to 5: 18 sc around (18)
Round 6: 5 sc, 4 dec, 5 sc (14)
Round 7: 5 sc, 2 dec, 5 sc (12)
Fasten off. Weave in ends.
Hazel’s Flowing Hair Cap
Work Rounds 1 to 14 exactly as Oliver’s cap, using Chestnut Brown.
Instead of loops on round 15, cut 40 strands of yarn, each 30cm long. Attach them to the cap using a larks head knot around the edge to create long, flowing hair.
Hazel’s Gathered Coral Dress
Round 1: Chain 25, join. Ch 1, 24 sc (24)
Rounds 2 to 4: 24 sc around (24)
Round 5: BLO 24 inc (48). This creates the dramatic gather.
Rounds 6 to 15: 48 sc around (48)
Fasten off. Slip onto the body before attaching the head.
Hazel’s Wide-Brimmed Sun Hat
Round 1: Using Tan yarn, 6 sc in magic ring (6)
Round 2: 6 inc (12)
Round 3: (1 sc, inc) repeat 6 times (18)
Round 4: (2 sc, inc) repeat 6 times (24)
Round 5: (3 sc, inc) repeat 6 times (30)
Round 6: (4 sc, inc) repeat 6 times (36)
Round 7: (5 sc, inc) repeat 6 times (42)
Round 8: (6 sc, inc) repeat 6 times (48)
Round 9: (7 sc, inc) repeat 6 times (54)
Rounds 10 to 14: 54 sc around (54)
Round 15 (Brim): FLO (2 hdc in next st, 1 hdc) repeat around (81)
Rounds 16 to 18: 81 hdc around (81)
Fasten off and weave in ends.
Hat Bow
Row 1: Using Coral Pink, ch 10. Starting in 2nd ch, 9 sc. Ch 1, turn.
Rows 2 to 4: 9 sc. Fasten off. Wrap yarn tightly around the center to create a bow shape. Sew onto the hat.
Hazel’s Mary Jane Shoes (Make 2)
Work Rounds 1 to 4 exactly as Oliver’s boots, using Deep Brown.
Round 5: 5 sc, 4 dec, 5 sc (14)
Round 6: 5 sl st, ch 4 (for the strap), skip 4 stitches, 5 sl st (14)
Fasten off and weave in ends.
Assembly & Final Touches
Pin the head to the body, ensuring the cheeks are perfectly centered. Sew securely using the long tail left from the head.
Attach the arms to the sides of the body, just below the neckline.
Attach the legs to the base of the body, positioning them so the dolls can sit balanced.
Sew the hair caps directly onto the heads. Use a tiny amount of coral pink yarn to embroider small, delicate noses one row below the eyes.
Tips & FAQs
Q: My doll’s head is flopping. How do I fix this?
A: Ensure you have stuffed the neck area exceptionally tight. You may also insert a small, rolled piece of plastic canvas down the center of the neck during assembly for a rigid spine.
Q: Can I use blanket yarn instead of cotton?
A: You certainly can, though it will dramatically increase the size. Be sure to size down your hook relative to the yarn label to keep the stitches tight and the stuffing hidden.
A Final Word
You have done exceptional work here. Seeing these pieces take shape in your hands is a profound joy. Hold onto this feeling of creation, and let your hands continue to make beautiful things for the world.

