
Greetings, my fellow artist. Today, we bring to life a creature of pure sunshine and sweetness. May your hands find joy in every stitch as we craft this beautiful little soul.
About This Creation
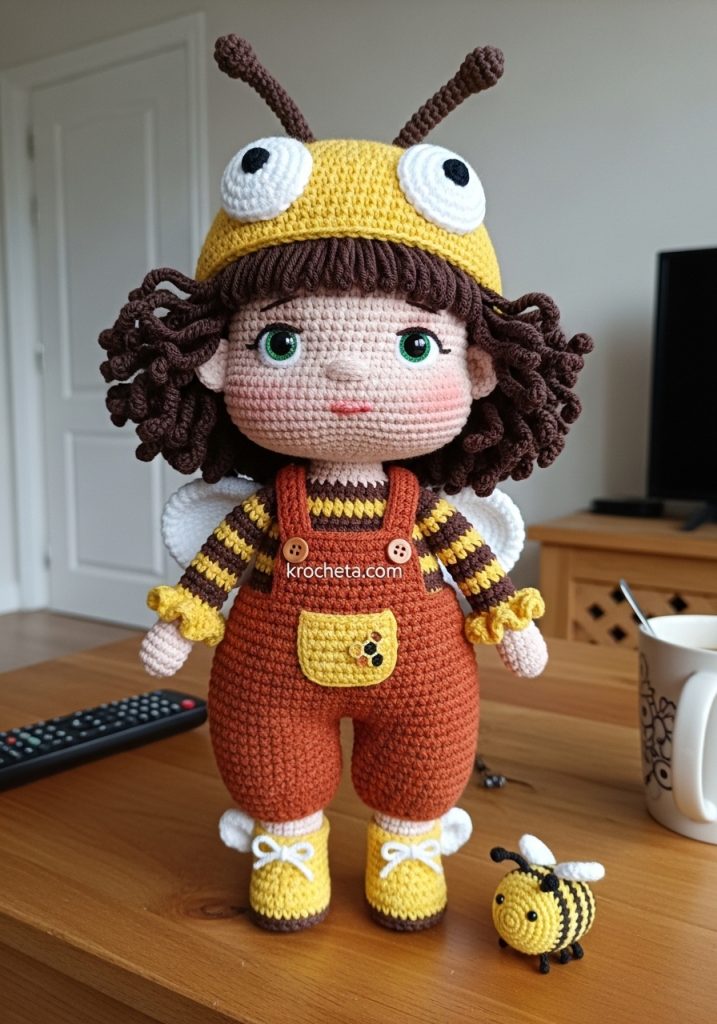
This honey bee girl embodies the soft innocence of childhood. Her design features eyes set low on a gently rounded face, giving her that undeniably endearing, wide-eyed gaze. From the plush cascade of her thick curls to the ruffled cuffs of her rust-orange overalls, every detail is carefully considered. This project is a wonderful study in shaping and layering. You will practice sculpting perfectly chubby cheeks and creating removable accessories like her expressive bug-eyed bonnet.
Project Snapshot
📊 Difficulty: Intermediate
⏰ Est. Time: 14 Hours
📏 Size: 25 cm (10 inches) tall
“In the quiet rhythm of counting stitches, we do not just make a doll; we breathe life into a friend.” – Patricia
Materials & Tools Needed
🧶 Yarn: Sport weight cotton yarn in Cream (skin tone), Dark Brown, Mustard Yellow, Rust Orange, and White
🪡 Hook: 2.25 mm crochet hook (size B)
✨ Other Materials: 8mm safety eyes, soft polyester fiberfill, a yarn needle, stitch markers, black embroidery thread for facial details, and two tiny bronze buttons.
Abbreviations & Stitches Used
➡️ ch: chain
➡️ sl st: slip stitch
➡️ sc: single crochet
➡️ hdc: half double crochet
➡️ inc: single crochet increase (2 sc in one stitch)
➡️ dec: invisible single crochet decrease
➡️ BLO: back loops only
➡️ FLO: front loops only
The Complete Honey Bee Girl Pattern
The Head
Artisan’s Note: Stuff the head firmly as you go, particularly pushing fiberfill into the lower cheeks to maintain that youthful, rounded bottom-heavy shape.
➡️ Rnd 1: With Cream, 6 sc in a magic ring (6)
➡️ Rnd 2: 6 inc (12)
➡️ Rnd 3: (1 sc, inc) 6 times (18)
➡️ Rnd 4: (2 sc, inc) 6 times (24)
➡️ Rnd 5: (3 sc, inc) 6 times (30)
➡️ Rnd 6: (4 sc, inc) 6 times (36)
➡️ Rnd 7: (5 sc, inc) 6 times (42)
➡️ Rnd 8: (6 sc, inc) 6 times (48)
➡️ Rnd 9: (7 sc, inc) 6 times (54)
➡️ Rnd 10: (8 sc, inc) 6 times (60)
➡️ Rnd 11-19: 1 sc in each st around (60)
➡️ Rnd 20: 15 sc, (inc, 1 sc) 6 times, 6 sc, (1 sc, inc) 6 times, 15 sc (72)
➡️ Rnd 21-25: 1 sc in each st around (72)
Artisan’s Note: Insert 8mm safety eyes between rounds 18 and 19, leaving 10 stitches between them. Embroider a tiny nose one round below the eyes, and add a soft pink blush to the cheeks.
➡️ Rnd 26: (10 sc, dec) 6 times (66)
➡️ Rnd 27: (9 sc, dec) 6 times (60)
➡️ Rnd 28: (8 sc, dec) 6 times (54)
➡️ Rnd 29: (7 sc, dec) 6 times (48)
➡️ Rnd 30: (6 sc, dec) 6 times (42)
➡️ Rnd 31: (5 sc, dec) 6 times (36)
➡️ Rnd 32: (4 sc, dec) 6 times (30)
➡️ Rnd 33: (3 sc, dec) 6 times (24)
➡️ Rnd 34: (2 sc, dec) 6 times (18)
➡️ Rnd 35: (1 sc, dec) 6 times (12)
➡️ Rnd 36: 6 dec (6)
Fasten off and weave in the end securely.
Body & Legs
Artisan’s Note: We begin at the toes in dark brown, transitioning into yellow stripes, and finally into the solid upper body.
➡️ Rnd 1: With Dark Brown, 6 sc in a magic ring (6)
➡️ Rnd 2: 6 inc (12)
➡️ Rnd 3: (1 sc, inc) 6 times (18)
➡️ Rnd 4-6: 1 sc in each st around (18)
➡️ Rnd 7-8: Switch to Yellow. 1 sc in each st around (18)
➡️ Rnd 9-10: Switch to Dark Brown. 1 sc in each st around (18)
➡️ Rnd 11-24: Continue alternating 2 rounds of Yellow and 2 rounds of Dark Brown. (18)
Fasten off the first leg. Make the second leg but do not fasten off.
➡️ Rnd 25: Ch 3 from the second leg, join to the first leg with a sc. Sc in remaining 17 sts of first leg, 3 sc along the chain, 18 sc around the second leg, 3 sc along the opposite side of the chain (42)
➡️ Rnd 26-32: With Yellow, 1 sc in each st around (42)
➡️ Rnd 33: (5 sc, dec) 6 times (36)
➡️ Rnd 34-38: 1 sc in each st around (36)
➡️ Rnd 39: (4 sc, dec) 6 times (30)
➡️ Rnd 40-42: 1 sc in each st around (30)
➡️ Rnd 43: (3 sc, dec) 6 times (24)
➡️ Rnd 44: Switch to Cream. BLO (2 sc, dec) 6 times (18)
➡️ Rnd 45-46: 1 sc in each st around (18)
Fasten off, leaving a long tail for sewing to the head.
Arms (Make 2)
➡️ Rnd 1: With Cream, 6 sc in a magic ring (6)
➡️ Rnd 2: (1 sc, inc) 3 times (9)
➡️ Rnd 3-5: 1 sc in each st around (9)
➡️ Rnd 6-22: Switch to Yellow and Dark Brown stripes, matching the leg pattern. 1 sc in each st around (9)
Fold the top flat and crochet 4 sc across both layers to close. Fasten off, leaving a tail for sewing.
Hair Cap & Curls
➡️ Rnd 1: With Dark Brown, 6 sc in a magic ring (6)
➡️ Rnd 2: 6 inc (12)
➡️ Rnd 3: (1 sc, inc) 6 times (18)
➡️ Rnd 4: (2 sc, inc) 6 times (24)
➡️ Rnd 5: (3 sc, inc) 6 times (30)
➡️ Rnd 6: (4 sc, inc) 6 times (36)
➡️ Rnd 7: (5 sc, inc) 6 times (42)
➡️ Rnd 8: (6 sc, inc) 6 times (48)
➡️ Rnd 9: (7 sc, inc) 6 times (54)
➡️ Rnd 10-16: 1 sc in each st around (54)
➡️ Curls: Ch 45. Starting in the 3rd chain from the hook, work 2 hdc in each chain back to the cap. Sl st into the next stitch on the cap. Repeat this process around the entire edge of the cap to create a thick mane of bouncy curls.
➡️ Bangs: Work shorter chains of 12 along the front, putting 1 hdc in each chain. Fasten off and leave a long tail for attaching to the head.
Overalls
Artisan’s Note: The overalls are worked in joined rounds from the waist down, then the bib is added.
➡️ Rnd 1: With Rust Orange, ch 42, join to first ch with a sl st to form a ring. Ch 1, 42 sc around, join (42)
➡️ Rnd 2-10: Ch 1, 1 sc in each st around, join (42)
Artisan’s Note: Divide for pant legs. Work on 21 stitches for each leg.
➡️ Rnd 11-20: Ch 1, 1 sc in each st around the 21 sts of the first leg, join (21)
➡️ Rnd 21: FLO 2 hdc in each st around (42)
Fasten off. Reattach yarn to the other 21 stitches and repeat for the second leg.
➡️ Bib: Attach yarn to the front center of the waistline. Work 12 sc across. Turn, ch 1, work 12 sc. Repeat for 6 rows.
➡️ Suspenders: Ch 25 from the top corners of the bib. Cross them over the back and sew to the back waistline.
➡️ Pocket: With Cream and Mustard, crochet a small square of alternating single crochets. Sew to the front bib with dark brown embroidery thread to resemble a honeycomb. Attach small bronze buttons at the top of the bib.
➡️ Ruffled Cuffs: Attach Cream yarn to the back loops of Rnd 20 on the pant legs. Ch 3, sl st in next st, repeat around.
Bee Hat
➡️ Rnd 1: With Yellow, work same as Head Rnd 1-10 (60)
➡️ Rnd 11-22: 1 sc in each st around (60)
➡️ Earflaps & Ties: Do not fasten off. Work 12 sc, turn, decrease by 1 st at each end of the row until 2 sts remain. Ch 25 for the tie. Fasten off. Skip 18 sts across the front, reattach yarn and repeat for the second earflap and tie.
➡️ Bug Eyes (Make 2): With White, 6 sc in MR. Inc in each st (12). 1 sc, inc around (18). 2 rounds even. Stuff lightly and sew to the top of the hat. Add a black French knot to the center of each.
➡️ Hat Wings (Make 2): With White, ch 15. Sc down the chain, working 3 sc in the end stitch, sc up the opposite side. Fasten off and sew behind the bug eyes.
➡️ Antennae (Make 2): With Dark Brown, ch 10. 3 sc in the 2nd ch from hook, sl st down the remaining chains. Sew to the top of the hat.
Boots
➡️ Rnd 1: With Dark Brown, ch 6. Starting in 2nd ch from hook, 4 sc, 3 sc in last ch. Opposite side: 3 sc, 2 sc in last ch (12)
➡️ Rnd 2: Inc, 3 sc, 3 inc, 3 sc, 2 inc (18)
➡️ Rnd 3: Switch to Yellow. BLO 1 sc in each st around (18)
➡️ Rnd 4-6: 1 sc in each st around (18)
➡️ Rnd 7: 5 sc, 4 dec, 5 sc (14)
➡️ Rnd 8-10: 1 sc in each st around (14)
➡️ Boot Wings (Make 2 per boot): With White, ch 5, sc in 2nd ch and across. Sew to the outer sides of the boots.
The Little Bee Companion
➡️ Rnd 1: With Yellow, 6 sc in a magic ring (6)
➡️ Rnd 2: 6 inc (12)
➡️ Rnd 3-4: 1 sc in each st around (12)
➡️ Rnd 5-6: Switch to Dark Brown. 1 sc in each st around (12)
➡️ Rnd 7-8: Switch to Yellow. 1 sc in each st around (12)
➡️ Rnd 9: Switch to Dark Brown. (1 sc, dec) 4 times (8)
➡️ Rnd 10: 4 dec (4). Fasten off and close the hole.
➡️ Tiny Wings: With White, ch 4, sl st back down. Sew to the back. Embroider happy sleeping eyes with black thread.
Assembly & Final Touches
Position the hair cap perfectly centered on the head and stitch it down securely around the hairline. The curls should fall naturally around the shoulders. Sew the head onto the body base, ensuring the face looks directly forward. Attach the arms to the sides of the body, right at the neck seam. Dress your doll in her overalls, slip on her tiny winged boots, and tie the bee bonnet under her chin. Place her little bee companion gently by her side.
Tips & FAQs
Q: How do I ensure the head does not wobble?
A: Take your time when sewing the head to the body. Use the long tail from the body and stitch through every single post of both pieces. Adding a small, tightly rolled tube of felt inside the neck area before closing can provide excellent hidden support.
Q: Can I use acrylic yarn instead of cotton?
A: Absolutely. While cotton gives wonderful stitch definition, a premium acrylic will yield a softer, slightly larger doll. Just ensure you use a hook size small enough to keep your tension tight so the fiberfill remains hidden.
A Final Word
You have poured your time and talent into this creation, and the result is truly special. May this little bee girl bring a touch of golden joy to your home or to the lucky soul who receives her. Keep your tension even, your heart open, and never stop creating.

