
My dear creator, the time has come to bring this magnificent, many-legged traveler to life. Working with plush velvet yarn requires patience, but the huggable reward is beyond measure. Let your hook glide with purpose today.
About This Creation & Angle
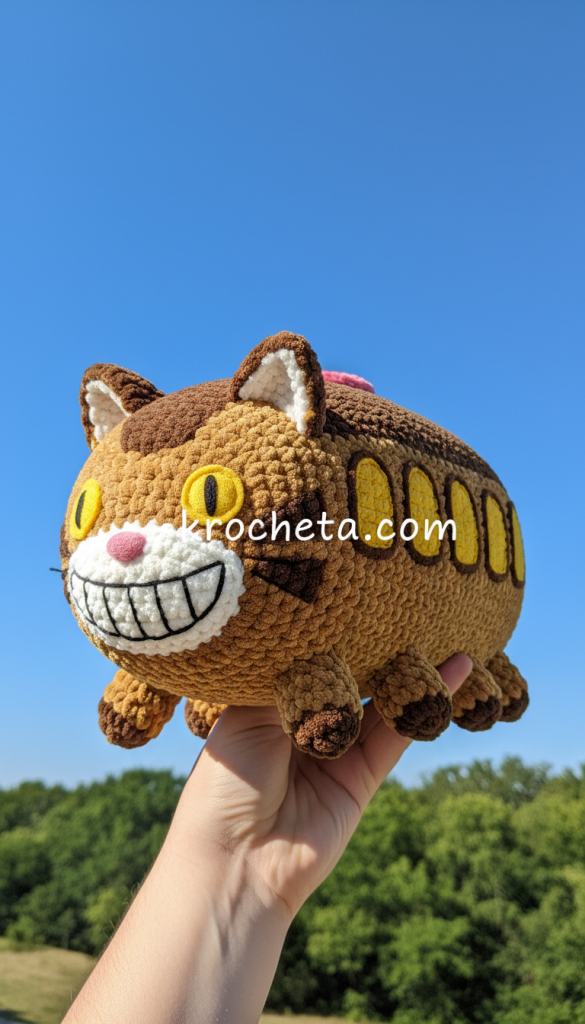
We are crafting a beloved icon of childhood wonder. This project embraces the ultra-soft texture of chunky velvet yarn, transforming it into a substantial, squishy companion. The magic lies in the structural details. From the arched felt windows to the dozen tiny paws, every element serves a precise purpose. It is a fantastic opportunity to master working with bulky chenille fibers while creating a show-stopping piece for any collector’s shelf.
Project Snapshot:
📊 Difficulty: Advanced Intermediate
⏰ Est. Time: 8 to 10 hours
📏 Size: Approximately 25cm (10 inches) long
“A wide grin hides a thousand stitches of love.” – Patricia Poltera
Materials & Tools Needed
🧶 Yarn: Super Bulky (Size 6) Velvet/Chenille Yarn. Golden Tan (2 skeins), Dark Chocolate Brown (1 skein).
🪡 Hook: 5.0mm (H) crochet hook.
✨ Other Materials: Stiff craft felt (Yellow, White, Black, Pink). Fabric glue or felting needle. Poly-fil stuffing. Yarn needle. Stitch markers.
Abbreviations & Stitches Used
ch: chain
sl st: slip stitch
sc: single crochet
inc: increase (2 sc in next stitch)
dec: invisible decrease (sc 2 together)
blo: back loop only
flo: front loop only
The Complete Feline Bus Pattern
The Head
Start with Golden Tan.
Rnd 1: 6 sc in a magic ring (6)
Rnd 2: inc in each st around (12)
Rnd 3: (sc 1, inc) 6 times (18)
Rnd 4: (sc 2, inc) 6 times (24)
Rnd 5: (sc 3, inc) 6 times (30)
Rnd 6: (sc 4, inc) 6 times (36)
Rnd 7: (sc 5, inc) 6 times (42)
Rnds 8-12: sc in each st around (42)
Artisan’s Note: We now shape the pronounced, chubby cheeks.
Rnd 13: sc 12, (inc, sc 1) 4 times, sc 2, (sc 1, inc) 4 times, sc 12 (50)
Rnds 14-18: sc in each st around (50)
Switch to Dark Chocolate Brown for the crown.
Rnd 19: (sc 23, dec) 2 times (48)
Rnd 20: (sc 6, dec) 6 times (42)
Rnd 21: (sc 5, dec) 6 times (36)
Rnd 22: (sc 4, dec) 6 times (30)
Rnd 23: (sc 3, dec) 6 times (24)
Stuff the head firmly, paying special attention to pushing filling out into the cheek shaping.
Rnd 24: (sc 2, dec) 6 times (18)
Rnd 25: (sc 1, dec) 6 times (12)
Rnd 26: dec 6 times (6)
Fasten off. Leave a long tail for sewing.
The Main Bus Body
We work in an oval around a foundation chain. Start with Golden Tan.
Rnd 1: ch 16. Starting in 2nd ch from hook, sc 14, 3 sc in last ch. Working down the opposite side of the chain, sc 13, inc in last ch (32)
Rnd 2: inc, sc 13, inc 3 times, sc 13, inc 2 times (38)
Rnd 3: sc 1, inc, sc 13, (sc 1, inc) 3 times, sc 13, (sc 1, inc) 2 times (44)
Rnd 4: sc 2, inc, sc 13, (sc 2, inc) 3 times, sc 13, (sc 2, inc) 2 times (50)
Rnd 5: sc 3, inc, sc 13, (sc 3, inc) 3 times, sc 13, (sc 3, inc) 2 times (56)
Rnds 6-10: sc in each st around (56)
Switch to Dark Chocolate Brown to create the roof line.
Rnd 11: Working in blo, sc in each st around (56)
Rnds 12-25: sc in each st around (56)
Artisan’s Note: The length of the bus is formed here. Maintain even tension.
Rnd 26: sc 3, dec, sc 13, (sc 3, dec) 3 times, sc 13, (sc 3, dec) 2 times (50)
Rnd 27: sc 2, dec, sc 13, (sc 2, dec) 3 times, sc 13, (sc 2, dec) 2 times (44)
Rnd 28: sc 1, dec, sc 13, (sc 1, dec) 3 times, sc 13, (sc 1, dec) 2 times (38)
Begin stuffing the body firmly to maintain the wide oval shape.
Rnd 29: dec, sc 13, dec 3 times, sc 13, dec 2 times (32)
Fasten off. Leave a very long tail to sew the back end shut flat.
The Ears (Make 2)
Use Dark Chocolate Brown.
Rnd 1: 4 sc in a magic ring (4)
Rnd 2: (sc 1, inc) 2 times (6)
Rnd 3: (sc 2, inc) 2 times (8)
Rnd 4: (sc 3, inc) 2 times (10)
Rnd 5: (sc 4, inc) 2 times (12)
Fasten off. Do not stuff. Flatten the piece. Leave a tail for sewing.
The Legs (Make 12)
Use Golden Tan.
Rnd 1: 6 sc in a magic ring (6)
Rnd 2: inc in each st around (12)
Rnds 3-5: sc in each st around (12)
Fasten off. Lightly stuff. Leave a tail for sewing.
The Tail
Start with Dark Chocolate Brown.
Rnd 1: 6 sc in a magic ring (6)
Rnd 2: inc in each st around (12)
Rnds 3-4: sc in each st around (12)
Change to Golden Tan.
Rnds 5-6: sc in each st around (12)
Change to Dark Chocolate Brown.
Rnds 7-8: sc in each st around (12)
Change to Golden Tan.
Rnds 9-10: sc in each st around (12)
Fasten off. Stuff lightly. Leave a tail for sewing.
Assembly & Final Touches
Sew the flat back of the bus body closed securely with your yarn needle.
Attach the head to the front of the body oval. Ensure the cheeks sit wide.
Sew the ears to the top corners of the head. Cut small triangles of white felt and glue them inside the ears.
Attach the twelve legs along the bottom edges of the body, six on each side, spaced evenly.
Embroider dark brown stripes across the top of each leg and three distinct stripes on each cheek.
Cut the large white grin from felt. Cut black felt lines for teeth. Glue or needle-felt the smile securely to the front of the face.
Cut yellow felt window arches and place them evenly along the sides of the bus body. Add the yellow, wide-set eyes with black pupils, and a small pink oval nose. Finally, attach the pink destination circle on the roof.
Tips & FAQs
Q: Why is my velvet yarn worming out of my stitches?
A: Velvet yarn requires tight, consistent tension. Try sizing down your hook by half a millimeter if your loops are loose.
Q: How do I ensure all twelve legs sit flat?
A: Pin all twelve legs in place before sewing a single one. Rest the bus on a flat table to check the balance. Adjust your pins until the stance is perfectly level.
A Final Word
You have brought a masterpiece of comfort into the world. May this many-legged friend carry joy wherever it rests.

