My dear friends, there is a profound beauty in the art we pass down through the generations. Today, I offer you a project that captures the very soul of a maker’s legacy. Let us gather our softest yarns and stitch a memory that will last a lifetime.
About This Creation & Angle
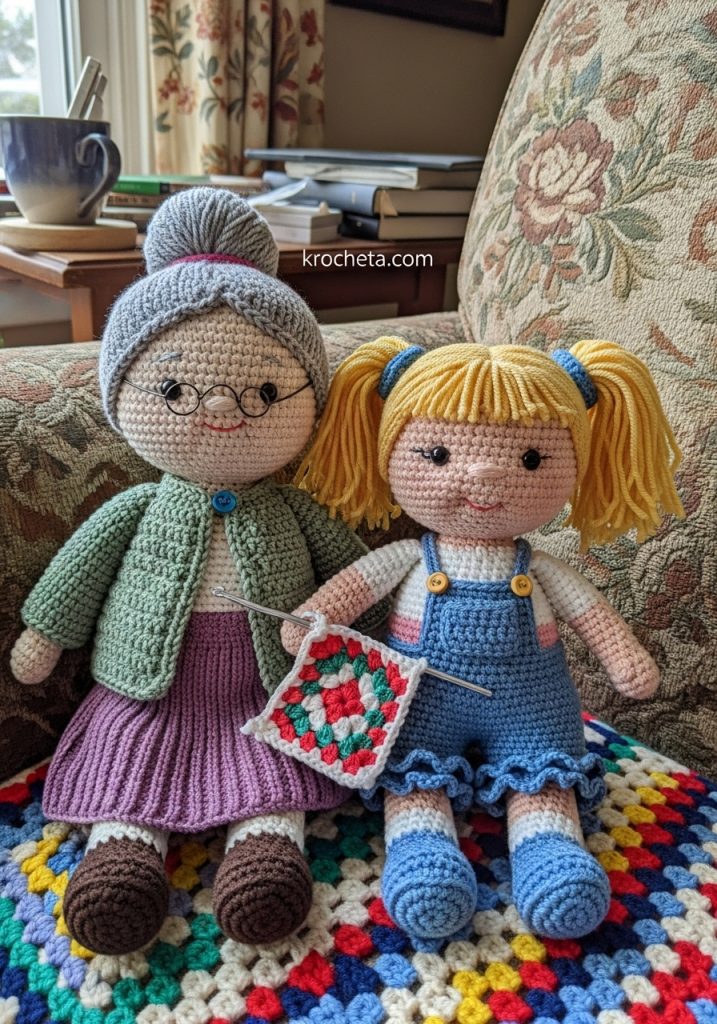
This is more than a simple project; it is an homage to the hands that taught us. The Eleanor and Little Lily pattern focuses heavily on structural shaping, ensuring the grandmother figure sits with natural, rounded posture while the child embodies the classic, soft baby schema. We utilize a palette of muted vintage tones and soft pastels, bringing a serene, nostalgic warmth to the finished piece. By mastering these precise details, you elevate your craft from simple toy-making to true soft sculpture.
Project Snapshot:
📊 Difficulty: Advanced Intermediate
⏰ Est. Time: 18 – 22 Hours
📏 Size: Eleanor sits at 9 inches; Lily sits at 5 inches.
“The truest art is found not in the completion of a piece, but in the love stitched into its very core.” – Patricia Poltera
Materials & Tools Needed
🧶 Yarn: Fingering weight cotton in Soft Peach, Warm Beige, Heather Grey, Vintage Rose, Cream, Sage Green, and Pale Yellow
🪡 Hook: 2.0mm and 2.5mm crochet hooks
✨ Other Materials: Premium polyester fiberfill
✨ Other Materials: 6mm and 8mm safety eyes
✨ Other Materials: Craft wire for glasses and tiny crochet hook
✨ Other Materials: Stitch markers and tapestry needle
✨ Other Materials: Soft pink blush for cheeks
Abbreviations & Stitches Used
ch: chain
sc: single crochet
hdc: half double crochet
dc: double crochet
inc: increase (2 sc in one stitch)
dec: invisible decrease (sc 2 together)
sl st: slip stitch
FLO: front loops only
BLO: back loops only
The Complete Eleanor & Little Lily Pattern
Eleanor (The Grandmother)
Head (Shaped with gentle cheek indentations)
Artisan’s Note: Stuff the head firmly as you go, paying special attention to the lower cheeks to maintain that soft, rounded, mature face.
Round 1: 6 sc in a magic ring (6)
Round 2: inc in each st around (12)
Round 3: (sc 1, inc) 6 times (18)
Round 4: (sc 2, inc) 6 times (24)
Round 5: (sc 3, inc) 6 times (30)
Round 6: (sc 4, inc) 6 times (36)
Round 7: (sc 5, inc) 6 times (42)
Round 8: (sc 6, inc) 6 times (48)
Round 9: (sc 7, inc) 6 times (54)
Round 10: (sc 8, inc) 6 times (60)
Rounds 11-18: sc in each st around (60)
Round 19: (sc 9, inc) 6 times (66)
Rounds 20-24: sc in each st around (66)
Round 25: sc 20, (inc, sc 1) 6 times, sc 4, (sc 1, inc) 6 times, sc 20 (78) – Cheek shaping begins.
Rounds 26-29: sc in each st around (78)
Round 30: sc 20, (dec, sc 1) 6 times, sc 4, (sc 1, dec) 6 times, sc 20 (66)
Round 31: (sc 9, dec) 6 times (60)
Round 32: (sc 8, dec) 6 times (54)
Round 33: (sc 7, dec) 6 times (48)
Round 34: (sc 6, dec) 6 times (42)
Round 35: (sc 5, dec) 6 times (36)
Round 36: (sc 4, dec) 6 times (30)
Round 37: (sc 3, dec) 6 times (24)
Round 38: (sc 2, dec) 6 times (18)
Fasten off, leaving a long tail for sewing. Place 6mm safety eyes between rounds 21 and 22, spacing them 10 stitches apart.
Torso & Legs (Worked continuously)
Artisan’s Note: We build the legs first, joining them to form a sturdy, seated base.
Leg 1:
Round 1: 6 sc in magic ring (6)
Round 2: inc in each st around (12)
Round 3: (sc 1, inc) 6 times (18)
Rounds 4-8: sc in each st around (18)
Round 9: sc 6, dec 3 times, sc 6 (15) – Knee shaping.
Round 10: sc 6, inc 3 times, sc 6 (18)
Rounds 11-20: sc in each st around (18)
Fasten off Leg 1. Make Leg 2, but do not fasten off.
Round 21: ch 3 from Leg 2, join to Leg 1 with a sc. sc 17 around Leg 1, sc 3 across ch, sc 18 around Leg 2, sc 3 across opposite side of ch (42)
Rounds 22-26: sc in each st around (42)
Round 27: (sc 5, dec) 6 times (36)
Rounds 28-35: sc in each st around (36)
Round 36: (sc 4, dec) 6 times (30)
Rounds 37-40: sc in each st around (30)
Round 41: (sc 3, dec) 6 times (24)
Rounds 42-43: sc in each st around (24)
Round 44: (sc 2, dec) 6 times (18)
Fasten off. Stuff firmly, ensuring the hips allow for a comfortable seated posture.
Arms (Bent at the elbows) – Make 2
Round 1: 6 sc in magic ring (6)
Round 2: (sc 1, inc) 3 times (9)
Rounds 3-10: sc in each st around (9)
Round 11: sl st 4, hdc 5 (9) – Elbow bend.
Round 12: sc in each st around (9)
Rounds 13-18: sc in each st around (9)
Fasten off, leave tail. Stuff lightly, leaving the top flat.
Textured Cardigan (Removable)
Worked flat in rows.
Row 1: ch 31, starting in 2nd ch from hook, hdc 30. Turn. (30)
Row 2: ch 1, (hdc 4, inc) 6 times. Turn. (36)
Row 3: ch 1, hdc 5, ch 6 (skip 6 sts for armhole), hdc 14, ch 6 (skip 6 sts for armhole), hdc 5. Turn. (36)
Rows 4-12: ch 1, hdc in each st across. Turn. (36)
Sleeves: Join yarn at armhole. hdc 14 evenly around. Work 10 rounds of hdc. Fasten off.
Pleated Skirt
Round 1: ch 42, join to form a ring. sc 42. (42)
Round 2: (dc 1, dc inc) 21 times. (63)
Round 3: Work 2 dc in each st around. (126)
Rounds 4-15: dc in each st around. (126)
Fasten off. Weave in ends.
Hair Base & Coiled Bun
Hair Base: Work rounds 1-12 of the Head pattern in Heather Grey. Fasten off, leave tail.
Coiled Bun: ch 40. Work 2 hdc in each ch across. The piece will naturally curl. Roll it into a bun shape and stitch securely to the top of the Hair Base.
Wire Glasses
Form two 10mm loops from craft wire. Connect them with a 4mm bridge. Trim and bend the arms to hook gently behind Eleanor’s ears.
Little Lily (The Grandchild)
Oversized Head
Round 1: 6 sc in magic ring (6)
Round 2: inc in each st around (12)
Round 3: (sc 1, inc) 6 times (18)
Round 4: (sc 2, inc) 6 times (24)
Round 5: (sc 3, inc) 6 times (30)
Round 6: (sc 4, inc) 6 times (36)
Round 7: (sc 5, inc) 6 times (42)
Round 8: (sc 6, inc) 6 times (48)
Rounds 9-16: sc in each st around (48)
Round 17: sc 12, (inc, sc 1) 6 times, (sc 1, inc) 6 times, sc 12 (60) – Pronounced baby cheeks.
Rounds 18-22: sc in each st around (60)
Round 23: (sc 8, dec) 6 times (54)
Round 24: (sc 7, dec) 6 times (48)
Round 25: (sc 6, dec) 6 times (42)
Round 26: (sc 5, dec) 6 times (36)
Round 27: (sc 4, dec) 6 times (30)
Round 28: (sc 3, dec) 6 times (24)
Round 29: (sc 2, dec) 6 times (18)
Fasten off. Insert 8mm safety eyes between rounds 15 and 16, 12 stitches apart.
Tiny Torso & Legs
Legs (Make 2):
Round 1: 6 sc in magic ring (6)
Round 2: (sc 1, inc) 3 times (9)
Rounds 3-6: sc in each st around (9)
Round 7: Join legs. (20)
Rounds 8-12: sc in each st around (20)
Round 13: (sc 3, dec) 4 times (16)
Rounds 14-15: sc in each st around (16)
Fasten off. Stuff plumply.
Stubby Arms (Reaching forward) – Make 2
Round 1: 5 sc in magic ring (5)
Round 2: inc in each st around (10)
Rounds 3-8: sc in each st around (10)
Fasten off. Do not stuff fully.
Ruffled Overalls
Round 1: ch 24, join in round. sc 24.
Round 2: (sc 3, inc) 6 times (30)
Rounds 3-6: sc in each st around (30)
Straps: ch 12, skip 10 sts, attach with sl st. Repeat for second strap.
Ruffle: Attach yarn to front loop of Round 1. Work 3 dc in each st around. Fasten off.
Hair Base & Twin Pigtails
Base: Work rounds 1-10 of Lily’s head in Pale Yellow.
Pigtails (Make 2): ch 15. sc in 2nd ch from hook and each across. Sew to the sides of the base.
The Shared Story (Accessories)
Miniature Granny Square Blanket
Using multiple pastel colors, work a classic granny square pattern for 4 rounds.
Tiny Ball of Yarn
Wrap a small amount of vintage rose yarn around a pea-sized sphere of fiberfill until completely covered. Secure with a hidden stitch.
Miniature Crochet Hook
Bend the tip of a small piece of craft wire to mimic a hook.
Assembly & Final Touches
Attach Eleanor’s head to her torso securely, checking that she balances perfectly in a seated position.
Pin Little Lily’s arms so they reach outward, resting gently on Eleanor’s lap.
Use a tiny dab of blush on both their cheeks to breathe life into their expressions.
Position the miniature Granny Square between them, wrapping the yarn slightly around Lily’s hands.
Tips & FAQs
Q: My pieces are coming out stiff. What should I do?
A: Adjust your tension. Amigurumi requires tight stitches, but your hands should not ache. Try a hook half a size larger if you struggle to maintain an even rhythm.
Q: How do I keep the seated figures from falling backward?
A: Focus the fiberfill toward the front of the hips and belly. A small glass bead packet placed inside the lower torso acts as an excellent counterweight.
A Final Word
Crafting these characters is a quiet meditation on love. May every stitch remind you of the hands that guided your own, and the beautiful legacy you continue to build.