My dear creator, the time has come to transform simple yarn into a profound statement of affection. This project requires patience, but the resulting heirloom will speak volumes of your dedication. Let us begin our work together.
About This Creation & Angle
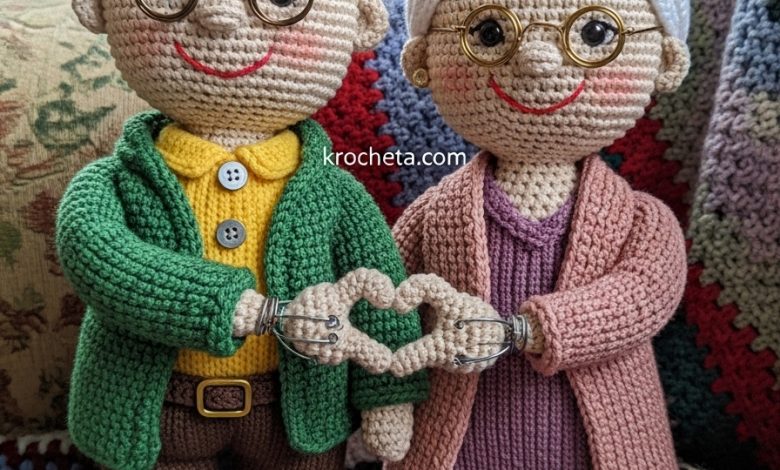
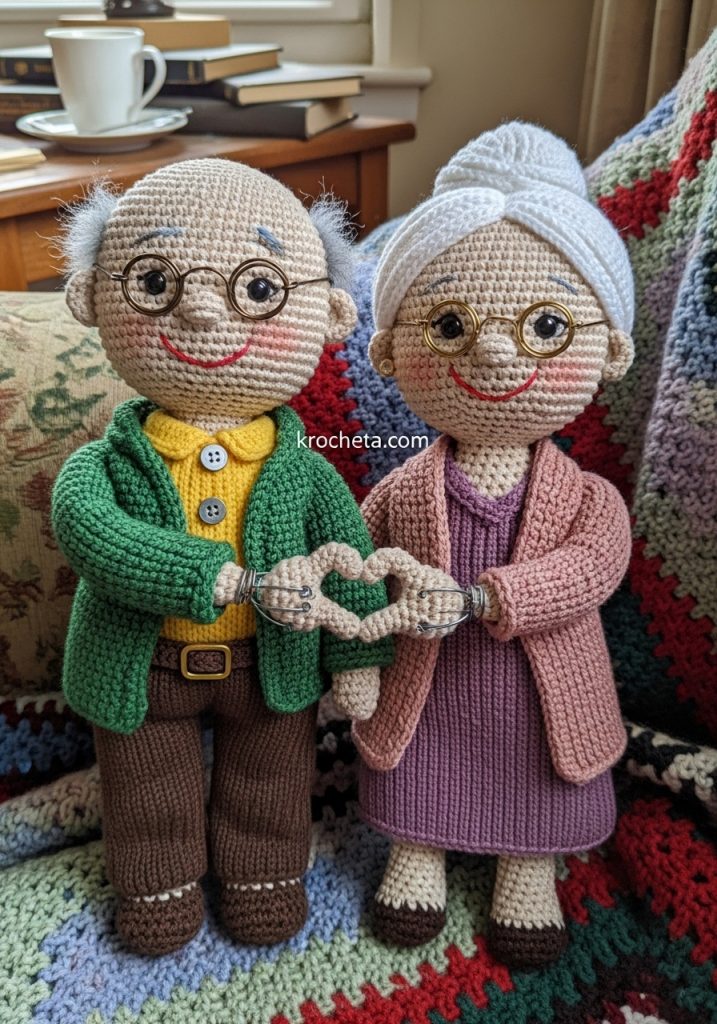
We are crafting more than mere dolls; we are sculpting a narrative of lifelong companionship. The Enduring Love Amigurumi Couple captures the tender magic of growing old together. Notice the gentle slope of their features, embodying the gaze of innocence and the embrace of softness.
By mastering this project, you will learn advanced facial shaping. You will also discover the secret to posable amigurumi hands that can form a perfect heart. This is a commercial-quality guide designed to elevate your artisan skills.
Project Snapshot:
📊 Difficulty: Advanced Intermediate
⏰ Est. Time: 18 – 24 Hours
📏 Size: Approximately 16 cm tall
“In every carefully placed stitch, we leave a whisper of our own heart’s capacity for love.” – Patricia Poltera
Materials & Tools Needed
🧶 Yarn: Fingering weight cotton in Peach, White, Grey, Yellow, Brown, Forest Green, Purple, Dusty Pink, and Black.
🪡 Hook: 2.0 mm ergonomic crochet hook.
✨ Other Materials: 6mm safety eyes, polyester fiberfill, thin brass craft wire, tapestry needle, stitch markers.
Abbreviations & Stitches Used
ch: chain
sl st: slip stitch
sc: single crochet
inc: increase (two single crochets in one stitch)
dec: decrease (single crochet two stitches together)
hdc: half double crochet
The Complete Enduring Love Couple Pattern
Elderly Head Base (Make 2, one for Arthur, one for Martha)
Rnd 1: 6 sc in a magic ring (6)
Rnd 2: 6 inc (12)
Rnd 3: ➡️sc, inc⬅️ repeat 6 times (18)
Rnd 4: ➡️2 sc, inc⬅️ repeat 6 times (24)
Rnd 5: ➡️3 sc, inc⬅️ repeat 6 times (30)
Rnd 6: ➡️4 sc, inc⬅️ repeat 6 times (36)
Rnd 7: ➡️5 sc, inc⬅️ repeat 6 times (42)
Rnd 8: ➡️6 sc, inc⬅️ repeat 6 times (48)
Rnds 9 – 20: 1 sc in each stitch around (48)
Rnd 21 (Cheek Shaping): 12 sc, ➡️inc, sc⬅️ repeat 4 times, 8 sc, ➡️sc, inc⬅️ repeat 4 times, 12 sc (56)
Rnds 22 – 28: 1 sc in each stitch around (56)
Rnd 29 (Cheek Decreases): 12 sc, ➡️dec, sc⬅️ repeat 4 times, 8 sc, ➡️sc, dec⬅️ repeat 4 times, 12 sc (48)
Rnd 30: ➡️6 sc, dec⬅️ repeat 6 times (42)
Rnd 31: ➡️5 sc, dec⬅️ repeat 6 times (36)
Rnd 32: ➡️4 sc, dec⬅️ repeat 6 times (30)
Rnd 33: ➡️3 sc, dec⬅️ repeat 6 times (24)
Rnd 34: ➡️2 sc, dec⬅️ repeat 6 times (18)
Rnd 35: ➡️sc, dec⬅️ repeat 6 times (12). Fasten off and leave a long tail.
Artisan’s Notes: Insert safety eyes between rounds 18 and 19, spacing them 6 stitches apart. Stuff the head firmly, paying special attention to pushing fiberfill into the expanded cheek pockets created in round 21 to ensure a rounded, chubby aesthetic.
Nose (Make 2)
Rnd 1: 6 sc in a magic ring (6)
Rnd 2: 6 inc (12)
Rnd 3: ➡️sc, inc⬅️ repeat 6 times (18)
Rnds 4 – 5: 1 sc in each stitch around (18)
Rnd 6: ➡️sc, dec⬅️ repeat 6 times (12). Fasten off, leaving a tail for sewing.
Ears (Make 4)
Rnd 1: 5 hdc in a magic ring. Do not pull the ring completely closed to form a semi-circle. Fasten off and leave a long tail.
Posable Hands & Fingers (Make 4 hands total)
Fingers (Make 16 total): Rnd 1: 4 sc in a magic ring. Rnds 2-4: 4 sc. Fasten off on three fingers; do not fasten off on the fourth.
Thumbs (Make 4 total): Rnd 1: 4 sc in a magic ring. Rnds 2-3: 4 sc. Fasten off.
Hand Assembly: Join three fingers to the fourth by sc around the perimeters. (12 sc). Crochet 2 rounds of 12 sc. Attach the thumb by sc across both the hand and thumb stitches. Decrease over the next two rounds down to 6 sc at the wrist.
Artisan’s Notes: Insert a skeleton of thin craft wire into the fingers before closing the wrist. This wire will allow Arthur and Martha to form their iconic heart gesture.
Arthur’s Arms & Sleeves (Make 2)
Attach yellow yarn to the 6 sc wrist opening.
Rnd 1: 6 inc (12)
Rnds 2 – 18: 1 sc in each stitch around (12). Fasten off.
Martha’s Arms & Sleeves (Make 2)
Attach pink yarn to the 6 sc wrist opening.
Rnd 1: 6 inc (12)
Rnds 2 – 18: 1 sc in each stitch around (12). Fasten off.
Arthur’s Body & Legs
Legs (Make 2 in Brown): Rnd 1: 6 sc in mr. Rnd 2: 6 inc (12). Rnds 3-12: 12 sc. Fasten off the first leg. Do not fasten off the second.
Body Joining: Ch 3, join to the first leg. Sc around both legs and the chain (30).
Rnds 13 – 22 (Trousers): 30 sc.
Change to Yellow yarn.
Rnds 23 – 34 (Shirt): 30 sc.
Rnd 35: ➡️3 sc, dec⬅️ repeat 6 times (24).
Rnd 36: ➡️2 sc, dec⬅️ repeat 6 times (18). Fasten off.
Martha’s Body & Dress
Dress Base (Purple): Rnd 1: 6 sc in mr. Rnd 2: 6 inc (12). Rnd 3: ➡️sc, inc⬅️ x 6 (18). Rnd 4: ➡️2 sc, inc⬅️ x 6 (24). Rnd 5: ➡️3 sc, inc⬅️ x 6 (30). Rnd 6: ➡️4 sc, inc⬅️ x 6 (36).
Rnds 7 – 25: Work 36 sc in the back loops only to create the ribbed texture of her dress.
Rnd 26: ➡️4 sc, dec⬅️ repeat 6 times (30).
Rnds 27 – 34: 30 sc.
Rnd 35: ➡️3 sc, dec⬅️ repeat 6 times (24).
Rnd 36: ➡️2 sc, dec⬅️ repeat 6 times (18). Fasten off.
Arthur’s Forest Green Cardigan
Row 1: Ch 25. Turn.
Rows 2 – 15: Sc in each ch across, ch 1, turn.
Armholes: Skip 4 stitches on each side during Row 16, ch 4 over the gap, and continue to build the back and front panels for 4 more rows. Fasten off and weave in ends.
Martha’s Dusty Pink Cardigan
Row 1: Ch 25. Turn.
Rows 2 – 18: Hdc in each ch across, ch 1, turn. This creates a softer, draped fabric.
Armholes: Formed identically to Arthur’s cardigan. Finish with a border of sc around the entire perimeter.
Hair & Glasses Details
Arthur’s Hair: Attach small tufts of grey yarn to the sides and back of his head. Comb out the yarn strands to create a fluffy, thinning look.
Martha’s Hair: Create a wig cap of white yarn (sc in rounds up to 48 stitches). Attach long strands of white yarn and sweep them into an elegant updo at the back of her head. Secure with a tapestry needle and matching thread.
Glasses: Using needle-nose pliers, carefully bend the brass craft wire into two small, connected rectangles for Arthur, and two oval shapes for Martha. Leave a straight edge to insert directly into the crocheted faces beside the eyes.
Assembly & Final Touches
Sew the heads onto the respective bodies using the long tail left from round 35.
Attach the noses securely between the eyes, resting just below the center line.
Sew the arms to the sides of the bodies, directly below the final neck round.
Dress Arthur in his green cardigan and Martha in her pink cardigan.
Bend their wire-filled fingers carefully to intertwine and form the shape of a heart.
Tips & FAQs
How do I ensure the wire doesn’t poke through?
Always use a wire with a smooth or looped end. You can wrap the tips of your craft wire in a tiny piece of masking tape before inserting it into the hands to protect your stitches.
Can I change the yarn weight?
Absolutely. Using a thicker yarn will simply result in a larger couple. Ensure you size down your hook appropriately to keep the stitches tight and prevent fiberfill from showing.
A Final Word
You have breathed life into yarn, my friend. This couple stands as a testament to your skill and to the enduring beauty of handmade art. May they bring warmth and joy to whichever home they grace.