Welcome back to the atelier, my dear friend. Today, we bring absolute elegance to life through the gentle art of crochet. May your stitches be joyful and your hands steady as we shape this beautiful lady together.
About This Creation & The Mercerized Secret
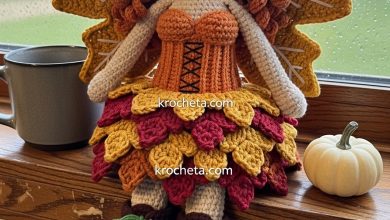
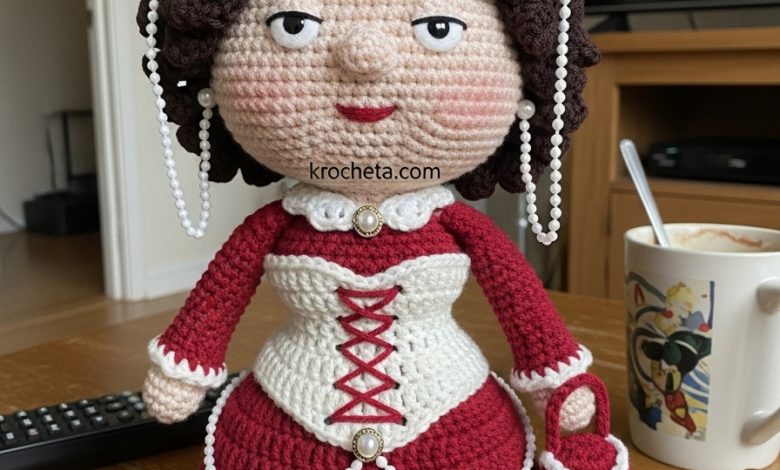
Creating layered, structured doll clothing requires a specific approach to tension and fiber. To achieve the crisp definition of her cream corset and the elegant drape of her crimson gown, we must look beyond standard acrylics. Mercerized cotton is our chosen medium for this project. The treatment process gives the cotton a subtle, pearl-like sheen and removes any fuzz, ensuring every scalloped edge and tiny accessory stands out with absolute clarity. This guide focuses on constructing those exact, high-end textures entirely from yarn, proving that true artistry requires no fabric shortcuts.
Project Snapshot
📊 Difficulty: Advanced Intermediate
⏰ Est. Time: 15–20 hours
📏 Size: Approximately 22 centimeters tall
“Patience is the truest tool in an artisan’s kit; let every stitch be a quiet breath.”
Materials & Tools Needed
🧶 Yarn: Fingering weight mercerized cotton in Crimson Red, Cream, Skin Tone, Dark Brown, White, and Forest Green.
🪡 Hook: 1.75mm crochet hook for tight, gapless stitches.
✨ Other Materials: Premium fiberfill stuffing.
✨ 6mm black safety eyes.
✨ Soft craft wire for internal neck support.
✨ A soft brush and gentle pink blush for her cheeks.
✨ Stitch markers and a tapestry needle.

Abbreviations & Stitches Used
ch: chain
sl st: slip stitch
sc: single crochet
inc: increase (2 single crochets in one stitch)
dec: invisible decrease (single crochet 2 together through front loops)
hdc: half double crochet
dc: double crochet
tr: treble crochet
BLO: back loop only
FLO: front loop only
The Complete Victorian Lady Pattern
The Head
We begin with the defining feature: her sweet, oversized head with beautifully shaped chubby cheeks.
Round 1: Using Skin Tone yarn, 6 sc in a magic ring (6)
Round 2: 6 inc (12)
Round 3: [1 sc, inc] 6 times (18)
Round 4: [2 sc, inc] 6 times (24)
Round 5: [3 sc, inc] 6 times (30)
Round 6: [4 sc, inc] 6 times (36)
Round 7: [5 sc, inc] 6 times (42)
Round 8: [6 sc, inc] 6 times (48)
Rounds 9-17: 48 sc (48)
Round 18: 12 sc, [inc, 1 sc] 6 times to form the first cheek, 12 sc, [1 sc, inc] 6 times to form the second cheek (60)
Rounds 19-23: 60 sc (60)
Artisan’s Note: Pause here. Insert the 6mm safety eyes between rounds 16 and 17, leaving 9 stitches of space between them. They must sit just above the cheek increases to capture that innocent, wide-eyed gaze.
Round 24: 12 sc, [dec, 1 sc] 6 times, 12 sc, [1 sc, dec] 6 times (48)
Round 25: [6 sc, dec] 6 times (42)
Round 26: [5 sc, dec] 6 times (36)
Round 27: [4 sc, dec] 6 times (30)
Round 28: [3 sc, dec] 6 times (24)
Round 29: [2 sc, dec] 6 times (18)
Round 30: [1 sc, dec] 6 times (12)
Fasten off. Stuff the head firmly, paying special attention to padding out those delicate, chubby cheeks.
The Body & Neck
This piece creates a sturdy neck that slopes beautifully into a petite, teardrop-shaped torso.
Round 1: Attach Skin Tone yarn directly to the opening of the head. 12 sc (12)
Rounds 2-4: 12 sc (12)
Artisan’s Note: Take your soft wire, fold the ends so they are not sharp, and insert it through the neck and deep into the head stuffing. This prevents the heavy head from drooping.
Round 5: [1 sc, inc] 6 times (18)
Round 6: [2 sc, inc] 6 times (24)
Round 7: [3 sc, inc] 6 times (30)
Rounds 8-12: 30 sc (30)
Round 13: [4 sc, inc] 6 times (36)
Round 14: [5 sc, inc] 6 times (42)
Rounds 15-20: 42 sc (42)
Round 21: [5 sc, dec] 6 times (36)
Round 22: [4 sc, dec] 6 times (30)
Round 23: [3 sc, dec] 6 times (24)
Round 24: [2 sc, dec] 6 times (18)
Round 25: [1 sc, dec] 6 times (12)
Stuff the body firmly around the wire.
Round 26: 6 dec (6)
Fasten off and pull the yarn tail tightly through the remaining front loops to close the base flat.
The Legs
Make two short, stout legs to serve as a solid foundation beneath her grand skirts.
Round 1: Using Cream yarn, 6 sc in a magic ring (6)
Round 2: 6 inc (12)
Round 3: BLO 12 sc (12)
Rounds 4-6: 12 sc (12)
Round 7: Change to Skin Tone yarn. BLO 12 sc (12)
Rounds 8-15: 12 sc (12)
Fasten off, leaving a long tail. Stuff firmly.
The Arms & White Gloves
Make two. Notice the delicate transition from the white glove ruffle to the bare arm.
Round 1: Using White yarn, 5 sc in a magic ring (5)
Round 2: 5 inc (10)
Rounds 3-6: 10 sc (10)
Round 7: FLO [1 sc, ch 2, sl st in the same stitch] in each stitch around to create the ruffled glove cuff. Fasten off the White yarn.
Round 8: Attach Skin Tone yarn to the remaining Back Loops of round 6. 10 sc (10)
Rounds 9-18: 10 sc (10)
Lightly stuff only the bottom half of the arm. Pinch the top opening flat and crochet 4 sc across both layers to close it neatly. Leave a tail for sewing.
The Hair Wig & Ringlets
A tightly fitted cap overflowing with luxurious, bouncy curls.
Round 1: Using Dark Brown yarn, 6 sc in a magic ring (6)
Round 2: 6 inc (12)
Round 3: [1 sc, inc] 6 times (18)
Round 4: [2 sc, inc] 6 times (24)
Round 5: [3 sc, inc] 6 times (30)
Round 6: [4 sc, inc] 6 times (36)
Round 7: [5 sc, inc] 6 times (42)
Round 8: [6 sc, inc] 6 times (48)
Rounds 9-14: 48 sc (48)
Now, we build the cascading ringlets directly onto the cap.
Row 15: [Sl st into the next stitch. Ch 45. Starting in the second chain from your hook, work 44 hdc back down the chain. Sl st into the EXACT SAME stitch on the cap.] Repeat this process for every single stitch around the edge to create a magnificent, dense head of curls.
The Cream Under-Skirt
This piece attaches directly to the body to simulate layered petticoats.
Round 1: Hold the doll upside down. Attach Cream yarn to the exposed front loops of Round 14 on the body. 42 inc (84)
Round 2: [1 dc, dc inc] around (126)
Rounds 3-15: 126 dc (126). The double crochets give the heavy skirt a beautiful drape.
Round 16: [1 dc, ch 2, skip 1 stitch, 1 dc in the next] repeat around to create a lace lattice.
Round 17: Work 3 dc into every single ch-2 space around to create the heavy bottom ruffle. Fasten off.
The Crimson Over-Dress
The grand, bell-shaped outer layer.
Round 1: Attach Crimson Red yarn to the body, one row above the Cream under-skirt. 42 inc (84)
Round 2: [1 dc, dc inc] around (126)
Rounds 3-12: 126 dc (126)
Round 13 (The Scalloped Edge): [Skip 2 stitches, work 7 tr into the next stitch, skip 2 stitches, sl st into the next stitch] repeat this sequence all the way around. Fasten off.
The Puffed Sleeves
Work these directly onto the top of the arms before attaching them to the body.
Round 1: Attach Crimson Red yarn near the closed top of the arm. 8 inc (16)
Rounds 2-4: 16 sc (16)
Round 5: 8 dec (8). Fasten off and weave in the ends.
The Corset
A separate, structured piece that pulls the entire aesthetic together.
Row 1: Using Cream yarn, ch 25. Starting in the second chain from the hook, 24 sc. Ch 1, turn. (24)
Rows 2-8: 24 sc. Ch 1, turn. (24)
Fasten off. We will lace this onto the body during assembly.
The Crimson Hat
A wide-brimmed beauty of high society.
Round 1: Using Crimson Red yarn, 6 sc in a magic ring (6)
Round 2: 6 inc (12)
Round 3: [1 sc, inc] 6 times (18)
Round 4: [2 sc, inc] 6 times (24)
Rounds 5-7: 24 sc (24)
Round 8: FLO [1 sc, inc] around (36)
Round 9: [2 sc, inc] around (48)
Round 10: [3 sc, inc] around (60). Fasten off cleanly.
The Roses (Make 3): Using Crimson Red yarn, ch 11. Work 2 sc in each chain across. The piece will naturally spiral. Roll it tightly into a rose shape and secure it with a stitch. Sew all three to the front of the hat brim. Add tiny Forest Green leaves (ch 4, sl st back down) beneath the roses.
The White Flourish: Using White yarn, ch 15. Sl st in the first 2 chains, sc in the next 3, hdc in the next 4, sc in the next 3, sl st in the last 2. Sew this curved piece beside the roses to mimic a soft feather.
The Handbag
A tiny structured purse for her stroll.
Round 1: Using Cream yarn, ch 8. 6 sc along the chain, 3 sc in the last chain. Turn the piece to work down the opposite side of the chain. 5 sc, 2 sc in the last space (16)
Rounds 2-5: 16 sc (16)
The Flap: Work back and forth on only the first 8 stitches for 4 rows. Add a tiny Crimson Red french knot to the center for the clasp.
The Handle: Ch 15, attaching the ends to either side of the bag.
The Pearl Accessories
Crocheted elegance to replace plastic beads.
The Necklace: Using White yarn, ch 22 tightly. Sl st in the first chain to form a ring.
The Gown Draping: Using White yarn, ch 30. We will drape this across the front of the dress during assembly.
Assembly & Final Touches
➡️ Position the legs at the flat base of the body and sew them securely in place. They should bear the weight evenly.
➡️ Sew the arms to the sides of the torso, placing them just beneath the neck shaping.
➡️ Place the wig cap onto the head. Sew the edges down securely, taking time to arrange the heavy ringlets gracefully over her shoulders.
➡️ Wrap the cream corset tightly around her waist. Thread a tapestry needle with Crimson Red yarn and lace it up the front in a criss-cross pattern, tying a tiny bow at the bottom.
➡️ Slip the white crocheted necklace over her head.
➡️ Sew the ends of the white draped chain to the sides of her crimson skirt.
➡️ Position the hat at a slight, charming angle and secure it to the wig cap with a few hidden stitches.
➡️ Place her tiny handbag over her wrist.
➡️ Using your soft brush, apply a gentle dusting of pink blush directly onto the pronounced slopes of her crocheted cheeks.
Tips & FAQs
My over-dress feels too stiff and stands out too far. What happened? Check your tension. If you crochet incredibly tightly, double crochets can become rigid. Try going up half a hook size for the skirt sections only, allowing the fabric to drape naturally over the under-skirt.
How do I ensure the hat brim stays flat and doesn’t curl? The mercerized cotton usually provides excellent structure. However, if your brim curls, you can lightly mist it with water and press it flat between two heavy books overnight to block the shape.
A Final Word
You have brought something truly magnificent into the world today. Look closely at the layers, the curls, the character you have sculpted from simple strands of thread. Your patience has yielded a masterpiece of elegance.