Greetings, my fellow maker. Our shared vision of a true earth-bound beauty is ready to take form beneath your hands. Let us transform humble yarn into a living, breathing testament of artisan skill.
About This Creation
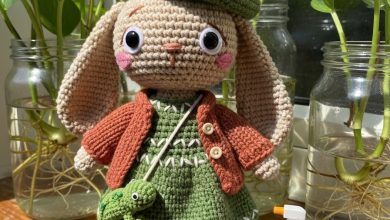
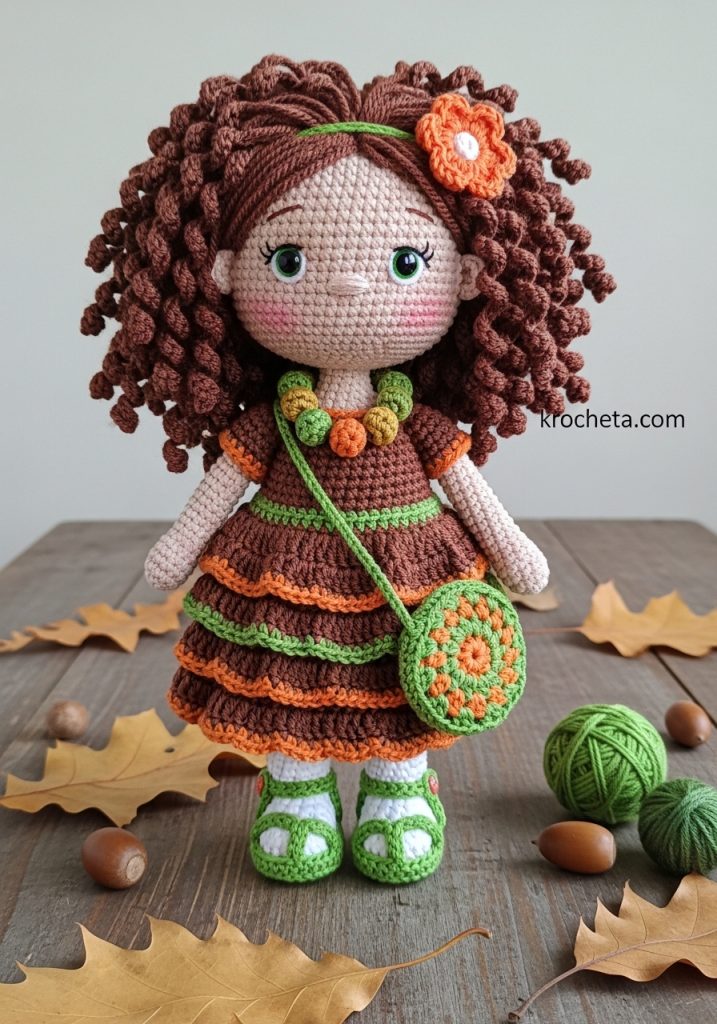
Willow is an homage to the grounding energy of nature, capturing the essence of a tranquil forest spirit. We are pushing the boundaries of amigurumi by replacing common hard accessories with pure, textured crochet work. Every tiny bobble on her necklace and every layered ruffle on her dress is built stitch by stitch. This guide explores advanced layering techniques and structural shaping to give her lifelike posture and enduring charm.
Project Snapshot
📊 Difficulty: Intermediate to Advanced
⏰ Est. Time: 18–22 Hours
📏 Size: Approximately 14cm tall
“Patience is the truest magic a maker possesses. Let your hands move with intention, and her soul will emerge.”
Materials & Tools Needed
🧶 Yarn: Fingering weight cotton (Scheepjes Catona or similar). Colors: Soft Beige (Skin), Chocolate Brown (Hair), Earthy Brown (Dress base), Rust Orange (Accents), Moss Green (Accents), Sunflower Yellow (Accents).
🪡 Hook: 2.0mm for a tight, gapless fabric.
✨ Other Materials: 6mm safety eyes (placed wide apart), soft polyester fiberfill, yarn needle for assembly, stitch markers, embroidery thread for delicate facial features.
Abbreviations & Stitches Used
ch: chain
sl st: slip stitch
sc: single crochet
inc: increase (2 sc in next stitch)
dec: invisible decrease (sc 2 together)
hdc: half double crochet
dc: double crochet
tr: treble crochet
BLO: back loop only
FLO: front loop only
bobble: 4-dc cluster stitch
The Complete Willow Pattern
The Head
Rnd 1: 6 sc in a magic ring (6)
Rnd 2: 6 inc (12)
Rnd 3: [1 sc, inc] 6 times (18)
Rnd 4: [2 sc, inc] 6 times (24)
Rnd 5: [3 sc, inc] 6 times (30)
Rnd 6: [4 sc, inc] 6 times (36)
Rnd 7: [5 sc, inc] 6 times (42)
Rnd 8: [6 sc, inc] 6 times (48)
Rnds 9-18: 1 sc in each st around (48)
Rnd 19 (Cheek Shaping): 14 sc, [inc, 1 sc] 4 times, 4 sc, [1 sc, inc] 4 times, 14 sc (56)
Rnds 20-25: 1 sc in each st around (56)
Artisan’s Note: Place the 6mm safety eyes between rounds 18 and 19, leaving exactly 11 visible stitches between them. This low, wide placement is the secret to her gentle, innocent gaze.
Rnd 26: 14 sc, [dec, 1 sc] 4 times, 4 sc, [1 sc, dec] 4 times, 14 sc (48)
Rnd 27: [6 sc, dec] 6 times (42)
Rnd 28: [5 sc, dec] 6 times (36)
Rnd 29: [4 sc, dec] 6 times (30)
Rnd 30: [3 sc, dec] 6 times (24)
Rnd 31: [2 sc, dec] 6 times (18)
Rnd 32: [1 sc, dec] 6 times (12)
Rnd 33: [4 sc, dec] 2 times (10)
Fasten off. Stuff the head firmly, paying special attention to padding out those lower cheeks.
The Legs (Make 2)
Rnd 1: With Soft Beige, 6 sc in a magic ring (6)
Rnd 2: 6 inc (12)
Rnds 3-5: 1 sc in each st around (12)
Rnd 6 (Ankle Shaping): 3 dec, 6 sc (9)
Rnd 7: 3 inc, 6 sc (12)
Rnds 8-15: 1 sc in each st around (12)
Rnd 16 (Knee Shaping): 4 sc, 2 inc, 6 sc (14)
Rnd 17: 4 sc, 2 dec, 6 sc (12)
Rnds 18-24: 1 sc in each st around (12)
Fasten off the first leg. Do not fasten off the second leg; we will continue directly to the body.
The Body
Rnd 25: Ch 3 from the second leg, join to the first leg with a sc. Sc in remaining 11 sts of first leg, 3 sc along the chain, 12 sc around second leg, 3 sc along the opposite side of the chain (30)
Rnd 26: [4 sc, inc] 6 times (36)
Rnd 27: [5 sc, inc] 6 times (42)
Rnds 28-32: 1 sc in each st around (42)
Rnd 33: [5 sc, dec] 6 times (36)
Rnds 34-38: 1 sc in each st around (36)
Rnd 39 (Waist Shaping): [4 sc, dec] 6 times (30)
Rnds 40-44: 1 sc in each st around (30)
Rnd 45: [3 sc, dec] 6 times (24)
Rnds 46-48: 1 sc in each st around (24)
Rnd 49: [2 sc, dec] 6 times (18)
Rnd 50: 1 sc in each st around (18)
Rnd 51 (Shoulder Slopes): [1 sc, dec] 6 times (12)
Rnd 52: [4 sc, dec] 2 times (10)
Rnds 53-54 (Neck): 1 sc in each st around (10)
Fasten off, leaving a long tail for sewing. Stuff the body firmly, emphasizing the soft belly curve and ensuring the neck is packed tightly to support the heavy hair.
The Arms (Make 2)
Rnd 1: With Soft Beige, 5 sc in a magic ring (5)
Rnd 2: 5 inc (10)
Rnds 3-4: 1 sc in each st around (10)
Rnd 5: 1 bobble st (thumb), 9 sc (10)
Rnd 6: [dec, 3 sc] 2 times (8)
Rnds 7-14: 1 sc in each st around (8)
Rnd 15 (Elbow Shaping): 2 inc, 6 sc (10)
Rnd 16: 2 dec, 6 sc (8)
Rnds 17-23: 1 sc in each st around (8)
Fasten off, leaving a tail for sewing. Lightly stuff the hands, leaving the upper arms unstuffed so they lay flat against her sides.
The Hair Cap & Spirals
Rnd 1: With Chocolate Brown, 6 sc in a magic ring (6)
Rnd 2: 6 inc (12)
Rnd 3: [1 sc, inc] 6 times (18)
Rnd 4: [2 sc, inc] 6 times (24)
Rnd 5: [3 sc, inc] 6 times (30)
Rnd 6: [4 sc, inc] 6 times (36)
Rnd 7: [5 sc, inc] 6 times (42)
Rnd 8: [6 sc, inc] 6 times (48)
Rnds 9-16: 1 sc in each st around (48)
Spirals (Make 25): Sl st into the next stitch. Ch 45. Starting in the second ch from hook, [2 sc in one ch, 1 sc in next] all the way back up the chain. Sl st into the next stitch on the cap. Repeat this process around the edge of the cap, and work a few spirals into the inner rounds for intense volume. Fasten off.
The Autumn Bloom
Rnd 1: With Sunflower Yellow, 6 sc in a magic ring (6)
Rnd 2: In FLO with Rust Orange, [sl st, ch 2, 2 dc, ch 2, sl st] in each st around (6 petals). Fasten off.
The Tiered Dress
Rnd 1: With Earthy Brown, ch 25. Sl st to form a ring.
Rnd 2: 25 sc around.
Rnd 3: [4 sc, inc] 5 times (30)
Rnd 4: [4 sc, ch 6, skip 6 sts, 10 sc, ch 6, skip 6 sts, 4 sc]
Rnds 5-8: 1 sc in each st around (30)
Rnd 9 (Skirt Base): In FLO, [2 dc in each st] around (60)
Rnds 10-14: 1 dc in each st around (60)
Rnd 15: Change to Rust Orange. [sc, ch 3, skip 1] around. Fasten off.
Second Tier: Attach Earthy Brown to the unworked BLO of Rnd 9. Ch 2, 1 dc in each st around (30). Next round, 2 dc in each st (60). Complete 5 rounds of dc. Finish with a Moss Green picot border [sc, ch 3, sl st in first ch, skip 1].
Sleeves: Attach Earthy Brown to the armhole. Work 15 sc around. Complete 8 rounds. Finish with a Rust Orange scalloped edge.
The Crocheted Bead Necklace
With Moss Green, ch 10. Switch to Sunflower Yellow, work a 3-dc bobble in the next chain. Switch back to Green, ch 5. Switch to Rust Orange, work a 3-dc bobble. Continue this pattern of chaining and bobbles until the necklace reaches 30 chains in length. Connect the ends with a slip stitch.
The Mandala Satchel
Panels (Make 2): Start with Sunflower Yellow. 8 hdc in a magic ring. Switch to Moss Green. [2 dc in each st] around (16). Switch to Rust Orange. [1 sc, inc] around (24). Fasten off.
Place panels wrong-sides together. With Earthy Brown, sc through both layers around ¾ of the circle to join them. Ch 40 for the strap, attach to the other side of the opening.
The Strappy Sandals (Make 2)
Rnd 1: With Earthy Brown, ch 6. 4 sc, 3 sc in last ch. Work down the other side: 3 sc, 2 sc in last st (12).
Rnd 2: Inc, 3 sc, 3 inc, 3 sc, 2 inc (18).
Rnd 3: Switch to Moss Green. In BLO, 18 sc.
Rnd 4: 18 sc.
Straps: Sl st to the side of the shoe. Ch 8, wrap over the instep, sl st to the opposite side. Work a tiny French knot in Rust Orange on the side.
Assembly & Final Touches
Attach the head to the body, adding extra stuffing to the neck right before closing the gap to prevent wobble.
Sew the arms flat to the sides of the body just below the neck line.
Position the hair cap onto the head. Pin it firmly, ensuring the face framing is completely symmetrical, then sew it securely into place.
Embroider a tiny, straight nose directly centered between the eyes, just one stitch wide. Add a soft blush to her cheeks using a real makeup brush and gentle pastel dust.
Dress Willow in her tiered gown, slip the sandals onto her feet, drape her textured necklace, and cross the mandala satchel over her shoulder. Finally, sew the Autumn Bloom into her rich curls.
Tips & FAQs
How do I prevent the heavy hair from pulling the head backward?
The firm stuffing in the chest and neck is crucial. Ensure your neck decreases are tight. You can also sew the hair cap slightly forward to balance the weight.
Can I brush out the yarn hair?
For Willow, we rely on the dense, crocheted ringlets to build texture. Brushing out these specific spirals will ruin the stitch definition.
My bobbles on the necklace are loose. How do I fix this?
Pull your working yarn firmly after completing each cluster stitch before changing colors. A tight tension is required to make them resemble solid beads.
A Final Word
You have brought something beautiful into the world today. Your dedication to the craft shines through every carefully hooked stitch and deeply textured curl. Keep your tension steady and your heart open to the magic of making.