Welcome back to the atelier, my fellow creators. Today, I am overjoyed to share a true labor of love with you. She is our boho wanderer, a soul of yarn and stuffing, waiting patiently for your hands to bring her to life.
About This Creation & Angle
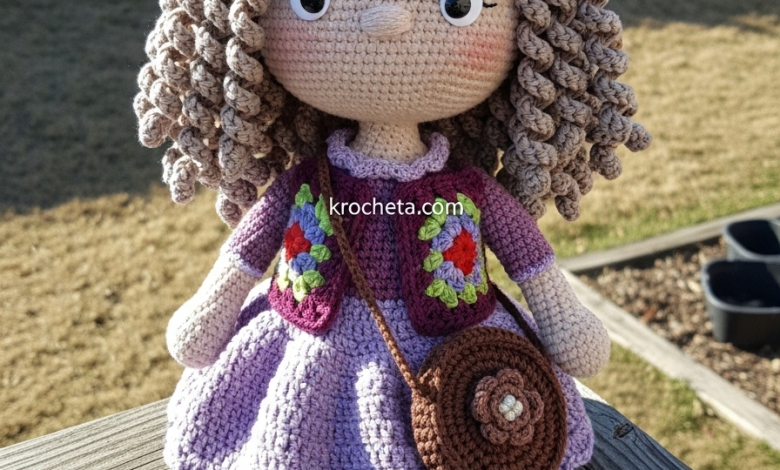
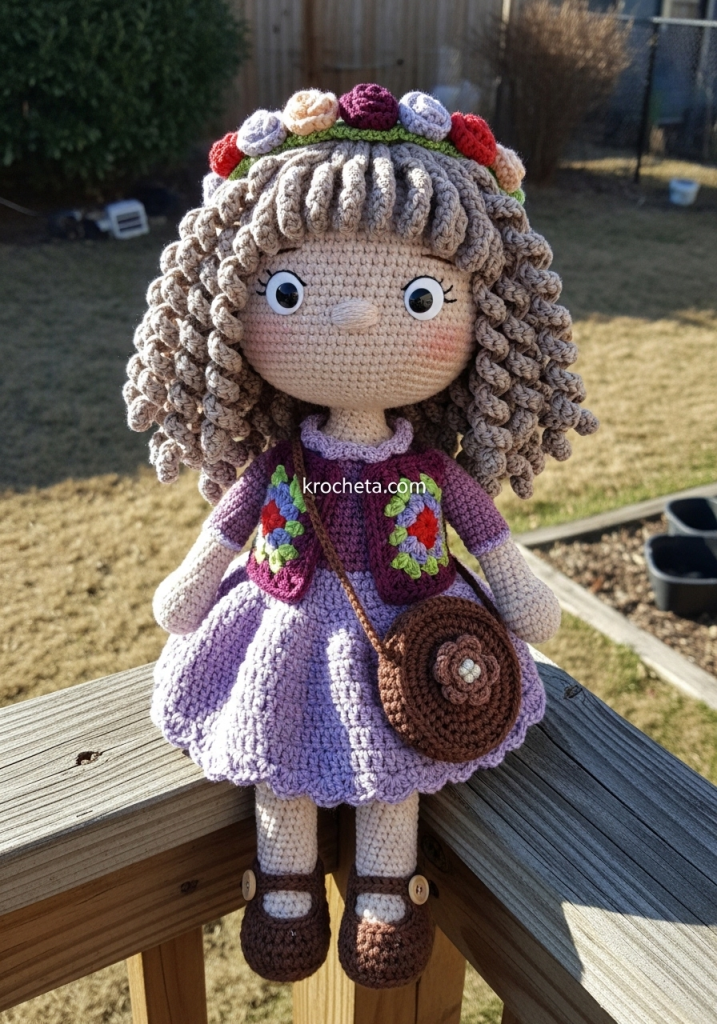
The beauty of a handmade doll lies in the quiet hours spent shaping her form. This project focuses on the fine art of amigurumi structuring. We aim for that precious, rounded innocence—a generously proportioned head paired with a soft, youthful frame. The layered garments, from the flowing scalloped dress to the multi-colored granny motif vest, offer an incredible opportunity to master colorwork and miniature assembly. Let this tutorial be your guide to creating heirloom-quality art that commands attention.
Project Snapshot
📊 Difficulty: Advanced Intermediate
⏰ Est. Time: 18 – 25 hours
📏 Size: Approximately 14 inches tall
“Patience in every stitch ensures a soul in every doll.” – Patricia Poltera
Materials & Tools Needed
🧶 Yarn: Light worsted weight cotton in Taupe (skin), Deep Plum, Light Lavender, Espresso Brown, and assorted colors (mustard, rose, sage) for the vest and flowers
🪡 Hook: 2.25mm for tight, seamless stitches on the doll, 2.5mm for garments
✨ Other Materials: Premium fiberfill stuffing
✨ Other Materials: 8mm safety eyes
✨ Other Materials: Two miniature wooden buttons for the shoes
✨ Other Materials: Yarn needle for assembly
Abbreviations & Stitches Used
ch: chain
sc: single crochet
hdc: half double crochet
dc: double crochet
inc: increase (two stitches in one)
dec: invisible decrease
sl st: slip stitch
BLO: back loop only
FLO: front loop only
The Complete Boho Wanderer Pattern
The Head
Artisan’s Notes: We are shaping a beautifully oversized, rounded head with distinct, chubby cheeks. Stuff firmly as you go to maintain the wide-set structure.
Round 1: 6 sc in a magic ring (6)
Round 2: inc in every st (12)
Round 3: [sc 1, inc] x 6 (18)
Round 4: [sc 2, inc] x 6 (24)
Round 5: [sc 3, inc] x 6 (30)
Round 6: [sc 4, inc] x 6 (36)
Round 7: [sc 5, inc] x 6 (42)
Round 8: [sc 6, inc] x 6 (48)
Round 9: [sc 7, inc] x 6 (54)
Round 10: [sc 8, inc] x 6 (60)
Round 11-19: sc in each st around (60)
Round 20 (Cheek Shaping): sc 15, [inc] x 6, sc 18, [inc] x 6, sc 15 (72)
Round 21-26: sc in each st around (72)
Artisan’s Notes: Insert 8mm safety eyes between rounds 18 and 19, spacing them 12 stitches apart. Ensure they sit low on the face, right above the cheek increases, to capture that gaze of innocence. Embroider a tiny nose spanning two stitches across round 20.
Round 27: [sc 10, dec] x 6 (66)
Round 28: [sc 9, dec] x 6 (60)
Round 29: [sc 8, dec] x 6 (54)
Round 30: [sc 7, dec] x 6 (48)
Round 31: [sc 6, dec] x 6 (42)
Round 32: [sc 5, dec] x 6 (36)
Round 33: [sc 4, dec] x 6 (30)
Round 34: [sc 3, dec] x 6 (24)
Round 35: [sc 2, dec] x 6 (18)
Fasten off, leaving a long tail for sewing.
The Body & Neck
Round 1: 6 sc in a magic ring (6)
Round 2: inc in every st (12)
Round 3: [sc 1, inc] x 6 (18)
Round 4: [sc 2, inc] x 6 (24)
Round 5: [sc 3, inc] x 6 (30)
Round 6: [sc 4, inc] x 6 (36)
Round 7: [sc 5, inc] x 6 (42)
Round 8-15: sc in each st around (42)
Round 16: [sc 5, dec] x 6 (36)
Round 17-20: sc in each st around (36)
Round 21: [sc 4, dec] x 6 (30)
Round 22-25: sc in each st around (30)
Round 26: [sc 3, dec] x 6 (24)
Round 27-29: sc in each st around (24)
Round 30: [sc 2, dec] x 6 (18)
Round 31-35 (The Neck): sc in each st around (18).
Fasten off. Stuff the body firmly, paying special attention to the neck core so it holds the large head proudly.
The Arms (Make 2)
Round 1: 6 sc in a magic ring (6)
Round 2: [sc 1, inc] x 3 (9)
Round 3-6: sc in each st around (9)
Round 7 (Elbow Shaping): dec, sc 7 (8)
Round 8: inc, sc 7 (9)
Round 9-24: sc in each st around (9)
Stuff only the bottom half. Press top flat and sc across to close. Fasten off.
The Legs (Make 2)
Round 1: 6 sc in a magic ring (6)
Round 2: inc in every st (12)
Round 3: [sc 1, inc] x 6 (18)
Round 4-8: sc in each st around (18)
Round 9 (Knee Shaping): dec x 2, sc 14 (16)
Round 10: inc x 2, sc 14 (18)
Round 11-25: sc in each st around (18)
Stuff firmly. Fasten off.
Hair Cap & Corkscrew Curls
Round 1-10: Repeat Rounds 1-10 of the Head pattern using taupe yarn to create the cap.
Round 11: sc in each st around (60)
The Curls: ch 45. sc in second ch from hook. inc in each remaining ch down the strand. sl st into the next sc on the cap. Repeat from * to * in every single stitch of Round 11, then work in spiraling rows upwards into the cap to create dense, heavy volume.
The Lavender Dress
Round 1: ch 31, turn.
Round 2: sc in second ch from hook and across (30)
Round 3: [sc 4, inc] x 6 (36)
Round 4 (Armholes): sc 6, ch 6, skip 6, sc 12, ch 6, skip 6, sc 6 (36)
Round 5-12: sc in each st around, join to work in the round (36)
Round 13: [dc 1, inc] around (54)
Round 14-22: dc in each st around (54)
Round 23 (Scallop Hem): skip 2 st, 5 dc in next st, skip 2 st, sl st in next. Repeat around. Fasten off.
The Granny Square Vest
Make 14 miniature granny squares using scrap boho colors for the center and deep plum for the outer round. Each square is exactly two rounds of traditional granny clusters.
Whipstitch the squares together: a block of 3×3 for the back, two front panels of 1×3, leaving the top outer edges unsewn for armholes. Add a row of single crochet around the entire neckline and front opening in deep plum.
The Crossbody Satchel
Round 1: Using espresso brown, 6 sc in magic ring (6)
Round 2: inc in every st (12)
Round 3: [sc 1, inc] x 6 (18)
Round 4: [sc 2, inc] x 6 (24)
Round 5: [sc 3, inc] x 6 (30)
Make two circles. Join them by sc 20 stitches together around the edge. Ch 60 for the strap and attach to the opposite side.
Mocha Flower Appliqué: In a magic ring with lighter brown, [ch 3, 2 dc, ch 3, sl st] x 5. Sew to the center of the bag.
The Textured Mary Jane Shoes (Make 2)
Artisan’s Notes: The charm of these shoes lies in the heavily textured, undeniable crochet finish. We will utilize back loops and front post stitches to create a thick, visible woven sole and upper.
Round 1: Using espresso brown, ch 7. sc in second ch from hook, sc 4, 3 sc in last ch. Work down opposite side: sc 4, 2 sc in last ch (14)
Round 2: inc, sc 4, inc x 3, sc 4, inc x 2 (20)
Round 3: inc x 2, sc 5, inc x 4, sc 5, inc x 4 (30)
Round 4: Working in BLO (Back Loop Only) to create a sharp, distinct sole ridge, sc in each st around (30)
Round 5: Working in FLO (Front Loop Only) for intense texture, sc in each st around (30)
Round 6-7: Switch to lighter earthy brown. sc in each st around (30)
Round 8: sc 10, dec x 5, sc 10 (25)
Round 9: sc 8, dec x 4, sc 9 (21)
Round 10 (The Strap): sc 5, ch 8, skip 10, sc 6.
Fasten off. Sew the tiny wooden button to the side opposite the strap attachment.
The Flower Crown
Using deep reds, pinks, and oranges, crochet 8 tiny roses: ch 11, 2 sc in second ch from hook and each ch across. Roll tightly and sew the base. Attach directly to the hairline of the corkscrew curls.
Assembly & Final Touches
➡️ Position the neck deeply into the head cavity. Sew securely, checking balance after every five stitches.
➡️ Sew legs to the base of the body, sitting slightly forward so she can rest on a shelf.
➡️ Attach arms perfectly parallel to the body, just below the neck seam.
➡️ Dress the doll in the lavender gown, slip on the granny vest, drape the satchel across her shoulder, and fit the textured Mary Janes onto her feet.
Tips & FAQs
➡️ How do I prevent the heavy hair from pulling the head backward? Stuff the chest cavity incredibly firm. When sewing the head to the body, tilt the chin downwards just a fraction of an inch before securing your final stitches.
➡️ The granny squares are too bulky, what did I do wrong? Ensure you are using a slightly smaller hook for the vest than the doll body, and keep your tension remarkably tight. The squares should measure no more than 1.5 inches across.
A Final Word