
Welcome back to our shared space of creation. Today, we bring to life a creature of pure, touchable joy. Let the yarn guide your hands as we sculpt sweetness into every single stitch.
About This Creation & Angle
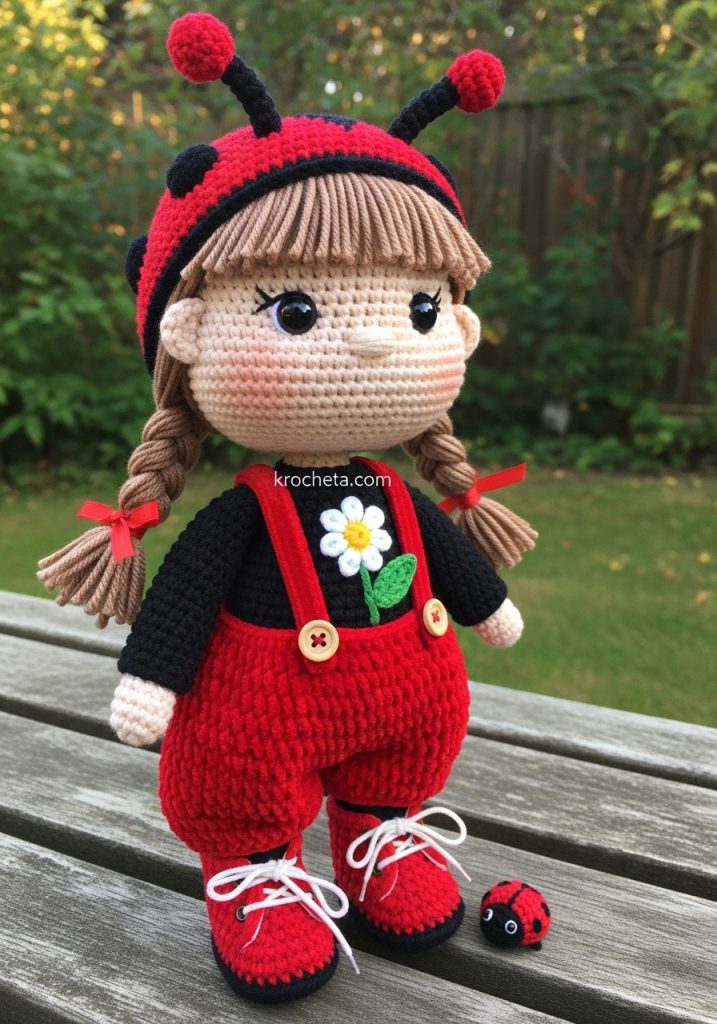
Texture breathes life into handmade art. Lottie is designed to be a tactile experience, combining the firm, structural integrity of classic cotton yarn for her body with the plush, irresistible softness of velvet for her garments. This project elevates standard amigurumi. It teaches you how to mix yarn weights and textures to create a high-end, boutique-quality piece. Her wide-set eyes and perfectly plump cheeks evoke a deep sense of innocence. Every detail, from the bend of her knees to the tiny daisy on her chest, tells a story of careful artisanship.
Project Snapshot
📊 Difficulty: Advanced Artisan
⏰ Est. Time: 15–18 hours
📏 Size: Approximately 26 cm tall
“A doll is not merely crocheted; she is coaxed into existence, one sculpted curve at a time.” – Patricia
Materials & Tools Needed
🧶 Skin Tone Yarn: Fine weight cotton (Beige)
🧶 Hair Yarn: Fine weight cotton (Light Brown)
🧶 Body/Boot Yarn: Fine weight cotton (Black)
🧶 Velvet Yarn: Bulky weight chenille/velvet (Red and Black)
🧶 Appliqué Yarn: Fine weight cotton (Yellow, Green)
🪡 Hooks: 2.0 mm (for skin/cotton) and 3.5 mm (for velvet)
✨ Safety Eyes: 8 mm (Black)
✨ Filling: Premium polyester fiberfill
✨ Embroidery Thread: Pink for blush, Brown for eyebrows
✨ Wire/Pipe Cleaners: For antenna structure
Abbreviations & Stitches Used
➡️ ch: chain
➡️ sc: single crochet
➡️ inc: increase (2 sc in one stitch)
➡️ dec: invisible decrease (sc 2 together)
➡️ hdc: half double crochet
➡️ dc: double crochet
➡️ sl st: slip stitch
➡️ BLO: back loops only
➡️ FLO: front loops only
The Complete Lottie Pattern
The Head
We begin with the core of her character. Take your time with the cheek shaping.
Rnd 1: 6 sc in a magic ring (6)
Rnd 2: 6 inc (12)
Rnd 3: [1 sc, inc] 6 times (18)
Rnd 4: [2 sc, inc] 6 times (24)
Rnd 5: [3 sc, inc] 6 times (30)
Rnd 6: [4 sc, inc] 6 times (36)
Rnd 7: [5 sc, inc] 6 times (42)
Rnd 8: [6 sc, inc] 6 times (48)
Rnd 9: [7 sc, inc] 6 times (54)
Rnds 10–18: 1 sc in each st around (54)
Artisan’s Note: The following rounds build her chubby cheeks.
Rnd 19: 15 sc, [inc, 1 sc] 4 times, 8 sc, [1 sc, inc] 4 times, 15 sc (62)
Rnds 20–24: 1 sc in each st around (62)
Rnd 25: 15 sc, [dec, 1 sc] 4 times, 8 sc, [1 sc, dec] 4 times, 15 sc (54)
Insert 8mm safety eyes between rounds 17 and 18, spacing them 12 stitches apart for that wide-set innocent gaze. Embroider a tiny nose one round below the eyes, centered.
Rnd 26: [7 sc, dec] 6 times (48)
Rnd 27: [6 sc, dec] 6 times (42)
Rnd 28: [5 sc, dec] 6 times (36)
Rnd 29: [4 sc, dec] 6 times (30)
Begin stuffing firmly. Focus the filling on the cheeks to push them outward.
Rnd 30: [3 sc, dec] 6 times (24)
Rnd 31: [2 sc, dec] 6 times (18)
Rnd 32: [1 sc, dec] 6 times (12)
Rnd 33: 1 sc in each st around (12)
Fasten off, leaving a long tail for sewing to the body.
Hair Wig Cap
Using light brown cotton yarn.
Rnds 1–9: Repeat Rnds 1–9 of the Head (54)
Rnds 10–16: 1 sc in each st around (54)
Rnd 17: We will now create the textured bangs. [sl st in next st, ch 4, start in 2nd ch from hook, 3 sc back down the ch] repeat this 12 times along the front edge. Sc in the remaining stitches around the back of the cap. Fasten off.
Artisan’s Note: For the pigtails, cut 30 strands of brown yarn (about 20 cm each). Attach 15 strands to each side of the wig cap using a larks head knot. Braid them tightly and tie with tiny red ribbons.
The Body
Starting with beige cotton yarn from the base, working upwards.
Rnd 1: 6 sc in a magic ring (6)
Rnd 2: 6 inc (12)
Rnd 3: [1 sc, inc] 6 times (18)
Rnd 4: [2 sc, inc] 6 times (24)
Rnd 5: [3 sc, inc] 6 times (30)
Rnd 6: [4 sc, inc] 6 times (36)
Rnd 7: [5 sc, inc] 6 times (42)
Rnds 8–12: 1 sc in each st around (42)
Change to Black cotton yarn for her under-sweater.
Rnd 13: BLO 1 sc in each st around (42)
Rnds 14–16: 1 sc in each st around (42)
Rnd 17: [5 sc, dec] 6 times (36)
Rnds 18–22: 1 sc in each st around (36)
Rnd 23: [4 sc, dec] 6 times (30)
Rnds 24–27: 1 sc in each st around (30)
Rnd 28: [3 sc, dec] 6 times (24)
Rnd 29: [2 sc, dec] 6 times (18)
Change back to Beige yarn for the neck.
Rnd 30: BLO [1 sc, dec] 6 times (12)
Rnds 31–33: 1 sc in each st around (12)
Stuff the body firmly, ensuring a flat base so she can sit independently. Fasten off.
Left & Right Arm (Make 2)
Begin with beige cotton yarn.
Rnd 1: 5 sc in a magic ring (5)
Rnd 2: 5 inc (10)
Rnds 3–4: 1 sc in each st around (10)
Rnd 5: 4-dc bobble stitch in the first st (this creates the thumb), 9 sc (10)
Rnd 6: 1 sc in each st around (10)
Change to Black cotton yarn.
Rnd 7: BLO 1 sc in each st around (10)
Rnds 8–12: 1 sc in each st around (10)
Artisan’s Note: Elbow shaping.
Rnd 13: 4 sl st, 2 sc, 2 inc, 2 sc (12)
Rnd 14: 1 sc in each st around (12)
Rnd 15: 4 sl st, 2 sc, 2 dec, 2 sc (10)
Rnds 16–24: 1 sc in each st around (10)
Stuff the bottom half firmly. Leave the top half unstuffed so the arms lie flat against the body. Pinch the top flat and crochet 5 sc through both layers to close. Leave a tail for sewing.
Left & Right Leg (Make 2)
Begin with black yarn for the shoe base.
Rnd 1: ch 6, start in 2nd ch from hook: 4 sc, 3 sc in last ch, turn and work down the other side of the chain: 3 sc, inc (12)
Rnd 2: inc, 3 sc, 3 inc, 3 sc, 2 inc (18)
Rnd 3: 1 sc, inc, 3 sc, [1 sc, inc] 3 times, 3 sc, [1 sc, inc] 2 times (24)
Rnd 4: BLO 1 sc in each st around (24)
Rnd 5: 1 sc in each st around (24)
Rnd 6: 6 sc, 6 dec, 6 sc (18)
Rnd 7: 5 sc, 4 dec, 5 sc (14)
Change to Beige yarn for the leg.
Rnd 8: BLO 1 sc in each st around (14)
Rnds 9–14: 1 sc in each st around (14)
Artisan’s Note: Knee shaping.
Rnd 15: 4 sl st, 3 sc, 3 inc, 4 sc (17)
Rnd 16: 1 sc in each st around (17)
Rnd 17: 4 sl st, 3 sc, 3 dec, 4 sc (14)
Rnds 18–26: 1 sc in each st around (14)
Stuff the foot and calf firmly. Lightly stuff the thigh. Pinch top flat and crochet 7 sc across to close. Leave tail for sewing.
Velvet Ladybug Hat
Switch to your 3.5mm hook and Black velvet yarn. Keep tension loose.
Rnd 1: 6 sc in a magic ring (6)
Rnd 2: 6 inc (12)
Rnd 3: [1 sc, inc] 6 times (18)
Rnd 4: [2 sc, inc] 6 times (24)
Rnd 5: [3 sc, inc] 6 times (30)
Rnd 6: [4 sc, inc] 6 times (36)
Rnds 7–11: 1 sc in each st around (36)
Change to Red velvet yarn for the trim.
Rnd 12: 1 hdc in each st around (36). Fasten off and weave in ends.
Antennae (Make 2 in black velvet): ch 8. Sl st in 2nd ch from hook, 6 sc back down the chain. Fasten off and sew to the top of the hat. Insert half a pipe cleaner into each for posing.
Velvet Overalls
Using 3.5mm hook and Red velvet yarn. We construct this from the legs up.
Trouser Leg 1:
Rnd 1: ch 16, join to first ch with sl st. (16)
Rnds 2–8: 1 sc in each st around (16). Fasten off.
Trouser Leg 2:
Repeat Rnds 1–8, but do not fasten off.
Joining the legs:
Rnd 9: ch 2, join to Leg 1. 16 sc around Leg 1, 2 sc in the chs, 16 sc around Leg 2, 2 sc in the opposite side of chs. (36)
Rnds 10–14: 1 sc in each st around (36)
Rnd 15: [4 sc, dec] 6 times (30)
Rnds 16–17: 1 sc in each st around (30)
Change to Black velvet yarn for the upper trim.
Rnd 18: 1 sc in each st around (30). Fasten off.
Suspenders (Make 2 in red velvet): ch 20. Sl st in 2nd ch and across. Fasten off. Sew to the front and back of the overalls. Attach two tiny wooden buttons to the front.
Chest Appliqués
Yellow Daisy (Fine cotton, 2.0mm hook):
In a magic ring with yellow: ch 2, 10 dc. Sl st to close. Fasten off. Use brown thread to embroider french knots in the center.
Green Leaf (Fine cotton, 2.0mm hook):
ch 6. In 2nd ch from hook: sl st, sc, hdc, dc, 3 dc in last ch. Turn to work down the other side: dc, hdc, sc, sl st. Fasten off.
Lace-Up Boots
Using Red cotton yarn and a 2.0mm hook.
Rnds 1–5: Follow Rnds 1–5 of the Leg pattern (24)
Rnd 6: 6 sc, 6 dec, 6 sc (18)
Rnd 7: 6 sc, 3 dec, 6 sc (15)
Rnds 8–10: 1 sc in each st around (15)
Change to Black cotton for the cuff.
Rnd 11: BLO 1 hdc in each st around (15). Fasten off. Use a strand of black yarn to lace back and forth over the front of the boot, tying a small bow at the top.
Tiny Ladybug Companion
Using Red cotton and 2.0mm hook.
Rnd 1: 6 sc in a magic ring (6)
Rnd 2: 6 inc (12)
Rnd 3: [3 sc, inc] 3 times (15)
Rnds 4–6: 1 sc in each st around (15)
Change to Black cotton.
Rnd 7: [1 sc, dec] 5 times (10)
Stuff lightly.
Rnd 8: 5 dec (5). Fasten off and sew closed. Use black yarn to embroider a line down the back and French knots for spots.
Assembly & Final Touches
➡️ Sew the head to the body securely, ensuring the neck is straight.
➡️ Attach the wig cap to the head, aligning the bangs just above the eyebrows. Sew it firmly around the edges.
➡️ Sew the arms to the sides of the body, just below the neck seam. Ensure the thumbs face forward.
➡️ Attach the legs to the bottom of the body. You want her in a permanent sitting position, so sew them slightly forward on the base.
➡️ Dress her in the velvet overalls. Sew the suspenders in place.
➡️ Attach the yellow daisy and green leaf appliqué to the chest of the overalls using a needle and matching thread.
➡️ Slip her boots onto her feet.
➡️ Place her hat on her head, adjusting the antennae to look alert.
Tips & FAQs
➡️ Working with Velvet: Velvet yarn sheds when cut. Burn the very tip of your cut ends with a lighter (carefully!) to seal them, preventing “worming” as you sew.
➡️ Cheek Plumping: If her face looks too flat after stuffing, use a long needle to weave a strand of yarn from the back of the neck into the cheek, catching a bit of stuffing, and pull gently to shape.
➡️ Tension: Keep your tension very tight for the cotton skin, but relax your hands slightly when working the velvet clothing. This ensures the clothes fit over her body beautifully.
A Final Word
Your artisan journey is complete. You have transformed simple threads into a creature possessing true soul and character. May Lottie sit proudly in your home, a testament to your patience and skill.

