
My dearest creator, there is something truly magical about bringing a story to life through yarn. Today, we craft a brave little pilot and his trusted flying machine, a project designed to capture the sweet innocence of childhood adventures. Let your hook fly true, and let us create an heirloom to cherish.
About This Creation & Angle
The true beauty of amigurumi lies in the materials we choose. For this project, selecting the best yarn for amigurumi—a sturdy, matte cotton—elevates a simple toy into a timeless keepsake. The muted palette of sage green and mustard yellow sings of vintage nostalgia, while the soft, rounded features of our little pilot evoke a gentle, undeniable charm. This is not merely a project; it is an exercise in creating character and warmth through tension and texture.
Project Snapshot:
📊 Difficulty: Intermediate to Advanced
⏰ Est. Time: 12 to 15 Hours
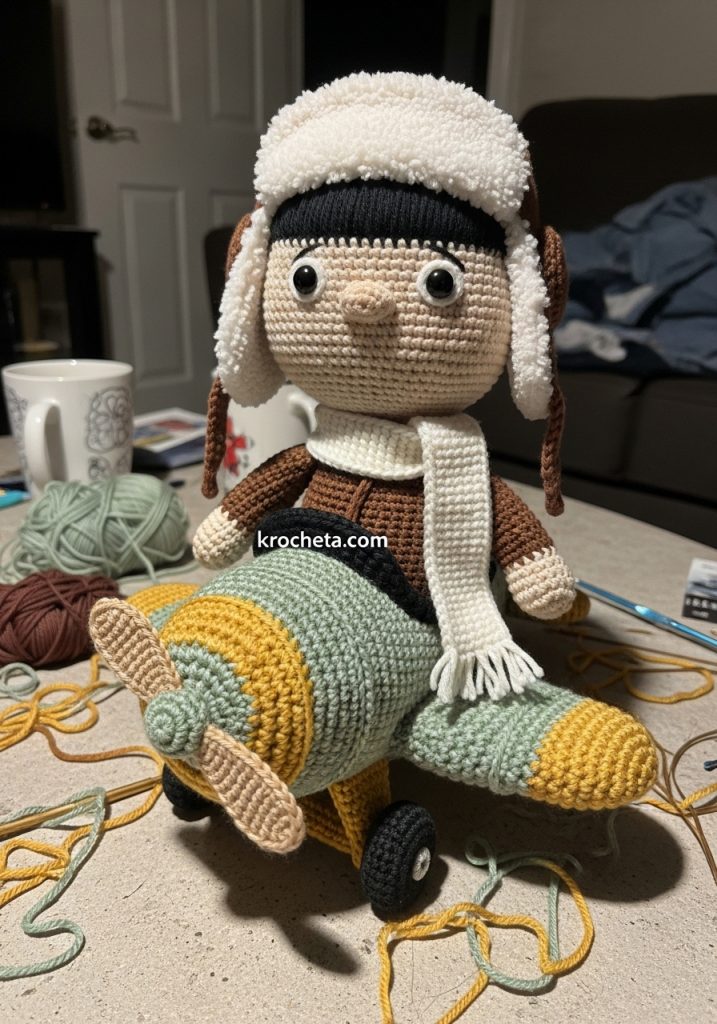
📏 Size: The aviator is roughly 14cm tall, while his airplane measures 18cm from nose to tail.
“Patience is the truest tool in your artisan’s kit.” – Patricia Poltera
Materials & Tools Needed
🧶 Yarn: Fine sport weight cotton yarn in Skin Tone, Brown, Black, Cream, Sage Green, Mustard Yellow, and Light Tan.
🪡 Hook: 2.25mm crochet hook
✨ Other Materials: 8mm safety eyes, soft polyester fiberfill stuffing, a tapestry needle, stitch markers, and soft craft wire for wing stability.
Abbreviations & Stitches Used
➡️ ch: chain
➡️ sl st: slip stitch
➡️ sc: single crochet
➡️ inc: single crochet increase
➡️ dec: invisible single crochet decrease
➡️ hdc: half double crochet
➡️ BLO: back loops only
➡️ FLO: front loops only
The Complete Vintage Aviator Pattern
The Head
(Use Skin tone yarn)
Round 1: 6 sc in magic ring (6)
Round 2: inc in each st around (12)
Round 3: [1 sc, inc] 6 times (18)
Round 4: [2 sc, inc] 6 times (24)
Round 5: [3 sc, inc] 6 times (30)
Round 6: [4 sc, inc] 6 times (36)
Round 7: [5 sc, inc] 6 times (42)
Round 8: [6 sc, inc] 6 times (48)
Round 9: [7 sc, inc] 6 times (54)
Round 10 to 18: sc in each st around (54) – 9 rounds
Round 19: [8 sc, inc] 6 times (60)
Round 20 to 23: sc in each st around (60) – 4 rounds. Artisan’s Note: Place safety eyes between rounds 17 and 18, exactly 11 stitches apart. Notice how low they sit to emphasize that sweet, youthful gaze.
Round 24: [8 sc, dec] 6 times (54)
Round 25: [7 sc, dec] 6 times (48)
Round 26: [6 sc, dec] 6 times (42)
Round 27: [5 sc, dec] 6 times (36)
Round 28: [4 sc, dec] 6 times (30)
Round 29: [3 sc, dec] 6 times (24)
Round 30: [2 sc, dec] 6 times (18)
Stuff the head firmly, paying special attention to pushing fiberfill into the lower cheeks for a rounded, chubby face.
Round 31: [1 sc, dec] 6 times (12)
Round 32: dec 6 times (6)
Fasten off. Leave a long tail for sewing.
The Hair Cap
(Use Black yarn)
Round 1 to 9: Repeat Rounds 1 to 9 of the Head (54)
Round 10 to 16: sc in each st around (54) – 7 rounds
Round 17: [8 sc, inc] 6 times (60)
Round 18 to 20: sc in each st around (60) – 3 rounds
Fasten off. Leave a very long tail for sewing securely to the head.
The Body & Legs
(Start with Brown yarn for the first leg)
Round 1: 6 sc in magic ring (6)
Round 2: inc in each st around (12)
Round 3: [1 sc, inc] 6 times (18)
Round 4: working in BLO, sc in each st around (18)
Round 5 to 8: sc in each st around (18) – 4 rounds
Fasten off the first leg. Make the second leg, but do not fasten off.
Round 9: ch 3 from the second leg, join to the first leg with a sc. sc 17 around the first leg, sc 3 along the chain, sc 18 around the second leg, sc 3 along the opposite side of the chain (42)
Round 10: [6 sc, inc] 6 times (48)
Round 11 to 15: sc in each st around (48) – 5 rounds
Round 16: [6 sc, dec] 6 times (42)
Round 17 to 19: sc in each st around (42) – 3 rounds
Round 20: [5 sc, dec] 6 times (36)
Round 21 to 23: sc in each st around (36) – 3 rounds
Round 24: [4 sc, dec] 6 times (30)
Round 25 to 27: sc in each st around (30) – 3 rounds
Round 28: [3 sc, dec] 6 times (24)
Stuff the body firmly, creating a stout, unified shape to represent his flight suit.
Round 29: sc in each st around (24)
Round 30: [2 sc, dec] 6 times (18)
Round 31: sc in each st around (18)
Fasten off. Leave a strong tail for sewing to the head.
The Arms (Make 2)
(Start with Skin tone yarn)
Round 1: 6 sc in magic ring (6)
Round 2: [2 sc, inc] 2 times (8)
Round 3 to 4: sc in each st around (8) – 2 rounds
Change to Brown yarn.
Round 5: sl st in each st around (8)
Round 6: working in BLO of Round 4, sc in each st around (8)
Round 7 to 18: sc in each st around (8) – 12 rounds
Stuff only the lower half of the arm lightly. Press the top flat and crochet 4 sc across both layers to close. Fasten off, leaving a tail for sewing.
The Aviator Hat
(Use Brown yarn)
Round 1 to 9: Repeat Rounds 1 to 9 of the Head (54)
Round 10 to 18: sc in each st around (54) – 9 rounds
Round 19: [8 sc, inc] 6 times (60)
Round 20 to 22: sc in each st around (60) – 3 rounds
Change to Cream yarn to create the shearling border.
Round 23: ch 2, hdc in each st around, sl st to join (60)
Round 24: ch 1, [sc, ch 2, sc in same stitch] in each st around to create a fluffy texture. Fasten off and weave in ends.
The Scarf
(Use Cream yarn)
Row 1: ch 51
Row 2: hdc in the 2nd ch from hook and in each ch across (50)
Row 3: ch 1, turn, sc in each st across (50)
Fasten off. Weave in all loose ends.
The Fuselage
(Use Sage Green yarn)
Round 1: 6 sc in magic ring (6)
Round 2: inc in each st around (12)
Round 3: [1 sc, inc] 6 times (18)
Round 4: [2 sc, inc] 6 times (24)
Round 5: [3 sc, inc] 6 times (30)
Round 6: [4 sc, inc] 6 times (36)
Round 7: [5 sc, inc] 6 times (42)
Round 8: [6 sc, inc] 6 times (48)
Round 9: [7 sc, inc] 6 times (54)
Round 10: [8 sc, inc] 6 times (60)
Round 11 to 25: sc in each st around (60) – 15 rounds
Round 26: [8 sc, dec] 6 times (54)
Round 27 to 30: sc in each st around (54) – 4 rounds
Round 31: [7 sc, dec] 6 times (48)
Round 32 to 35: sc in each st around (48) – 4 rounds
Round 36: [6 sc, dec] 6 times (42)
Round 37 to 40: sc in each st around (42) – 4 rounds
Round 41: [5 sc, dec] 6 times (36)
Round 42 to 45: sc in each st around (36) – 4 rounds
Stuff the fuselage firmly as you progress, maintaining a smooth, tapered shape.
Round 46: [4 sc, dec] 6 times (30)
Round 47 to 49: sc in each st around (30) – 3 rounds
Round 50: [3 sc, dec] 6 times (24)
Round 51 to 53: sc in each st around (24) – 3 rounds
Round 54: [2 sc, dec] 6 times (18)
Round 55: [1 sc, dec] 6 times (12)
Round 56: dec 6 times (6)
Fasten off and sew the tail completely closed.
The Nose Cone
(Use Mustard Yellow yarn)
Round 1: 6 sc in magic ring (6)
Round 2: inc in each st around (12)
Round 3: [1 sc, inc] 6 times (18)
Round 4: [2 sc, inc] 6 times (24)
Round 5: [3 sc, inc] 6 times (30)
Round 6: [4 sc, inc] 6 times (36)
Round 7: [5 sc, inc] 6 times (42)
Round 8: [6 sc, inc] 6 times (48)
Round 9: [7 sc, inc] 6 times (54)
Round 10: [8 sc, inc] 6 times (60)
Change to Cream yarn.
Round 11 to 12: sc in each st around (60) – 2 rounds
Fasten off. Leave a very long tail. Sew to the flat front (Rounds 1 to 10) of the Fuselage, stuffing lightly before closing.
The Propeller Base & Blades
(Use Light Tan yarn)
Propeller Base:
Round 1: 6 sc in magic ring (6)
Round 2: [1 sc, inc] 3 times (9)
Round 3: sc in each st around (9)
Round 4: [2 sc, inc] 3 times (12)
Round 5: sc in each st around (12)
Fasten off, leave a tail for sewing.
Blades (Make 2):
Round 1: 4 sc in magic ring (4)
Round 2: inc in each st around (8)
Round 3: [1 sc, inc] 4 times (12)
Round 4 to 10: sc in each st around (12) – 7 rounds
Round 11: [1 sc, dec] 4 times (8)
Flatten the top edge and crochet 4 sc across to close. Fasten off. Sew the blades symmetrically to the base, then sew the entire assembly securely to the center of the Nose Cone.
The Main Wings (Make 2)
(Use Sage Green yarn)
Row 1: ch 21
Row 2: sc in the 2nd ch from hook and in each ch across (20)
Row 3 to 12: ch 1, turn, sc in each st across (20) – 10 rows
Change to Mustard Yellow yarn.
Row 13: ch 1, turn, sc evenly around the entire perimeter of the wing, placing 3 sc in the corners to keep them sharp.
Fasten off. Leave a long tail for sewing. Artisan’s Note: Insert soft craft wire for stability before attaching these horizontally to the sides of the fuselage.
The Tail Fin & Horizontal Stabilizers
(Use Sage Green yarn)
Tail Fin (Make 1):
Row 1: ch 11
Row 2: sc in 2nd ch from hook and across (10)
Row 3 to 6: ch 1, turn, sc in each st across (10)
Fasten off.
Horizontal Stabilizers (Make 2):
Row 1: ch 9
Row 2: sc in 2nd ch from hook and across (8)
Row 3 to 5: ch 1, turn, sc in each st across (8)
Fasten off. Sew the two stabilizers flat to the sides of the narrow tail end, and the vertical fin standing straight up between them.
The Cockpit Rim
(Use Mustard Yellow yarn)
Artisan’s Note: To create the cockpit seating, surface crochet an oval shape directly onto the top of the solid sage green fuselage body (around Rounds 20 to 30) to represent the opening for our pilot. For the elevated rim:
Row 1: ch 40 (adjust length to surround your surface oval)
Row 2: sc in 2nd ch from hook and across (39)
Fasten off. Sew this structured strip standing upright around the edge of the cockpit line.
The Wheels (Make 3)
(Use Black yarn)
Round 1: 6 sc in magic ring (6)
Round 2: inc in each st around (12)
Round 3: [1 sc, inc] 6 times (18)
Round 4: working in BLO, sc in each st around (18)
Round 5: sc in each st around (18)
Round 6: working in BLO, [1 sc, dec] 6 times (12)
Stuff lightly.
Round 7: dec 6 times (6)
Fasten off, close hole. Sew two wheels under the main wings for balance and one small wheel under the tail.
Assembly & Final Touches
Position the black hair cap onto the head and sew it securely along the edges. Attach the brown body to the base of the head, ensuring the neck area is well-stuffed to prevent wobbling. Pin the arms to either side of the body just below the neck seam, angling them slightly forward, and stitch them firmly into place. Fit the brown aviator hat over the head; you may leave it removable or tack it down invisibly. Wrap the cream scarf elegantly around his neck. Finally, place your brave little pilot into the cockpit of his vintage airplane, ready for his grand adventure.
Tips & FAQs
Question: How do I achieve the perfect vintage aesthetic?
Answer: Choosing muted, matte cotton yarns over shiny acrylics instantly elevates the piece. The sage green and mustard yellow naturally evoke a nostalgic charm.
Question: My airplane wings are drooping. What should I do?
Answer: Do not panic, my friend. Inserting a piece of soft craft wire or a sturdy pipe cleaner between the layers of the wings before sewing them to the fuselage provides excellent, invisible support.
A Final Word
Every stitch you have placed is a testament to your dedication and skill. Watching this brave aviator take shape is a joyous process, and I am so deeply proud of the work you have done today. May your hands always

