
My dear creator, the time has come to bring sweet Clementine into the light. She is a true labor of love, designed to capture hearts instantly. Let us begin this beautiful journey together.
About This Creation & Angle
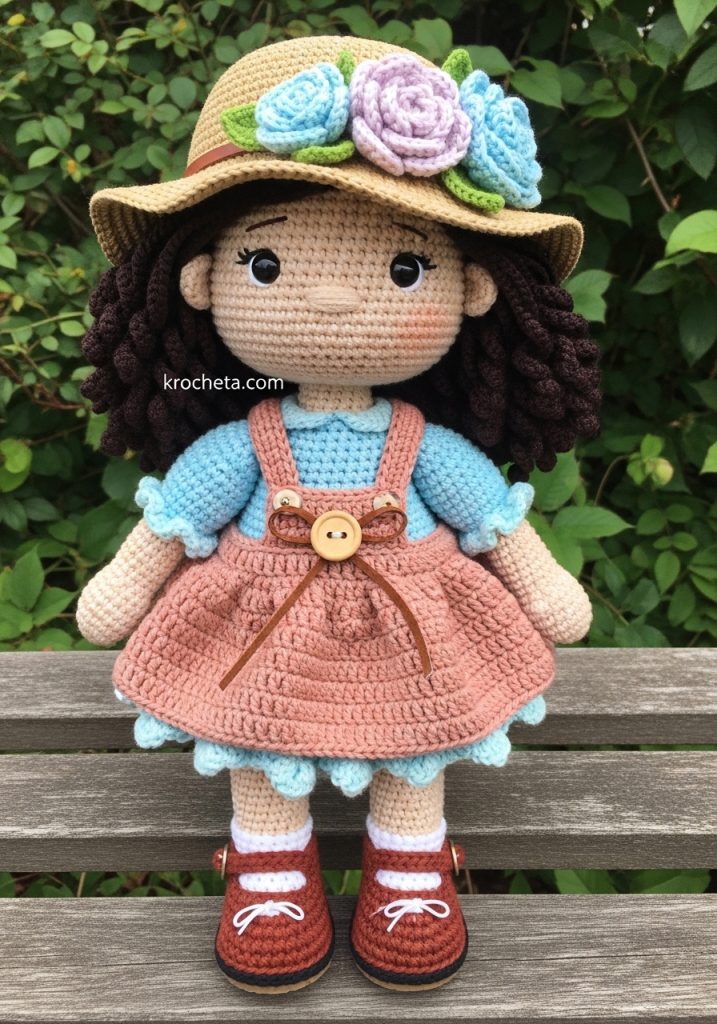
Clementine is not just a doll; she is a story waiting to be told. I designed her with generously spaced eyes and a delightfully oversized head to naturally draw out a feeling of pure adoration. We are creating a masterpiece that begs to be held and photographed. Every ruffle of her sky-blue under-dress and every textured stitch of her dusty peach pinafore adds profound value to your craft. This project is your gateway to mastering layered crochet garments and expressive face sculpting. Your audience will absolutely fall in love with her.
Project Snapshot
📊 Difficulty: Advanced Intermediate
⏰ Est. Time: 12-15 hours
📏 Size: Approximately 11 inches tall
“True beauty lies in the quiet, careful stitches we place one by one.” – Patricia
Materials & Tools Needed
🧶 Yarn: Sport weight cotton (Dusty Peach, Sky Blue, Cream, Deep Terracotta, Dark Brown, Straw)
🪡 Hook: 2.5mm crochet hook
✨ Other Materials: 8mm safety eyes, soft fiberfill stuffing, stitch markers, yarn needle, small wooden button, tiny scrap of faux leather cord, pastel crochet thread for roses
Abbreviations & Stitches Used
➡️ ch: chain
➡️ sl st: slip stitch
➡️ sc: single crochet
➡️ hdc: half double crochet
➡️ dc: double crochet
➡️ inc: increase (2 sc in same stitch)
➡️ dec: invisible decrease (sc 2 together)
➡️ BLO: back loop only
➡️ FLO: front loop only
The Complete Clementine Pattern
Head Artisan’s Note: Stuff the head firmly as you go, paying special attention to the lower cheeks to maintain that precious, wide shape.
Rnd 1: 6 sc in magic ring (6)
Rnd 2: 6 inc (12)
Rnd 3: (1 sc, inc) x 6 (18)
Rnd 4: (2 sc, inc) x 6 (24)
Rnd 5: (3 sc, inc) x 6 (30)
Rnd 6: (4 sc, inc) x 6 (36)
Rnd 7: (5 sc, inc) x 6 (42)
Rnd 8: (6 sc, inc) x 6 (48)
Rnd 9: (7 sc, inc) x 6 (54)
Rnd 10: (8 sc, inc) x 6 (60)
Rnd 11-20: 60 sc (10 rounds)
Rnd 21: (9 sc, inc) x 6 (66)
Rnd 22-26: 66 sc (5 rounds) Artisan’s Note: Insert safety eyes between Rnd 19 and 20, leaving 13 stitches between them. Embroider a tiny nose one round below the center of the eyes.
Rnd 27: (9 sc, dec) x 6 (60)
Rnd 28: (8 sc, dec) x 6 (54)
Rnd 29: (7 sc, dec) x 6 (48)
Rnd 30: (6 sc, dec) x 6 (42)
Rnd 31: (5 sc, dec) x 6 (36)
Rnd 32: (4 sc, dec) x 6 (30)
Rnd 33: (3 sc, dec) x 6 (24)
Rnd 34: (2 sc, dec) x 6 (18)
Rnd 35: (1 sc, dec) x 6 (12) Fasten off, leaving a long tail for sewing.
Hair Artisan’s Note: The wig cap needs to be slightly loose to accommodate the textured curls.
Rnd 1-10: Repeat Rnds 1-10 of the Head pattern using Dark Brown yarn.
Rnd 11-18: 60 sc (8 rounds)
Strands: Ch 35, start in 2nd ch from hook, 34 hdc down the chain, sl st into next st on the cap. Repeat this around the entire edge of the cap to create thick, rolling curls. Fasten off and leave a long tail.
Body Artisan’s Note: The torso should be plump. We want that undeniable baby charm.
Rnd 1: 6 sc in magic ring in Cream yarn (6)
Rnd 2: 6 inc (12)
Rnd 3: (1 sc, inc) x 6 (18)
Rnd 4: (2 sc, inc) x 6 (24)
Rnd 5: (3 sc, inc) x 6 (30)
Rnd 6: (4 sc, inc) x 6 (36)
Rnd 7: (5 sc, inc) x 6 (42)
Rnd 8-15: 42 sc (8 rounds)
Rnd 16: (5 sc, dec) x 6 (36)
Rnd 17-20: 36 sc (4 rounds)
Rnd 21: (4 sc, dec) x 6 (30)
Rnd 22-25: 30 sc (4 rounds)
Rnd 26: (3 sc, dec) x 6 (24)
Rnd 27-28: 24 sc (2 rounds)
Rnd 29: (2 sc, dec) x 6 (18)
Rnd 30: (1 sc, dec) x 6 (12) Fasten off and hide the yarn tail.
Arms (Make 2) Artisan’s Note: We shape the elbows with targeted increases and decreases to give her a natural, gentle bend.
Rnd 1: 6 sc in magic ring in Cream yarn (6)
Rnd 2: (2 sc, inc) x 2 (8)
Rnd 3-5: 8 sc (3 rounds)
Rnd 6: 3 inc, 5 sc (11) – Elbow shaping
Rnd 7: 3 dec, 5 sc (8)
Rnd 8-20: 8 sc (13 rounds) Do not stuff heavily. Pinch the top flat and crochet 4 sc across to close. Fasten off, leaving a tail for sewing.
Legs (Make 2) Artisan’s Note: Notice the subtle knee shaping. This prevents her legs from looking stiff and lifeless.
Rnd 1: 6 sc in magic ring in Cream yarn (6)
Rnd 2: 6 inc (12)
Rnd 3: (1 sc, inc) x 6 (18)
Rnd 4-8: 18 sc (5 rounds)
Rnd 9: 3 dec, 12 sc (15)
Rnd 10: 15 sc
Rnd 11: 3 inc, 12 sc (18) – Knee shaping
Rnd 12-22: 18 sc (11 rounds) Stuff firmly. Fasten off.
Shoes (Make 2) Artisan’s Note: The contrasting sole makes her footwear look authentic.
Rnd 1: With Dark Brown, ch 7, start in 2nd ch from hook. 5 sc, 3 sc in last ch, work down other side, 4 sc, inc (14)
Rnd 2: inc, 4 sc, 3 inc, 4 sc, 2 inc (20)
Rnd 3: Change to Deep Terracotta. In BLO, 20 sc.
Rnd 4-5: 20 sc (2 rounds)
Rnd 6: 6 sc, 4 dec, 6 sc (16)
Strap: Ch 8 across the instep, sl st to opposite side. Fasten off.
Under-Dress & Sleeves Artisan’s Note: Worked from the top down. The sky blue creates a perfect, soft base.
Row 1: With Sky Blue, ch 25, start in 2nd ch from hook, 24 sc. Ch 1, turn.
Row 2: (3 sc, inc) x 6 (30)
Row 3: 4 sc, ch 6 (skip 7 sts), 8 sc, ch 6 (skip 7 sts), 4 sc. (Sleeve holes created)
Row 4-10: sc across.
Row 11: (1 dc, inc dc) repeat across. (Creates ruffle) Fasten off. For sleeves, reattach yarn at armhole, crochet 14 hdc around. Repeat for 6 rounds. Fasten off.
Pinafore Dress Artisan’s Note: This is her signature piece. We use a textured stitch to give the fabric gorgeous depth.
Row 1: With Dusty Peach, ch 31, start in 2nd ch from hook, 30 sc. Ch 1, turn.
Row 2-5: 30 sc (4 rows)
Row 6: Join to work in the round. (1 dc, front post dc) repeat around.
Rnd 7-18: Repeat Rnd 6 to create a textured skirt. Finish with a round of reverse single crochet (crab stitch) along the hem. Fasten off.
Sun Hat Artisan’s Note: A wide brim frames her face perfectly.
Rnd 1-8: With Straw yarn, follow Rnds 1-8 of the Head pattern.
Rnd 9-12: 48 sc (4 rounds)
Rnd 13: In FLO, (3 dc in each st) around to create a dramatic, ruffled brim. Fasten off. Make three small rolled roses in peach and blue crochet thread. Sew them to the hat band.
Assembly & Final Touches
➡️ Position the wig cap on the head and sew securely. Arrange the curls beautifully around her face.
➡️ Attach the arms to the sides of the body at Rnd 29.
➡️ Sew the legs to the base of the body, ensuring she can balance correctly.
➡️ Dress her in the under-dress, then the pinafore.
➡️ Sew the wooden button to the pinafore skirt and tie the faux leather cord through it.
➡️ Slip her tiny Mary Jane shoes onto her feet.
➡️ Gently place the sun hat atop her curls. Add a tiny blush of pink powder to her cheeks.
Tips & FAQs
Q: My doll’s head is flopping. How do I fix this? A: You must stuff the neck area incredibly tight. You can also insert a rolled piece of stiff felt or a plastic crafting tube down through the neck into the body for structural support.
Q: The pinafore looks too stiff. A: Make sure you are using a soft sport-weight cotton and check your tension. If you crochet very tightly, go up half a hook size just for the dress.
A Final Word
You have crafted something truly spectacular. Clementine carries your artistic spirit in every stitch. I am so deeply proud of the work you have done today. Share her proudly, and watch the world fall in love.

