Create your own adorable Oliver and Hazel dolls with this premium amigurumi crochet pattern. A comprehensive step-by-step tutorial for passionate makers.
Welcome back to the workbench, my fellow creator. Today, we bring life to Oliver and Hazel, two souls bound by the innocence of youth. Prepare your hooks and let your hands work their magic.
About This Creation
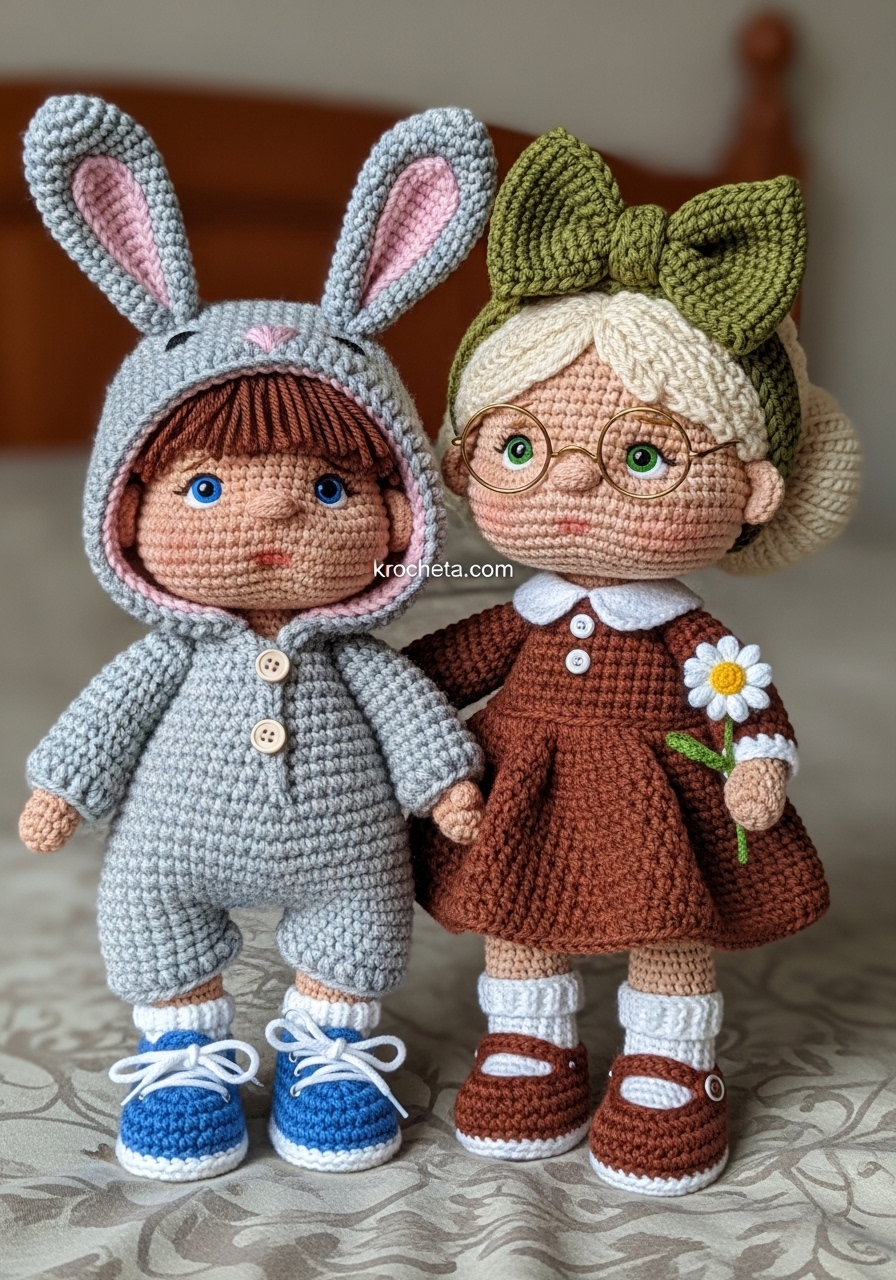
There is a profound joy in sculpting character from simple yarn. Oliver and Hazel represent the quiet, sturdy friendships of childhood. We are focusing on soft, rounded forms. Notice the low, wide-set eyes and the gentle, chubby cheeks. These specific proportions trigger our instinct to nurture. Every stitch is an act of care. Whether you are crafting these for a loved one or adding them to your own collection, this project is an investment of your heart.
Project Snapshot
📊 Difficulty: Intermediate to Advanced
⏰ Est. Time: 15 Hours per companion
📏 Size: These companions stand at a charming 14cm, a perfect size for small hands or sitting upon a favorite bookshelf.
“Patience is the truest fiber in any artisan’s stash.”
Materials & Tools Needed
🧶 Yarn: Sport Weight cotton-acrylic blend. You will need Beige for skin, Heather Grey for the onesie, Rich Brown for the dress, Olive Green for the headband, White for socks and accents, Denim Blue, and Brick Red for the shoes.
🪡 Hook: 2.0mm, or the appropriate size to achieve a dense, gapless fabric.
✨ Other Materials: High-quality polyester fiberfill.
✨ 6mm black safety eyes.
✨ Black and pink embroidery thread for facial details.
✨ Thin craft wire for Hazel’s glasses.
✨ Three tiny white buttons for Oliver’s suit.

Abbreviations & Stitches Used
➡️ ch: chain
➡️ sl st: slip stitch
➡️ sc: single crochet
➡️ hdc: half double crochet
➡️ dc: double crochet
➡️ inc: increase (two single crochets in one stitch)
➡️ dec: invisible decrease (pull up a loop through the front loops of the next two stitches)
The Complete Oliver and Hazel Pattern
The Artisan’s Canvas: Head (Make 2)
We begin with the mind and the face. Work in continuous spirals. Stuff firmly as you progress, paying special attention to the cheeks.
Round 1: 6 sc in a magic ring (6)
Round 2: 6 inc (12)
Round 3: [1 sc, 1 inc] 6 times (18)
Round 4: [2 sc, 1 inc] 6 times (24)
Round 5: [3 sc, 1 inc] 6 times (30)
Round 6: [4 sc, 1 inc] 6 times (36)
Round 7: [5 sc, 1 inc] 6 times (42)
Round 8: [6 sc, 1 inc] 6 times (48)
Round 9: [7 sc, 1 inc] 6 times (54)
Round 10: [8 sc, 1 inc] 6 times (60)
Rounds 11 to 20: 1 sc in each stitch around (60)
Round 21: 20 sc, [1 sc, 1 inc] 5 times, 10 sc, [1 inc, 1 sc] 5 times, 20 sc. This creates our beautiful, wide cheeks. (70)
Rounds 22 to 26: 1 sc in each stitch around (70)
Artisan’s Note: Now is the moment to place your 6mm safety eyes. Insert them between Rounds 18 and 19. Space them exactly 11 stitches apart. They must sit low and wide to capture that gaze of innocence.
Round 27: 20 sc, [1 sc, 1 dec] 5 times, 10 sc, [1 dec, 1 sc] 5 times, 20 sc (60)
Round 28: [8 sc, 1 dec] 6 times (54)
Round 29: [7 sc, 1 dec] 6 times (48)
Round 30: [6 sc, 1 dec] 6 times (42)
Round 31: [5 sc, 1 dec] 6 times (36)
Round 32: [4 sc, 1 dec] 6 times (30)
Round 33: [3 sc, 1 dec] 6 times (24)
Round 34: [2 sc, 1 dec] 6 times (18)
Fasten off, leaving a long tail for sewing.
The Foundation: Body and Legs (Make 2)
We construct the legs first, joining them to build a seamless torso. Start with White yarn for the socks.
Round 1: 6 sc in a magic ring (6)
Round 2: 6 inc (12)
Round 3: [1 sc, 1 inc] 6 times (18)
Rounds 4 to 8: 1 sc in each stitch around (18)
Change to Beige yarn for the skin.
Round 9: Working in the back loops only, 1 sc in each stitch around (18)
Rounds 10 to 18: 1 sc in each stitch around. Fasten off the first leg. Repeat for the second leg, but do not fasten off. (18)
Round 19: Chain 3 from the second leg. Join to the first leg with a sc. Work 17 more sc around the first leg. Work 3 sc along the chain. Work 18 sc around the second leg. Work 3 sc along the other side of the chain. (42)
Rounds 20 to 26: 1 sc in each stitch around (42)
Round 27: [5 sc, 1 dec] 6 times (36)
Rounds 28 to 32: 1 sc in each stitch around (36)
Round 33: [4 sc, 1 dec] 6 times (30)
Rounds 34 to 36: 1 sc in each stitch around (30)
Round 37: [3 sc, 1 dec] 6 times (24)
Round 38: 1 sc in each stitch around (24)
Round 39: [2 sc, 1 dec] 6 times. Stuff the body firmly. (18)
Fasten off. Weave in the ends.
The Embrace: Arms (Make 4)
Start with Beige yarn.
Round 1: 5 sc in a magic ring (5)
Round 2: 5 inc (10)
Rounds 3 to 16: 1 sc in each stitch around (10)
Do not overstuff the arms. We want them to lay flat against the body. Pinch the top flat and crochet 4 sc across both layers to close. Fasten off with a long tail.
Oliver’s Crown: Hair Base
Using Brown yarn.
Rounds 1 to 10: Follow the exact instructions for Rounds 1 to 10 of the Head pattern. (60)
Rounds 11 to 16: 1 sc in each stitch around (60)
Round 17: We will now create the textured fringe. [Chain 6, start in second chain from hook, work 5 hdc back down the chain. Skip one stitch on the base, sl st into the next stitch.] Repeat this sequence 6 times for the front bangs. Sc in the remaining stitches around the base. Fasten off.
Hazel’s Crown: Hair Base and Bun
Using Blonde yarn.
Rounds 1 to 15: Follow the exact instructions for Rounds 1 to 15 of Oliver’s Hair Base. (60)
Fasten off. Place the cap on the head and sew it securely.
The Bun:
Round 1: 6 sc in a magic ring (6)
Round 2: 6 inc (12)
Round 3: [1 sc, 1 inc] 6 times (18)
Rounds 4 to 6: 1 sc in each stitch around (18)
Fasten off, stuff lightly, and sew to the lower back of Hazel’s hair base.
Oliver’s Attire: The Bunny Onesie
Using Heather Grey yarn. We work this piece from the neck down, leaving it open at the front.
Row 1: Chain 25. Starting in the second chain from the hook, 24 sc. Turn. (24)
Row 2: ch 1, [3 sc, 1 inc] 6 times. Turn. (30)
Row 3: ch 1, 4 sc, chain 6, skip 6 stitches (armhole created), 10 sc, chain 6, skip 6 stitches, 4 sc. Turn. (30)
Rows 4 to 12: ch 1, 1 sc in each stitch across. Turn. (30)
Now we divide for the short legs.
Row 13: ch 1, 15 sc. Join to the first sc of this row to form a circle.
Rounds 14 to 18: Work 15 sc in the round for the first leg. Fasten off.
Rejoin yarn to the remaining 15 stitches and repeat Rounds 14 to 18 for the second leg.
The Hood:
Rejoin Grey yarn to the starting chain at the neck.
Row 1: ch 1, 24 inc across the neckline. Turn. (48)
Rows 2 to 25: ch 1, 48 sc. Turn. (48)
Fold the top of the hood in half and slip stitch across to seam it closed.
The Bunny Ears (Make 2)
Using Heather Grey yarn.
Round 1: 6 sc in a magic ring (6)
Round 2: [1 sc, 1 inc] 3 times (9)
Round 3: [2 sc, 1 inc] 3 times (12)
Round 4: [3 sc, 1 inc] 3 times (15)
Rounds 5 to 18: 1 sc in each stitch around (15)
Round 19: [3 sc, 1 dec] 3 times (12)
Round 20: 1 sc in each stitch around (12)
Flatten the base and crochet 5 sc across. Fasten off. Sew these to the top of the hood.
Hazel’s Attire: The Meadow Dress
Using Rich Brown yarn.
Row 1: Chain 25. Starting in the second chain, 24 sc. Turn. (24)
Row 2: ch 1, [3 sc, 1 inc] 6 times. Turn. (30)
Row 3: ch 1, 4 sc, chain 6, skip 6 stitches, 10 sc, chain 6, skip 6 stitches, 4 sc. Turn. (30)
Row 4: ch 1, [4 sc, 1 inc] 6 times. Turn. (36)
Row 5: ch 1, [5 sc, 1 inc] 6 times. Turn. (42)
Join to work in the round from this point forward.
Rounds 6 to 18: ch 1, 42 sc, sl st to join. (42)
Fasten off. Rejoin White yarn at the neckline. Work 2 hdc in each stitch around the neck to create the ruffled Peter Pan collar.
Footwear: Sneakers and Mary Janes
Oliver’s Sneakers (Make 2 in Denim Blue):
Round 1: Chain 6. 4 sc along the chain, 3 sc in the end chain. Work 3 sc down the other side, 2 sc in the last chain. (12)
Round 2: 1 inc, 3 sc, 3 inc, 3 sc, 2 inc. (18)
Round 3: Working in the back loops only, 18 sc. (18)
Rounds 4 to 5: 18 sc. (18)
Round 6: 5 sc, 4 dec, 5 sc. (14)
Fasten off. Use white yarn to embroider small “X” shapes for laces.
Hazel’s Mary Janes (Make 2 in Brick Red):
Work Rounds 1 to 4 exactly as Oliver’s sneakers.
Round 5: 5 sc, chain 6, skip 6 stitches across the front of the foot, 5 sc. (16)
Fasten off.
Hazel’s Accessories
Headband (Olive Green): Chain 45. Sc in each chain. Fasten off.
The Bow: Chain 30. Join into a ring. Work 6 rounds of 30 sc. Cinch the middle tightly with yarn and sew it to the headband.
The Daisy: Using Yellow, make 6 sc in a magic ring. Change to White. [Chain 5, sl st back down the chain, sl st into the next yellow stitch] 6 times. Wrap floral wire in Green yarn for the stem.
Glasses: Take a 10cm piece of craft wire. Bend it around the base of a thick marker to form two perfect circles, twisting the bridge in the middle. Trim the ends to serve as the arms that will slide into the hair.
Assembly & Final Touches
Precision is paramount. Center the head on the body and pin it securely before sewing. Attach the arms just below the neckline.
Embroider a tiny horizontal line for the nose in Beige yarn, exactly between the eyes. Add delicate, scattered freckles using a single strand of Brown embroidery thread. Use Pink thread to sew a tiny, straight mouth directly below the nose.
Dress Oliver in his onesie and Hazel in her dress. Slip their shoes over the ribbed socks. Position Hazel’s glasses resting gently on her nose.
Tips & FAQs
Question: My doll’s neck wobbles. How do I fix this?
Answer: Stuffing is an art. Pack the neck area exceedingly tight. You may also insert a small, rolled tube of felt or a specialized plastic neck joint inside the body before attaching the head.
Question: How do I achieve the perfect flush on the cheeks?
Answer: I prefer using a real, soft pink cosmetic blush. Apply it gently with a dry, fluffy brush directly onto the yarn over the cheek increases. Build the color slowly.
Question: The onesie feels too tight to put on Oliver.
Answer: Crochet tension can vary from day to day. If the clothing is snug, try going up half a hook size for the garments while keeping the body tight.
A Final Word
Your hands have coaxed a beautiful story out of simple thread. Look at Oliver and Hazel, standing side by side. They are a testament to your patience and your skill. Keep practicing, keep refining your stitches, and always remember the joy of making something entirely your own.

