
A warm welcome back to the atelier. There is a special kind of magic in crafting a protector, a gentle soul whose very presence brings comfort. This project is dear to my heart because it celebrates texture and warmth. We are not just making a doll; we are crafting a companion who looks as though he has just stepped out of a magical forest to offer you tea and rock cakes.
About This Creation & Angle
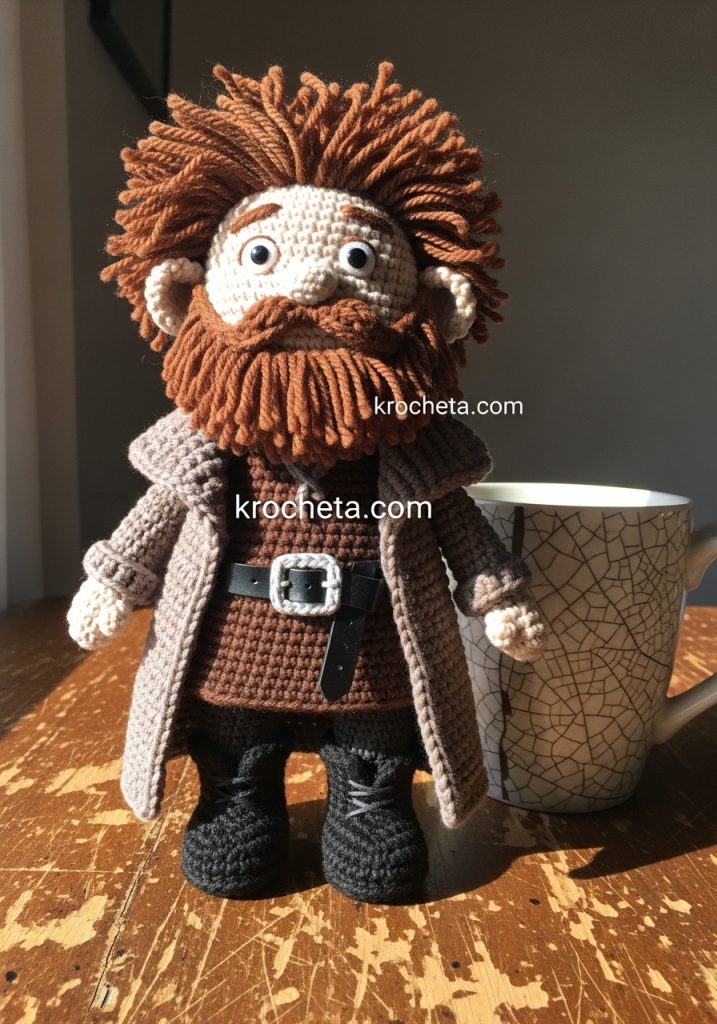
The beauty of this “Gentle Giant” lies in the juxtaposition of his rugged appearance and his soft, squishy nature. While many amigurumi patterns shy away from complex hair, we are embracing it here. This project is an excellent masterclass in working with texture—specifically, how to create a voluminous beard and mane that feels organic rather than messy. It is a perfect addition to any fantasy collection or as a guardian for a bookshelf.
Project Snapshot:
📊 Difficulty: Intermediate (Requires patience with hair attachment)
⏰ Est. Time: 8–10 Hours
📏 Size: Approx. 22cm (8.5 inches) tall
“He may look rough around the edges, but his stitches are pure love.” — Patricia
Materials & Tools Needed
🧶 Yarn: DK or Worsted Weight Cotton in the following shades: Chocolate Brown (Coat/Boots), Mocha/Taupe (Outer Coat), Oatmeal or Fair Skin Tone (Head/Hands), Brick Red/Rust (Under-shirt detail), Black (Belt).
🪡 Hook: 2.5mm or 2.75mm (to keep stitches tight)
✨ Other Materials: 10mm Safety Eyes, Polyester Fiberfill, Tapestry Needle, Stitch Marker, Pet Slicker Brush (optional for fuzzing up the beard).
Abbreviations & Stitches Used
ch: chain
sl st: slip stitch
sc: single crochet
inc: increase (2 sc in one st)
dec: decrease (sc 2 together)
BLO: back loop only
FLO: front loop only
The Complete Gentle Giant Pattern
The Sturdy Boots (Make 2)
Start with Dark Brown Yarn
R1: ch 6, start in 2nd ch from hook. 4sc, 3sc in last ch. Turn and work on other side: 3sc, inc (12)
R2: inc, 3sc, 3inc, 3sc, 2inc (18)
R3: BLO sc around (18)
R4-R6: sc around (18) — 3 rounds
R7: 5sc, 4 dec, 5sc (14) — The boot shape forms
R8-R10: sc around (14) — 3 rounds
Fasten off the first leg. Do not fasten off the second leg. Ch 2 and join to the first leg with a sl st.
The Body & Tunic
Continue with Dark Brown Yarn
R11: sc 14 (first leg), sc 2 (on ch), sc 14 (second leg), sc 2 (on other side of ch) (32)
R12-R14: sc around (32) — 3 rounds
Change to Brick Red/Rust Yarn (The Belt Line)
R15: sc around (32)
R16: sc around (32)
Change to Chocolate Brown Yarn (Upper Tunic)
R17: BLO sc around (32) — This leaves front loops for the skirt of the tunic later
R18-R22: sc around (32) — 5 rounds
R23: (6sc, dec) x 4 (28)
R24: sc around (28)
R25: (5sc, dec) x 4 (24)
R26: (2sc, dec) x 6 (18)
Stuff the body firmly.
The Head
Change to Skin Tone Yarn
R27: BLO (1sc, dec) x 6 (12) — Neck definition
R28: inc around (24)
R29: (3sc, inc) x 6 (30)
R30: (4sc, inc) x 6 (36)
R31: (5sc, inc) x 6 (42)
R32-R40: sc around (42) — 9 rounds for a tall, forehead-heavy look
Insert Safety Eyes between R35 and R36, about 7 stitches apart.
R41: (5sc, dec) x 6 (36)
R42: (4sc, dec) x 6 (30)
R43: (3sc, dec) x 6 (24)
R44: (2sc, dec) x 6 (18)
Stuff the head. Be generous, especially in the cheeks.
R45: (1sc, dec) x 6 (12)
R46: dec around (6)
Close the hole.
The Arms (Make 2)
Start with Skin Tone
R1: Magic Ring 6sc (6)
R2: (2sc, inc) x 2 (8)
R3: sc around (8)
Change to Dark Brown (Sleeves)
R4-R10: sc around (8) — 7 rounds
Lightly stuff the hand only. Flatten top and sew closed.
The Great Coat
Use Mocha/Taupe Yarn. Worked in Rows (not rounds).
Row 1: ch 33, start in 2nd ch. 32sc. ch 1, turn.
Row 2-10: sc across (32) — 9 rows
Row 11: (6sc, dec) x 4 (28)
Row 12-14: sc across (28)
Sleeves for Coat (Make 2, worked in rounds directly from coat edge or separately and sewn)
Separate method:
R1: Magic Ring 6sc
R2: inc around (12)
R3-R8: sc around (12)
Fasten off. Sew these to the sides of the coat.
The Wild Mane (Hair & Beard)
Use Dark Brown Textured/Fuzzy Yarn
The Wig Cap:
R1: Magic Ring 6sc
R2: inc around (12)
R3: (1sc, inc) x 6 (18)
R4: (2sc, inc) x 6 (24)
R5: (3sc, inc) x 6 (30)
R6: (4sc, inc) x 6 (36)
R7-R10: sc around (36)
Sew the cap to the head.
The Strands (The tedious but magical part):
Cut 10cm lengths of yarn. Using your hook, loop them into the wig cap and the lower face (chin and cheeks) to form the beard.
Artisan’s Note: Do not attach beard hair above the nose line. Keep the cheekbones clear to let his kind expression shine through. Once attached, use a wire pet brush to gently fluff the yarn if you desire a frizzier look, or leave it as strands for a chunky look.
The Belt
Use Black Yarn
Row 1: ch 34 (check fit around waist), sc across.
Sew ends together around the waist. Embroider a square buckle with grey/silver yarn.
Assembly & Final Touches
- Sew the arms to the sides of the body at round 26.
- Place the Great Coat onto the figure. You may tack it down with a few hidden stitches or leave it removable.
- Embroider thick, worried eyebrows using dark brown yarn. They should slant slightly upwards in the center to give him that gentle, concerned look.
- Apply a soft blush to the cheeks using pink eyeshadow or a crayon.
Tips & FAQs
Q: My beard looks too messy. What should I do?
A: Trim it! Just like a real barber, give your giant a trim. Cut the yarn at an angle so it tapers naturally rather than ending bluntly.
Q: Can I use chunky yarn?
A: Absolutely. He will be enormous and even more huggable. Just increase your hook size to 5.0mm.
A Final Word
There he stands—sturdy, loyal, and ready for adventure. I hope the rhythm of the stitches brought you peace today. Remember, it is the small imperfections that give a handmade soul its character. Until next time, keep your hook moving and your heart open.
— Patricia, krocheta.com

