
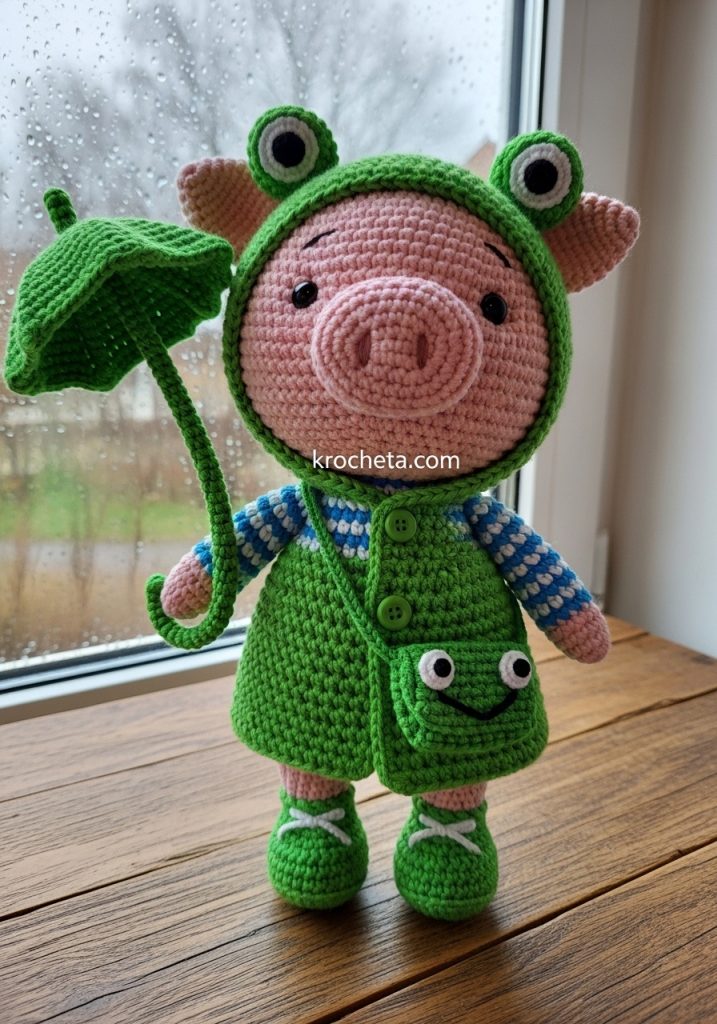
There is a particular quiet magic found in rainy days, isn’t there? The rhythm of droplets against the glass invites us to slow down and create something comforting. Pippin was born from that feeling—a sweet, optimistic soul who doesn’t hide from the rain but dresses for the occasion. I invite you to pour your heart into his stitches; he is a companion who reminds us that even a little storm can be an adventure if one is properly prepared.
About This Creation & The Art of Dressing
This project is more than just a toy; it is a study in “fit and finish.” While many amigurumi feature static, sewn-on clothing, Pippin challenges you to act as a tailor. We are crafting a removable wardrobe.
The focus here is on Structure and Ease. You will learn how to create a coat that fits over the body without bulk, mastering the negative space required for sleeves to slide over arms. We also explore “narrative accessories”—the giant leaf and tiny pochette—which give Pippin his story. It is these thoughtful layers that transform a simple doll into a character with a life of his own.
Project Snapshot
📊 Difficulty: Intermediate to Advanced (requires working with small details and fit)
⏰ Est. Time: 15–20 Hours
📏 Size: Approximately 14cm tall (excluding leaf)
“A well-dressed amigurumi is a testament to the maker’s patience. The clothes must respect the doll’s shape, not hide it.” — Patricia
Materials & Tools Needed
🧶 Yarn: Sport or DK weight cotton. ➡️ Soft Pink (Skin) ➡️ Kelly Green (Coat/Shoes/Leaf) ➡️ Royal Blue (Stripes) ➡️ White (Stripes) ➡️ Dark Green (Frog eye details)
🪡 Hook: 2.25mm (for doll) and 2.5mm (for clothing, to ensure fit)
✨ Other Materials: ➡️ 8mm Black Safety Eyes ➡️ 6mm Black Safety Eyes (for frog hood and bag) ➡️ Floral wire (for the leaf stem) ➡️ 3 Small wooden buttons (approx 9mm) ➡️ Fiberfill stuffing ➡️ Tapestry needle ➡️ Blush for cheeks
Abbreviations & Stitches Used
ch: chain
sl st: slip stitch
sc: single crochet
hdc: half double crochet
inc: increase (2 sc in one st)
dec: decrease (invisible decrease preferred)
BLO: back loop only
FLO: front loop only
The Complete Pippin Pattern
The Architect (Head)
Using Pink yarn and 2.25mm hook.
Rnd 1: Start 6 sc in a magic ring. (6)
Rnd 2: Inc in every st. (12)
Rnd 3: [Sc 1, inc] x 6. (18)
Rnd 4: [Sc 2, inc] x 6. (24)
Rnd 5: [Sc 3, inc] x 6. (30)
Rnd 6: [Sc 4, inc] x 6. (36)
Rnd 7: [Sc 5, inc] x 6. (42)
Rnd 8: [Sc 6, inc] x 6. (48)
Rnd 9–18: Sc in each st around. (48) Place safety eyes between Rnds 14 and 15, approx 9 stitches apart.
Rnd 19: [Sc 6, dec] x 6. (42)
Rnd 20: [Sc 5, dec] x 6. (36)
Rnd 21: [Sc 4, dec] x 6. (30)
Rnd 22: [Sc 3, dec] x 6. (24)
Rnd 23: [Sc 2, dec] x 6. (18)
Fasten off, leaving a long tail for sewing. Stuff firmly, prioritizing the cheeks.
The Expression (Snout)
Using Pink yarn.
Rnd 1: Chain 5. Start in 2nd ch from hook. Sc 3, 3 sc in last ch. Turn and work down other side: Sc 2, inc. (10)
Rnd 2: Inc, sc 2, [inc] x 3, sc 2, [inc] x 2. (16)
Rnd 3: In BLO, sc around. (16)
Rnd 4: Sc around normally. (16)
Fasten off. Embroider two nostrils with dark pink thread. Stuff lightly.
The Listeners (Ears)
Make 2. Using Pink yarn.
Rnd 1: 6 sc in magic ring. (6)
Rnd 2: [Sc 1, inc] x 3. (9)
Rnd 3: [Sc 2, inc] x 3. (12)
Rnd 4: [Sc 3, inc] x 3. (15)
Rnd 5–6: Sc around. (15)
Fold flat and sc across the opening to close. Do not stuff.
The Core (Body)
Start with Pink (bottom).
Rnd 1: 6 sc in magic ring. (6)
Rnd 2: Inc in every st. (12)
Rnd 3: [Sc 1, inc] x 6. (18)
Rnd 4: [Sc 2, inc] x 6. (24)
Rnd 5: [Sc 3, inc] x 6. (30)
Rnd 6: [Sc 4, inc] x 6. (36)
Rnd 7–9: Sc around in Pink. (36)
Switch to White. Begin stripe pattern (2 rounds White, 2 rounds Blue).
Rnd 10: (White) [Sc 4, dec] x 6. (30)
Rnd 11: (White) Sc around. (30)
Rnd 12: (Blue) Sc around. (30)
Rnd 13: (Blue) Sc around. (30)
Rnd 14: (White) [Sc 3, dec] x 6. (24)
Rnd 15: (White) Sc around. (24)
Rnd 16: (Blue) Sc around. (24)
Rnd 17: (Blue) [Sc 2, dec] x 6. (18)
Fasten off. Stuff body firmly.
The Limbs (Arms)
Make 2. Start with Pink.
Rnd 1: 6 sc in magic ring. (6)
Rnd 2: [Sc 1, inc] x 3. (9)
Rnd 3–4: Sc around. (9)
Switch to Blue (sleeve).
Rnd 5–10: Sc around. (9)
Rnd 11: Fold flat and sc across to close.
The Limbs (Legs)
Make 2. Using Pink.
Rnd 1: 6 sc in magic ring. (6)
Rnd 2: Inc in every st. (12)
Rnd 3–4: Sc around. (12)
Rnd 5: [Sc 2, dec] x 3. (9)
Rnd 6–10: Sc around. (9)
Fasten off. Stuff lightly.
The Disguise (Frog Raincoat)
Use 2.5mm hook and Green yarn. Worked flat in rows (Cardigan style).
Row 1: Ch 19. Start 2nd ch from hook. [Sc 2, inc] x 6. (24). Ch 1, turn.
Row 2: [Sc 3, inc] x 6. (30). Ch 1, turn.
Row 3 (Armholes): Sc 5, ch 4 (skip 6 sts), sc 8, ch 4 (skip 6 sts), sc 5. (26 sts + 8 ch). Ch 1, turn.
Row 4: Sc across all sts and chains. (34). Ch 1, turn.
Row 5–12: Sc across. (34). Adjust length until it hits the pig’s knees.
The Hood: Join yarn at the right side of the neck chain (Row 1).
Row 1 (Hood): Sc 18 across the neck chain loops. Ch 1, turn.
Row 2: [Sc 2, inc] x 6. (24). Ch 1, turn.
Row 3–10: Sc across. (24).
Row 11: Fold the top of the hood in half and sc the two layers together to close the seam.
Frog Eyes for Hood (Make 2): Rnd 1: 6 sc in MR. Rnd 2: Inc around. (12). Rnd 3-4: Sc around. (12). Sew to top of hood. Glue small eyes or felt circles on top.
The Footwear (Removable Shoes)
Make 2. Using Green.
Rnd 1: Ch 5. Sc 3, 3 sc in last ch. Turn. Sc 2, inc. (10)
Rnd 2: Inc, sc 2, [inc] x 3, sc 2, [inc] x 2. (16)
Rnd 3: BLO sc around. (16)
Rnd 4: Sc around. (16)
Rnd 5: Strap—Ch 6, skip 6 sts on shoe, sl st to other side. Fasten off.
The Shelter (Giant Leaf)
Using Green.
Row 1: Ch 15. Sc down the chain (14).
Row 2: Work around the other side of the chain to create an oval. Sc 14.
Row 3: [Sc, hdc, dc 3, hdc, sc] repeat around to create wavy leaf edges. Glue a piece of floral wire down the center spine of the leaf for structure, covering it with a strand of yarn.
Assembly & Final Touches
➡️ The Face: Sew the snout centrally between the eyes. Sew ears to Rnds 6-7 of the head. Add blush to cheeks and nose.
➡️ The Body: Sew head to body. Attach arms at the neck seam. Sew legs to the bottom of the body (Pippin is a sitting pig).
➡️ Dressing: Slide the shoes onto the feet. Put on the raincoat—it should be snug but removable.
➡️ The Accessories: For the pochette, make a small green circle (6 sc, inc to 12, sc 2 rows) and add a long chain strap. Hang it over his shoulder.
Tips & FAQs
Q: My raincoat is too tight. A: Clothing tension is tricky! Try going up to a 2.75mm hook for the coat if your tension is naturally tight.
Q: Can I make the leaf without wire? A: You can, but it will flop. The wire gives it that “umbrella” posture. If this is for a very small child, omit the wire and sew the leaf directly to the hand.
A Final Word
Pippin is now ready to brave the weather. I hope his creation brought a sense of peace to your hands. Remember, the beauty of our craft lies in these small, deliberate details—the tiny button, the turn of a hood, the stitch that holds a story.
Until we meet again in the wool, Patricia

