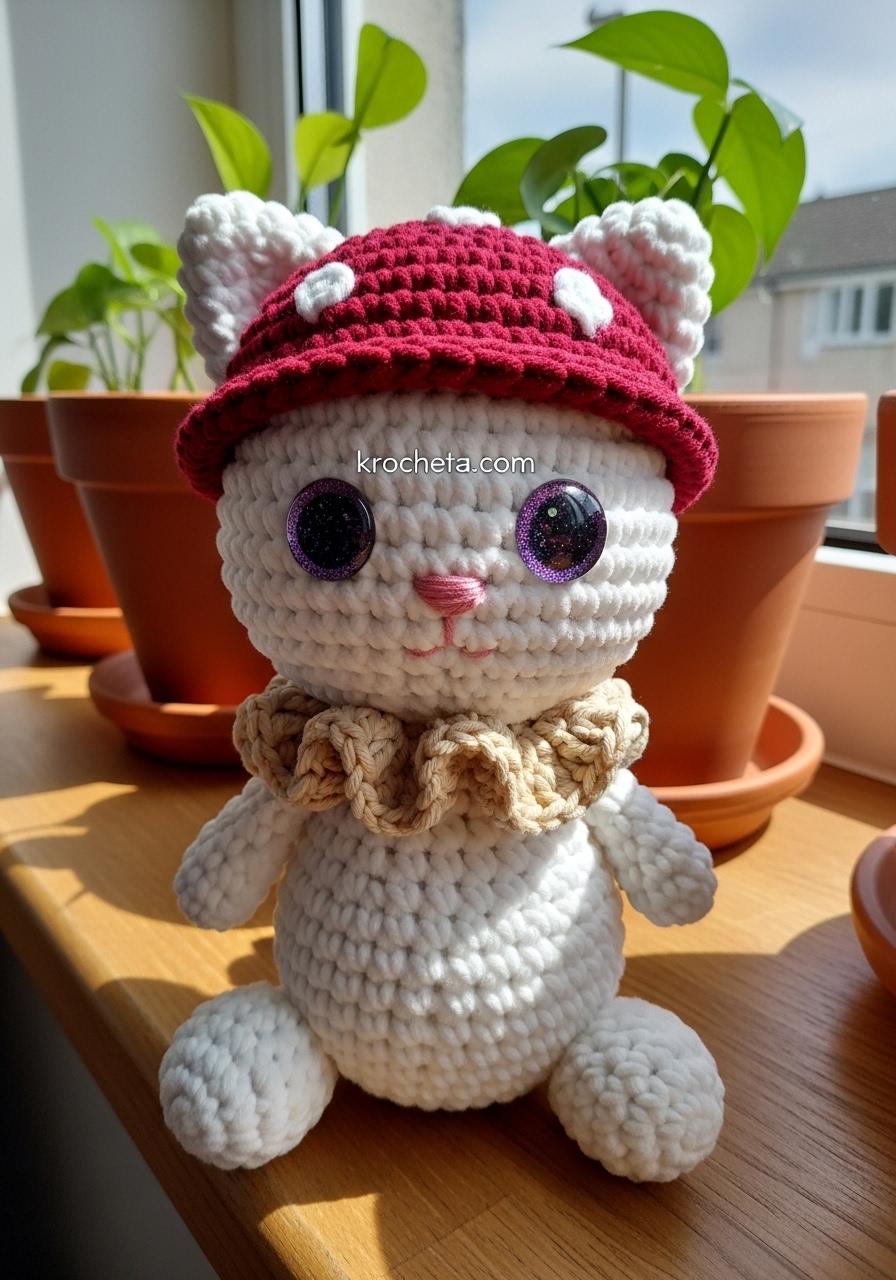
There is a quiet magic in taking a simple strand of yarn and turning it into a friend who looks back at you with soulful eyes. Today, we are bringing Pippin to life. He is a creature of the forest floor, soft to the touch and ready to sit quietly on a bookshelf or in the arms of someone special. This project is close to my heart because it combines the plush comfort of chenille with the structure of shaped amigurumi. Let us pick up our hooks and begin this journey.
About This Creation & Angle
Pippin is designed to bridge the gap between “toy” and “art piece.” By using super bulky chenille yarn, we achieve a satisfyingly squishy texture that is perfect for sensory comfort, yet the pattern itself relies on careful counting to ensure he sits upright and proud.
The commercial angle here is “Texture Mastery.” Many crafters struggle with chenille yarn because seeing stitches can be difficult. This pattern uses tactile stitch definitions and specific increases to make working with velvet yarns effortless. If you sell your finished makes, Pippin’s “Cottagecore” aesthetic makes him a high-demand item for craft fairs and boutique shops.
Project Snapshot
📊 Difficulty: Intermediate (due to working with chenille)
⏰ Est. Time: 4–6 Hours
📏 Size: Approx. 18cm (7 inches) tall
“The beauty of amigurumi is not in the perfection of the stitch, but in the personality that emerges from the tension of your hands.” – Patricia Poltera
Materials & Tools Needed
🧶 Yarn: Super Bulky (Size 6) Chenille/Velvet yarn. ➡️ Main Color: White or Cream (approx. 100g) ➡️ Cap Color: Deep Red (approx. 50g) ➡️ Accent Color: Beige or Taupe for the collar (approx. 20g)
🪡 Hook: 4.5mm or 5.0mm (depending on your tension to ensure no gaps)
✨ Other Materials: ➡️ 20mm or 25mm “Galaxy” or Glitter Safety Eyes ➡️ Pink embroidery floss for the nose ➡️ Polyfill stuffing ➡️ Yarn needle with a large eye ➡️ Stitch markers

Abbreviations & Stitches Used
ch: chain
sl st: slip stitch
sc: single crochet
inc: increase (2 sc in one stitch)
dec: invisible decrease (sc two stitches together)
BLO: back loop only
The Complete Pippin Pattern
The Head
Use White Chenille. Stuff firmly as you work.
R1: Start 6 sc in a magic ring (6)
R2: Inc in every st around (12)
R3: (Sc 1, inc) x 6 (18)
R4: (Sc 2, inc) x 6 (24)
R5: (Sc 3, inc) x 6 (30)
R6: (Sc 4, inc) x 6 (36)
R7: (Sc 5, inc) x 6 (42)
R8–16: Sc in each st around (42) [9 rounds of straight working for height]
R17: (Sc 5, dec) x 6 (36)
R18: (Sc 4, dec) x 6 (30)
Insert safety eyes between R13 and R14, roughly 7 stitches apart.
R19: (Sc 3, dec) x 6 (24)
R20: (Sc 2, dec) x 6 (18)
R21: (Sc 1, dec) x 6 (12)
R22: Dec around (6)
Fasten off and weave in end.
The Mushroom Cap
Use Red Chenille. We want this to be wide and slightly floppy.
R1: Start 6 sc in a magic ring (6)
R2: Inc in every st around (12)
R3: (Sc 1, inc) x 6 (18)
R4: (Sc 2, inc) x 6 (24)
R5: (Sc 3, inc) x 6 (30)
R6: (Sc 4, inc) x 6 (36)
R7: (Sc 5, inc) x 6 (42)
R8: (Sc 6, inc) x 6 (48)
R9–11: Sc in each st around (48)
R12: Work this round in BLO. (Sc 6, dec) x 6 (42) [This creates the curl of the cap rim]
R13: Sc in each st around (42)
Fasten off, leaving a long tail if you wish to sew it on, or weave in ends for a removable hat.
The Cap Spots (Make 4-5)
Use White Chenille.
R1: Start 6 sc in a magic ring (6)
R2: Sl st to the first st. Fasten off leaving a tail for sewing.
The Ears (Make 2)
Use White Chenille.
R1: Start 4 sc in a magic ring (4)
R2: (Sc 1, inc) x 2 (6)
R3: (Sc 2, inc) x 2 (8)
R4: Sc in each st around (8)
Fasten off. Do not stuff. Flatten the shape.
The Body
Use White Chenille. Stuff firmly, focusing on the bottom for stability.
R1: Start 6 sc in a magic ring (6)
R2: Inc in every st around (12)
R3: (Sc 1, inc) x 6 (18)
R4: (Sc 2, inc) x 6 (24)
R5: (Sc 3, inc) x 6 (30)
R6–10: Sc in each st around (30)
R11: (Sc 3, dec) x 6 (24)
R12–13: Sc in each st around (24)
R14: (Sc 2, dec) x 6 (18)
R15–16: Sc in each st around (18)
R17: (Sc 1, dec) x 6 (12)
Fasten off, leaving a long tail for sewing to the head.
Front Legs (Make 2)
Use White Chenille. Lightly stuff the bottom only.
R1: Start 6 sc in a magic ring (6)
R2: (Sc 2, inc) x 2 (8)
R3–8: Sc in each st around (8)
Fasten off, leaving a tail for sewing.
Back Legs/Haunches (Make 2)
Use White Chenille. Stuff lightly.
R1: Start 6 sc in a magic ring (6)
R2: Inc in every st around (12)
R3–5: Sc in each st around (12)
R6: (Sc 2, dec) x 3 (9)
Fasten off, leaving a tail for sewing.
The Tail
Use White Chenille. Do not stuff.
R1: Start 4 sc in a magic ring (4)
R2–10: Sc in each st around (4)
Fasten off, leaving a tail for sewing.
The Ruffle Collar
Use Beige/Taupe Chenille.
R1: Ch 20 (or enough to fit loosely around the neck), sl st to first ch to form a ring.
R2: Ch 2, 3 dc in every ch around. Sl st to join.
Fasten off and weave in ends.
Assembly & Final Touches
1. Secure the Head: Pin the head to the body. Using the yarn tail from the body, sew firmly around the neck opening. The head is large, so go around twice to prevent wobbling.
2. Attach Limbs: ➡️ Sew the Front Legs to the upper chest, close together so he looks polite. ➡️ Sew the Back Legs to the lower sides of the body, angled slightly forward so he sits securely. ➡️ Sew the Tail to the lower back, centered.
3. The Mushroom Cap: Sew the white spots onto the red cap randomly. You can sew the cap permanently to the head or leave it removable. If permanent, place it slightly tilted back so the face is visible.
4. Face: Using pink thread, embroider a small “Y” or triangle shape for the nose between the eyes.
5. Dress: Place the ruffle collar around his neck.
Tips & FAQs
Q: My chenille yarn is shedding! What do I do? A: This is common. Briefly singe the raw end of the yarn with a lighter (carefully!) before starting to melt the fibers together, preventing further shedding.
Q: Can I brush the yarn? A: I do not recommend wire brushing chenille as it can bald the thread. Use a lint roller to remove dust instead.
A Final Word
Creating Pippin is an exercise in joy. When you place that final spot on his cap, you are finishing a story that began with a simple loop. I hope he brings a touch of woodland wonder to your home. Until we meet again at the crafting table.

