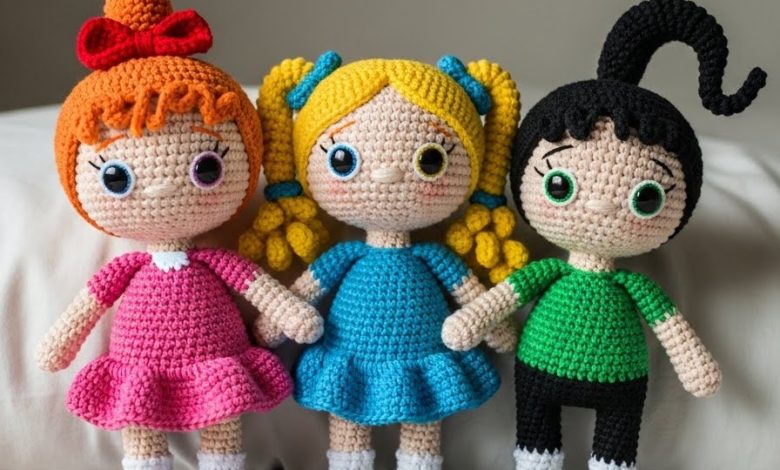
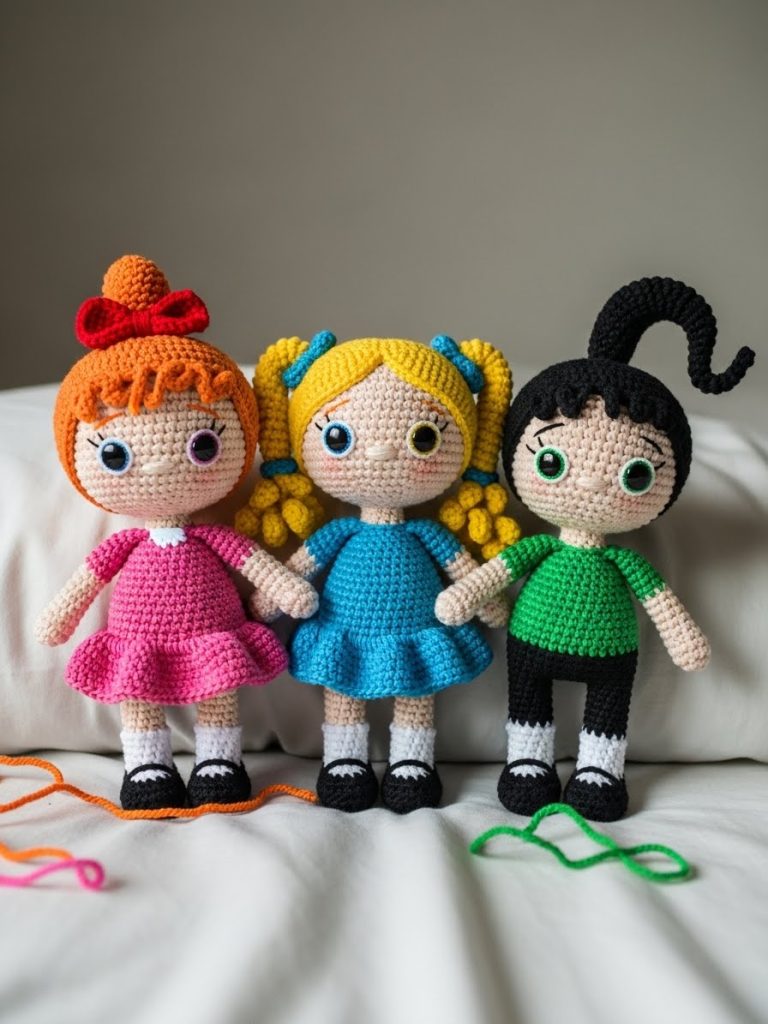
My dearest maker, welcome back to the workbench. Today, we channel the pure, unadulterated energy of childhood. There is a profound joy in capturing characters that are defined by simple geometries yet hold such massive personalities. We are not just stitching dolls; we are sculpting three distinct spirits—leadership, joy, and rebellion—wrapped in the softest yarn.
About This Creation & The Nostalgic Angle
In the world of amigurumi, the “Chibi” proportion—where the head matches or exceeds the body size—is the gold standard for cuteness. This project focuses heavily on the architectural integrity of the hair and the depth of the gaze. Many patterns rely on felt for eyes, but we shall crochet ours for a premium, tactile finish that elevates the final piece from a toy to a collector’s item. By using a seamless bottom-up construction, we minimize sewing and increase durability.
Project Snapshot:
📊 Difficulty: Intermediate (Requires color changes and assembly)
⏰ Est. Time: 3–4 Hours per Heroine
📏 Size: Approx. 12–14cm tall (depending on yarn tension)
“True character is revealed not in the pattern, but in the placement of the eyes and the chaotic perfection of the hair.” — Patricia Poltera
Materials & Tools Needed
🧶 Yarn: Sport or DK weight cotton yarn.
- Universal: Skin Tone, White (Socks/Eyes), Black (Shoes/Belt/Pupils).
- Blossom: Bright Pink (Dress), Orange (Hair), Red (Bow).
- Bubbles: Sky Blue (Dress), Sunshine Yellow (Hair).
- Buttercup: Lime Green (Dress), Black (Hair).
🪡 Hook: 2.25mm or 2.5mm (to keep stitches tight).
✨ Other Materials: Fiberfill stuffing, tapestry needle, stitch markers, sewing pins.
Abbreviations & Stitches Used
ch: chain
sc: single crochet
inc: increase (2 sc in one stitch)
dec: decrease (invisible decrease preferred)
BLO: back loop only
FLO: front loop only
sl st: slip stitch
The Complete Townsville Trio Pattern
We begin with the universal body base used for all three sisters.
The Legs (Make 2 per doll)
Start with Black Yarn (Shoes).
🧶 Rnd 1: 6 sc in a magic ring. (6)
🧶 Rnd 2: sc, inc repeat 3 times. (9)
🧶 Rnd 3: sc in each st around. (9)
🧶 Rnd 4: Change to White (Socks). sc in each st around. (9)
🧶 Rnd 5: sc, dec repeat 3 times. (6) — Stuff the foot firmly here.
🧶 Rnd 6: sc in each st around. (6)
➡️ Fasten off the first leg. Do not fasten off the second leg.
The Body (Seamless Join)
Change to Dress Color (Pink, Blue, or Green).
🧶 Rnd 7: Chain 2 from the second leg, join to the first leg with a sc. sc in remaining 5 st of first leg, sc in 2 ch, sc in 6 st of second leg, sc in other side of 2 ch. (16)
🧶 Rnd 8: inc, 6 sc, inc repeat twice (in the corners to round the hips). (20)
🧶 Rnd 9–10: sc in each st around. (20)
🧶 Rnd 11: Change to Black (Belt). sc in each st around. (20)
🧶 Rnd 12: Change back to Dress Color. sc in each st around. (20)
🧶 Rnd 13: 3 sc, dec repeat around. (16)
🧶 Rnd 14: 2 sc, dec repeat around. (12) — Stuff body firmly.
🧶 Rnd 15: Change to Skin Tone. 4 sc, dec repeat twice. (10)
The Head (Continues from Body)
We create a large, lollipop-shaped head.
🧶 Rnd 16: inc in every stitch. (20)
🧶 Rnd 17: 1 sc, inc repeat around. (30)
🧶 Rnd 18: 2 sc, inc repeat around. (40)
🧶 Rnd 19: 3 sc, inc repeat around. (50)
🧶 Rnd 20–29 (10 rounds): sc in each st around. (50) — This height is crucial for eye placement.
🧶 Rnd 30: 3 sc, dec repeat around. (40)
🧶 Rnd 31: 2 sc, dec repeat around. (30)
🧶 Rnd 32: 1 sc, dec repeat around. (20) — Stuff head heavily. Keep it rounded.
🧶 Rnd 33: dec around. (10)
➡️ Cut yarn, weave through front loops, and pull tight to close.
The Arms (Make 2 per doll)
Use Skin Tone.
🧶 Rnd 1: 5 sc in magic ring. (5)
🧶 Rnd 2–4: sc in each st around. (5)
➡️ Leave a long tail for sewing.
The Signature Gaze (The Eyes)
Make 2 per doll. These are layered.
Part A: The White Sclera
🧶 Rnd 1: in White, chain 4. Start in 2nd ch from hook: inc, sc 1, 3 sc in last ch. Turn to other side: sc 2. (8)
🧶 Rnd 2: inc in first 2 st, sc 1, inc in next 3 st, sc 1, inc in last st. (14)
➡️ Fasten off, leave tail.
Part B: The Iris (Color) & Pupil (Black)
Note: For a finer look, I recommend embroidering the black pupil onto the colored iris rather than crocheting a tiny circle.
🧶 Rnd 1: With Eye Color (Pink/Green/Blue), 6 sc in magic ring. Sl st to close.
➡️ Sew the Colored Iris onto the bottom-right of the White Sclera. Embroider a black pupil in the center of the color, and a tiny white “sparkle” stitch.
Defining the Personalities (Hair & Accessories)
The Leader (Blossom)
Hair Cap (Orange): Follow Head Rnds 16–19 to get to 50 stitches. Work 6 rounds even. Bangs: ch 6, sc down. Skip 2 st on cap, sl st. Repeat for 3 jagged bangs. The Bow (Red): Row 1: ch 15, sc across. Work 6 rows of sc. Wrap yarn tightly around the center to pinch it into a bow shape. Sew to top of head.
The Joy (Bubbles)
Hair Cap (Yellow): Follow Head Rnds 16–19 to get to 50 stitches. Work 6 rounds even. Pigtails (Make 2): Rnd 1: 6 sc in MR. Rnd 2: inc around (12). Rnd 3: 1 sc, inc (18). Rnd 4–6: sc around. Rnd 7: 1 sc, dec. Stuff lighty. Sew to sides of head.
The Fighter (Buttercup)
Hair Cap (Black): Follow Head Rnds 16–19 to get to 50 stitches. Work 6 rounds even. The Flip: When sewing the cap, create a “widow’s peak” in the center forehead. Side Spikes: ch 4, sl st back down, attach to side of head to create the flipped-out bob look.
Assembly & Final Touches
✨ Placement: Pin the eyes low on the face—rows 22–26 of the head. The top of the eye should align with the top of the ear line (if they had ears!).
✨ Arms: Sew arms to the body at Rnd 14, slightly angled forward.
✨ Cheeks: Do not skip this! Using a dry brush and a tiny bit of pink blush, dust the area directly under the eyes for that soft, innocent glow.
Tips from the Atelier
🧶 The “Neck Wobble”: If the head feels too heavy for the small body, insert a tightly rolled tube of felt or a Q-tip inside the neck before closing the head. This acts as a spine.
🧶 Color Changes: To keep the stripes on the body crisp, change colors on the final “pull through” of the previous stitch.
A Final Word
There is magic in the trio. Whether you keep them to guard your own desk or gift them to a kindred spirit, remember that even the smallest creation carries the mightiest heart. May your stitches be even and your tension true.
Patricia