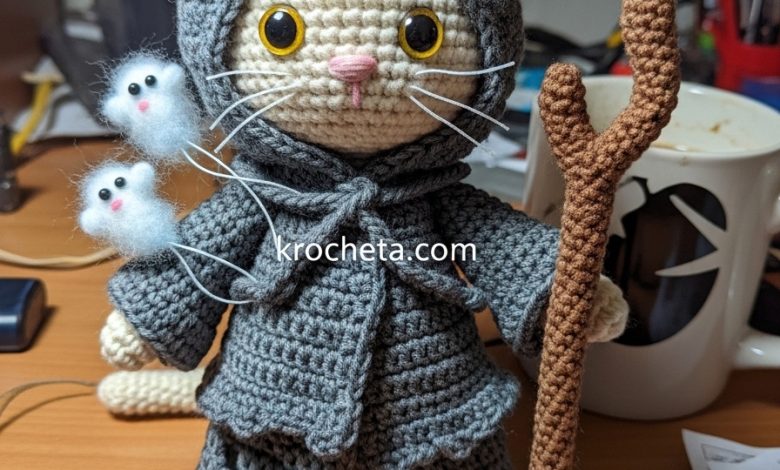
There is a particular magic in balancing the dark with the adorable. With Grimm, we are not merely stitching a cat; we are sculpting a personality. He is a weary traveler of the spirit world, yet soft enough to hold. This project invites you to master the art of “imperfect perfection”—using ragged stitches to tell a story of ancient robes, while keeping the face sweet and inviting. Let us begin this journey of shadow and light.
About This Creation & The Art of Layering
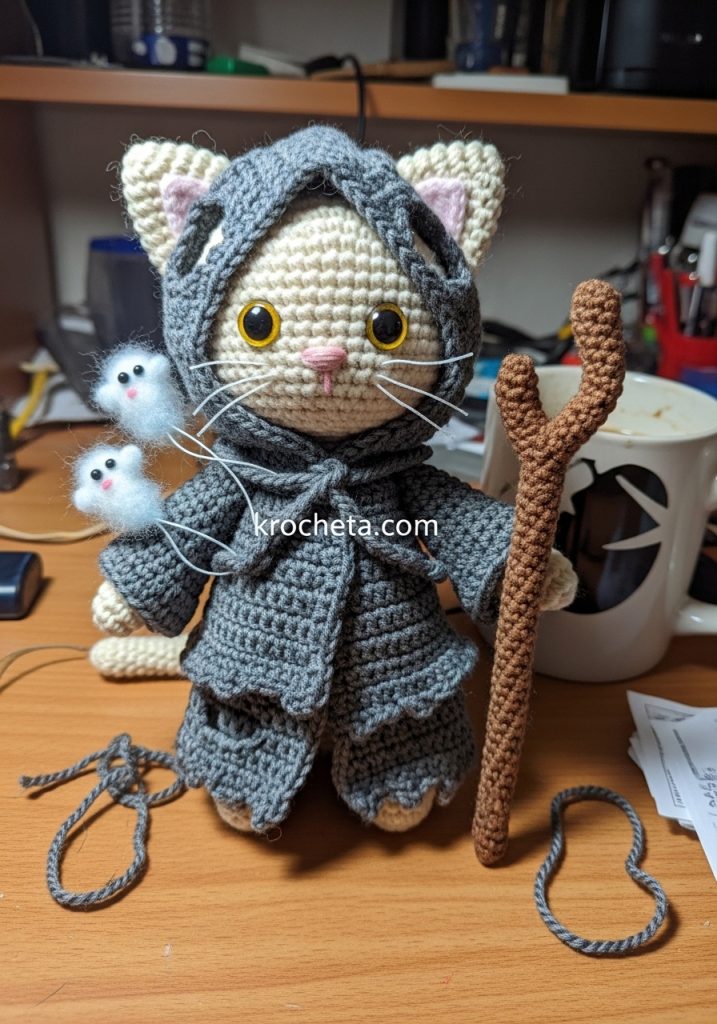
This project focuses on structural storytelling. Unlike standard amigurumi where details are embroidered on, Grimm features removable, multi-layered garments. The “Void Robe” utilizes distinct stitch heights to create a tattered, worn-in effect without fraying the yarn.
Commercially, dolls with removable accessories and complex backstories fetch significantly higher prices (often 3x standard rates) because they offer interactivity. Grimm is designed to be a premium collector’s piece or a high-end gift for fantasy lovers.
Project Snapshot:
📊 Difficulty: Advanced Intermediate (Requires patience with small details)
⏰ Est. Time: 12–15 Hours
📏 Size: Approx. 14cm (sitting)
“The true soul of amigurumi lies not in the perfection of the stitch, but in the intention behind it.” — Patricia
Materials & Tools Needed
🧶 Yarn: Semi-cotton blend (50% Cotton/50% Acrylic) in Sport Weight. Colors: Charcoal Grey (Robe), Slate Blue (Inner Tunic), Cream (Fur), Amber/Gold (Eyes), Pale Ghost Blue (Wisps), Bark Brown (Staff).
🪡 Hook: 2.25mm (for doll) and 2.75mm (for clothing ease).
✨ Other Materials: Standard fiberfill stuffing 14mm Safety Eyes (Gold or Yellow) Aluminum Craft Wire (2mm) for the tail and staff A pet slicker brush (to fluff the wisps) Tapestry needle (bent tip preferred)
Abbreviations & Stitches Used
ch: chain
sl st: slip stitch
sc: single crochet
hdc: half double crochet
inc: increase (2 sc in one st)
dec: invisible decrease
BLO: back loop only
FLO: front loop only
The Complete Grimm Pattern
I. The Vessel: Head (Cream Yarn)
Use 2.25mm hook. Stuffed firmly.
Round 1: 6 sc in magic ring (6)
Round 2: inc in each st around (12)
Round 3: 🧶 sc 1, inc 🧶 rep around (18)
Round 4: 🧶 sc 2, inc 🧶 rep around (24)
Round 5: 🧶 sc 3, inc 🧶 rep around (30)
Round 6: 🧶 sc 4, inc 🧶 rep around (36)
Round 7: 🧶 sc 5, inc 🧶 rep around (42)
Round 8: 🧶 sc 6, inc 🧶 rep around (48)
Rounds 9–14: sc in each st around (48)
Round 15 (Cheek Shaping): sc 18, [inc, sc 1] x 6, sc 18 (54)
Rounds 16–19: sc in each st around (54)
Round 20: sc 18, [dec, sc 1] x 6, sc 18 (48)
Round 21: 🧶 sc 6, dec 🧶 rep around (42)
Insert safety eyes between Round 14 and 15, about 9 stitches apart (centered above the cheek increases).
Round 22: 🧶 sc 5, dec 🧶 rep around (36)
Round 23: 🧶 sc 4, dec 🧶 rep around (30)
Round 24: 🧶 sc 3, dec 🧶 rep around (24)
Round 25: 🧶 sc 2, dec 🧶 rep around (18)
Fasten off. Leave a long tail for sewing.
Artisan’s Note: Do not overstuff the bottom of the face; keep it slightly flat to enhance the chubby cheek look.
II. The Vessel: Sitting Body (Slate Blue & Cream)
Start with Slate Blue (Under-tunic color).
Round 1: 6 sc in magic ring (6)
Round 2: inc in each st around (12)
Round 3: 🧶 sc 1, inc 🧶 rep around (18)
Round 4: 🧶 sc 2, inc 🧶 rep around (24)
Round 5: 🧶 sc 3, inc 🧶 rep around (30)
Round 6: 🧶 sc 4, inc 🧶 rep around (36)
Round 7: 🧶 sc 5, inc 🧶 rep around (42)
Rounds 8–12: sc in each st around (42) — Creates the heavy base.
Round 13: 🧶 sc 5, dec 🧶 rep around (36)
Rounds 14–16: sc in each st around (36)
Round 17: 🧶 sc 4, dec 🧶 rep around (30)
Rounds 18–20: sc in each st around (30)
Round 21: 🧶 sc 3, dec 🧶 rep around (24)
Round 22: sc in each st around (24)
Change color to Cream (Neck).
Round 23: BLO sc in each st around (24) — Leave front loops for collar attachment later.
Round 24: 🧶 sc 2, dec 🧶 rep around (18)
Rounds 25–26: sc in each st around (18)
Fasten off. Stuff firmly, focusing on the base for stability.
III. The Void Robe (Charcoal Grey)
Worked flat in rows, then joined. Use 2.75mm hook for drape.
Row 1: ch 25. sc in 2nd ch from hook and across. Turn. (24)
Row 2: sc in each st across. Turn. (24)
Row 3 (Armholes): sc 4, ch 6 (skip 4 sts), sc 8, ch 6 (skip 4 sts), sc 4. Turn.
Row 4: sc in all sts and chains. (28)
Rows 5–8: sc in each st across. (28)
Row 9 (Flare): 🧶 sc 3, inc 🧶 rep across. (35)
Rows 10–14: sc in each st across. (35)
Row 15 (The Tattered Hem): ch 4, sl st in same st, sc 2, ch 6, sl st in same st, sc 3. Repeat across randomly to create jagged edges.
Fasten off. Weave in ends.
IV. The Shadow Hood (Charcoal Grey)
Use 2.75mm hook.
Round 1: ch 30, join to form a ring.
Rounds 2–6: sc in each st around. (30)
Row 7 (Open for face): ch 1, turn. sc 20. Leave remaining stitches unworked.
Rows 8–15: Work back and forth on these 20 sts to create the hood depth.
Row 16: Fold the top edge in half and sc through both layers to close the seam.
Artisan’s Note: Before finishing, try the hood on the head. Mark where the ears are and create chain-gaps (ch 4, skip 3 sts) in the corresponding row to let the ears poke through.
V. Accessories: Staff & Wisps
The Elder Staff: Take a 10cm piece of wire. Coat heavily with glue or wrap tightly with Bark Brown yarn. Create a “gnarled” top by wrapping extra yarn in a bulky knot at one end. Attach a small jump ring or scrap yarn loop to hang a tiny bead.
Spirit Wisps (Pale Blue): Round 1: 4 sc in magic ring. Round 2: inc, sc 3 (5). Round 3: inc, sc 4 (6). Round 4: sc around. Round 5: dec, sc 4. Fasten off. Brush vigorously with the slicker brush until the yarn becomes a fuzzy cloud.
Assembly & Final Touches
- Posture: Sew the head to the body. Ensure the chin is tucked slightly down for that “innocent gaze” look.
- Limbs: Attach arms at round 22 of the body. Attach feet to the bottom front of the body, angled slightly outward so he sits securely.
- Dressing: Slide the Void Robe onto the body. Place the hood over the head, pulling the ears through the designated gaps.
- The Tail: Insert a wire into the tail piece (if not already done) and sew the tail to the lower back, curving it around his side.
- Face: Embroider a tiny, flat nose in pink or grey thread between the eyes. Do not embroider a mouth; the mystery is better preserved without one.
Tips & FAQs
Q: My hood is too tight! A: This often happens with tighter tension. Switch to a 3.0mm hook for the hood specifically, or add 4 chains to the starting foundation.
Q: The wisps aren’t fuzzy enough. A: You must be aggressive with the brush! Use a pet slicker brush and tear at the fibers until the stitch definition disappears completely.
A Final Word
There is a quiet power in Grimm. He sits on the shelf not merely as a decoration, but as a guardian of secrets. I hope his creation brings a touch of magic to your hands. May your yarn never tangle, and your stitches always count.
Yours in craft, Patricia