Welcome to the atelier, my dear creator. Today, we are not just making a toy; we are weaving a ‘Woven Soul.’
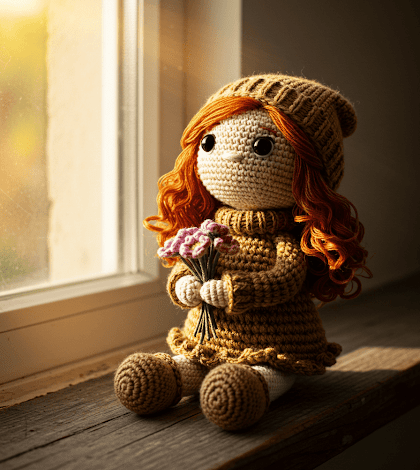
Together, we will breathe life into Evangeline, the Flower Maiden, a gentle soul and a truly magical addition to any heirloom collection.
🎨 About This Creation & Our Angle
From the moment I envisioned this piece, I knew it had to be more than just a pattern. It had to be an heirloom. This is the heart of our “Woven Soul” angle—we are crafting a masterpiece for the artisan who finds joy in details.
The thematic core, “A Timeless Storybook Charm,” is woven into her every feature. From her gently needle-sculpted cheeks to her expressive embroidered eyes and flowing hair, Evangeline is the embodiment of a cherished keepsake.
This is the perfect project to create as a breathtaking, high-end gift or as the treasured centerpiece for a doll collection. It’s a creation that holds a story.
| Attribute | Detail |
| 🧶 Difficulty | Advanced |
| 🕒 Est. Time | 12-15 Hours |
| 📏 Size | Approx. 14 inches (35 cm) tall |
It’s a meditative process of turning simple yarn into a cherished friend, a display piece that will garner gasps of admiration, or a beloved gift that will be treasured for generations.
🧶 Materials & Tools Needed
To weave this creation, you will need to gather a few simple treasures. I recommend a DK weight cotton-blend yarn for that smooth, heirloom quality.
- Yarn: DK Weight (8-ply) in the following colors:
- Antique Cream (Skin)
- Dusty Mauve (Dress & Beanie)
- Burnt Umber (Hair)
- Marigold, Magenta, Sage Green (Bouquet scraps)
- Hook: 2.5mm
- Embroidery Floss: Black, White, Dark Blue, Light Blue (Eyes), Petal Pink (Mouth).
- Other Materials: Stitch marker, fiberfill stuffing, tapestry needle, embroidery needle, scissors, pins.
💡 Abbreviations & Stitches Used
We will be working in continuous rounds. Use a stitch marker to mark the first stitch of each round.
- ch – chain
- sl st – slip stitch
- sc – single crochet
- hdc – half double crochet
- dc – double crochet
- inc – single crochet increase (2 sc in one stitch)
- dec – invisible decrease (sc 2 stitches together through front loops)
- MR – magic ring
- BLO / FLO – back loop / front loop only
- (…) – stitches in this round
📖 The Complete Evangeline, the Flower Maiden Pattern
Let us begin our creation. We will start with the head, which is the most detailed part of our journey.
Head (in Antique Cream)
Stuff firmly as you go. Embroider the face before closing.
- Rnd 1-10: Start with 6 sc in a MR. Increase by 6 sts each round until Rnd 10 (60 sts).
- Rnd 11-23: (13 rounds) sc in all 60 stitches (60 sts).
- This is the time to perform needle sculpting for the eye sockets and embroider the face.
- Rnd 24: [8 sc, dec] x6 (54 sts).
- Rnd 25-32: Continue decreasing by 6 sts each round (e.g., [7 sc, dec], [6 sc, dec]…) until you have 6 sts left.
- Fasten off, close hole, and weave in end.
Body (Start in Dusty Mauve)
Stuff firmly as you go.
- Rnd 1-5: Start with 6 sc in a MR. Increase by 6 sts each round until Rnd 5 (30 sts).
- Rnd 6: sc in all 30 stitches (30 sts).
- Rnd 7-8: (Change to Antique Cream, BLO) sc in all 30 stitches (30 sts).
- Rnd 9-10: (Change to Dusty Mauve) sc in all 30 stitches (30 sts).
- Rnd 11: [4 sc, inc] x6 (36 sts).
- Rnd 12-15: (4 rounds) sc in all 36 stitches (36 sts).
- Rnd 16: [5 sc, inc] x6 (42 sts).
- Rnd 17-25: (9 rounds) sc in all 42 stitches (42 sts).
- Rnd 26-32: Decrease by 6 sts each round (e.g., [5 sc, dec], [4 sc, dec]…) until you have 6 sts left.
- Fasten off, close hole, and weave in end.
Artisan’s Note: The secret to the expressive face is needle sculpting. After stuffing, use a long needle with skin-tone yarn. Pass it from the neck opening to the eye area and pull gently to create indentations. This adds incredible depth.
Arms (Make 2, start in Antique Cream)
- Rnd 1: 6 sc in MR (6 sts).
- Rnd 2: [inc] x6 (12 sts).
- Rnd 3-5: (3 rounds) sc in all 12 stitches (12 sts).
- Rnd 6: (Change to Dusty Mauve, BLO) sc in all 12 stitches (12 sts).
- Rnd 7-18: (12 rounds) sc in all 12 stitches (12 sts).
- Stuff hand lightly, leave arm unstuffed. Flatten top and sc across to close. F/O, leave tail.
Legs & Shoes (Make 2, start in Dusty Mauve)
- Rnd 1: Ch 7. In 2nd ch: inc, 4 sc, 4 sc in last. Other side: 4 sc, inc. (16 sts)
- Rnd 2: [inc] x2, 4 sc, [inc] x4, 4 sc, [inc] x2 (28 sts).
- Rnd 3: (BLO) sc in all 28 stitches (28 sts).
- Rnd 4-5: (2 rounds) sc in all 28 stitches (28 sts).
- Rnd 6: 8 sc, 6 dec, 8 sc (22 sts).
- Rnd 7: (Change to Antique Cream, BLO) 6 sc, 4 dec, 8 sc (18 sts).
- Rnd 8: [sc, dec] x6 (12 sts).
- Stuff foot firmly.
- Rnd 9-20: (12 rounds) sc in all 12 stitches (12 sts).
- Stuff leg. Fasten off, leaving a long tail for sewing.
Beanie & Bouquet
- Beanie (Dusty Mauve): Rnd 1-10: Increase as for Head until Rnd 10 (60 sts). Rnd 11-18: sc in all 60 sts. Rnd 19-20: Create a ribbed brim using (sc, dc) in FLO. F/O.
- Bouquet (Scrap Colors): Create 5-7 tiny flowers by chaining 4, sl st to form a ring, and working 5 petals of (ch 2, 2 dc, ch 2, sl st) into the ring. Wrap stems with green yarn.
🧵 Assembly & Final Touches
Here is where our creation truly comes to life. Be patient with your needle; this is where the soul is added.
- Head to Body: Sew the head securely to the body opening. Add extra stuffing to the neck as you sew for stability.
- Limbs: Sew the legs to the base of the body (Rnds 27-31). Sew the arms to the sides of the body, just below the turtleneck (Rnd 9).
- The Face (The Gaze of Innocence): This is the most important step.
- Eyes: Using your embroidery floss, create large, multi-layered oval eyes between Rnds 18 and 19. Start with dark blue, add light blue, outline in black, and add a white highlight.
- Nose/Mouth: Use cream yarn for a horizontal stitch nose (Rnd 20) and petal pink floss for a small ‘v’ mouth below it.
- Blush: Add a gentle blush to her cheeks.
- Hair: Cut many 15-inch strands of Burnt Umber yarn. Attach them one by one to the scalp using a Larks Head knot, following a pinned hairline.
- Finishing Touches: Place the beanie on her head and tack the small flower bouquet to her hands.
[Image Placeholder: A close-up of Evangeline’s embroidered eyes and hair]
💡 Tips & Frequently Asked Questions
Q: How do I make the face more expressive?
A: The secret is needle sculpting! Before you embroider, use a long needle with matching skin-tone yarn. Pass the yarn from the neck opening to the eye area and pull gently to create indentations that add incredible depth and realism.
Q: Is there a trick to attaching the hair evenly?
A: Absolutely. Before you begin, use pins or a disappearing ink marker to draw a guideline for the hairline around the face and a spiral on the scalp. This gives you a map to follow, ensuring the hair is placed symmetrically.
Q: What’s the best way to stuff the doll?
A: Stuff firmly and in small increments. The head and neck need to be especially firm to prevent wobbling. The body should be plump but still soft. Stuff the arms and legs more lightly to allow for movement.
💌 A Final Word
Your beautiful heirloom is complete. You have done more than follow a pattern; you have participated in an act of creation, weaving not just yarn, but a soul.
May this little creation bring a whisper of magic to whomever it is destined for. Well done, my dear creator. Truly well done.