
To my fellow creators, welcome back to the workbench. Today we step away from the gentle meadows and into the shadows, though we bring our crochet hooks as a light. There is a profound satisfaction in capturing the eerie essence of a horror icon and softening it with the texture of yarn. It is a challenge of character, precision, and bravery. Let us begin.
About This Creation & The Collector’s Angle
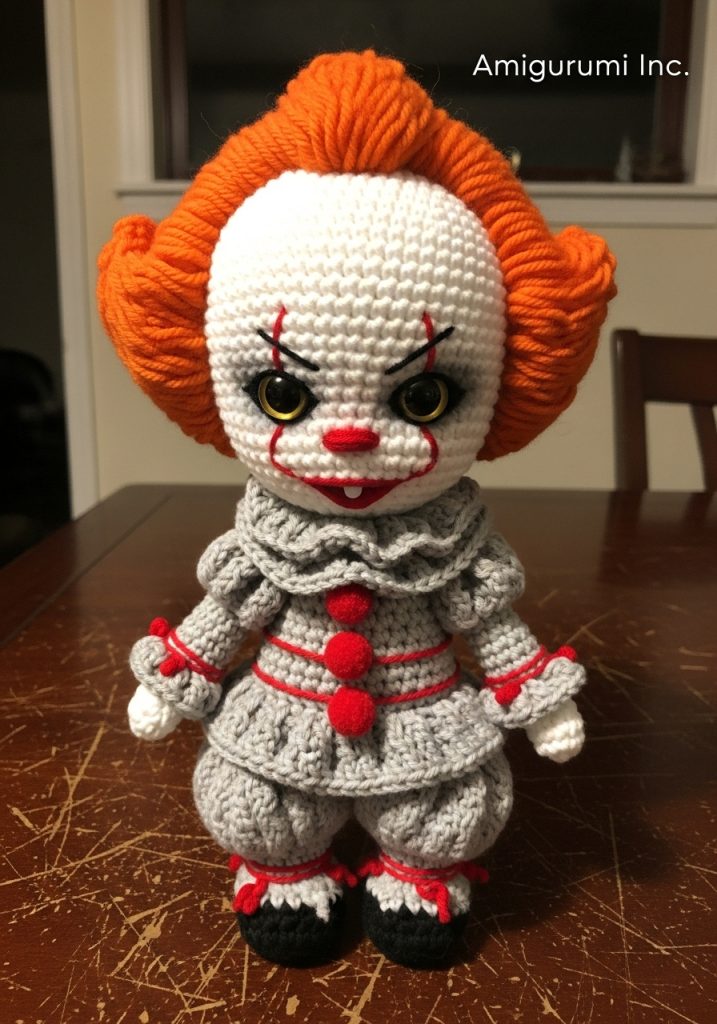
This project sits at the intersection of pop culture memorabilia and high-end fiber art. While many patterns focus solely on the “cute” factor, we are aiming for “disturbing accuracy.” The value here lies in the details: the specific shaping of the forehead to mimic the film character, the Victorian-era construction of the ruff, and the brushed-yarn technique that transforms standard acrylic into that wild, fiery mane. This is not just a doll; it is a conversation piece for any horror enthusiast’s shelf.
Project Snapshot
📊 Difficulty: Advanced Intermediate (Requires facial sculpting and brushing)
⏰ Est. Time: 12–15 Hours
📏 Size: Approx. 20cm (8 inches) tall
“We do not fear the complexity; we embrace the stitches one by one until the monster becomes a friend.” — Patricia
Materials & Tools Needed
🧶 Yarn: DK or Worsted Weight (Size 3 or 4). Colors: Bright White (Head/Hands), Ash Grey (Suit), Pumpkin Orange (Hair), Deep Red (Accents).
🪡 Hook: 2.5mm or 2.75mm (aim for tight tension to prevent gap holes)
✨ Other Materials: Gold/Yellow safety eyes (10mm), Red safety nose (8mm), Pet slicker brush (for hair), Polyester fiberfill, Red embroidery thread, Tapestry needle, Stitch markers.
Abbreviations & Stitches Used
ch: chain
sl st: slip stitch
sc: single crochet
inc: increase (2 sc in one stitch)
dec: decrease (invisible decrease preferred)
hdc: half double crochet
dc: double crochet
BLO: back loop only
FLO: front loop only
The Complete Dancing Nightmare Project
Component 1: The Sculpted Head (White)
Work in continuous spirals. Use a stitch marker.
🧶 Round 1: 6 sc in a magic ring (6)
🧶 Round 2: inc in each st around (12)
🧶 Round 3: (sc 1, inc) x 6 (18)
🧶 Round 4: (sc 2, inc) x 6 (24)
🧶 Round 5: (sc 3, inc) x 6 (30)
🧶 Round 6: (sc 4, inc) x 6 (36)
🧶 Round 7: (sc 5, inc) x 6 (42)
🧶 Round 8: (sc 6, inc) x 6 (48)
🧶 Round 9: (sc 7, inc) x 6 (54)
🧶 Rounds 10–18: sc in each st around (54) [9 rounds for a high forehead]
🧶 Round 19: (sc 8, inc) x 6 (60) [Widening for the cheeks]
🧶 Rounds 20–24: sc in each st around (60)
🧶 Round 25: (sc 8, dec) x 6 (54)
Artisan’s Note: Insert safety eyes between Rounds 20 and 21, approximately 10 stitches apart. Insert red nose centered between the eyes one row lower.
🧶 Round 26: (sc 7, dec) x 6 (48)
🧶 Round 27: (sc 6, dec) x 6 (42)
🧶 Round 28: (sc 5, dec) x 6 (36)
🧶 Round 29: (sc 4, dec) x 6 (30)
🧶 Round 30: (sc 3, dec) x 6 (24)
Stuff the head firmly, focusing on the cheeks to keep them rounded.
🧶 Round 31: (sc 2, dec) x 6 (18)
🧶 Round 32: (sc 1, dec) x 6 (12)
🧶 Fasten off, leaving a long tail for sewing.
Component 2: The Victorian Suit Body (Grey)
We begin at the hips and work upwards.
🧶 Round 1: 6 sc in magic ring (6)
🧶 Round 2: inc in each st around (12)
🧶 Round 3: (sc 1, inc) x 6 (18)
🧶 Round 4: (sc 2, inc) x 6 (24)
🧶 Round 5: (sc 3, inc) x 6 (30)
🧶 Round 6: (sc 4, inc) x 6 (36)
🧶 Round 7: (sc 5, inc) x 6 (42)
🧶 Rounds 8–12: sc in each st around (42) [Pantaloons section]
🧶 Round 13: (sc 5, dec) x 6 (36)
🧶 Round 14: sc in each st around (36)
🧶 Round 15: (sc 4, dec) x 6 (30)
🧶 Rounds 16–20: sc in each st around (30) [Torso]
🧶 Round 21: (sc 3, dec) x 6 (24)
🧶 Round 22: sc in each st around (24)
🧶 Round 23: (sc 2, dec) x 6 (18)
🧶 Round 24: sc in each st around (18)
🧶 Fasten off. Stuff firmly.
Component 3: The Puff Sleeves & Arms (Make 2, Grey & White)
Start with White for the hands.
🧶 Round 1: 6 sc in magic ring (6)
🧶 Round 2: (sc 1, inc) x 3 (9)
🧶 Rounds 3–4: sc in each st around (9)
Change to Grey yarn for the sleeve.
🧶 Round 5: FLO inc in each st around (18) [Creating the ruffle cuff]
🧶 Round 6: Work in the Back Loops of Round 4 behind the ruffle: sc in each st around (9)
🧶 Round 7: inc in each st around (18) [Start of puff sleeve]
🧶 Rounds 8–12: sc in each st around (18)
🧶 Round 13: (sc 1, dec) x 6 (12)
🧶 Round 14: dec x 6 (6)
🧶 Fasten off, leaving a tail. Flatten the top of the arm slightly before sewing.
Component 4: The Victorian Ruff (Cream/Beige)
This is worked flat and tied or sewn onto the neck.
🧶 Row 1: Chain 20 (ensure this fits loosely around the neck), turn.
🧶 Row 2: ch 2 (counts as dc), 3 dc in every ch across. Turn.
🧶 Row 3: ch 2, 3 dc in every st across. [This creates extreme ruffling]
🧶 Fasten off. Twist the piece to encourage the spirals.
Component 5: The Boots (Make 2, Grey/Black)
🧶 Round 1: 6 sc in magic ring (6)
🧶 Round 2: inc in each st around (12)
🧶 Round 3: (sc 3, inc) x 3 (15)
🧶 Rounds 4–6: sc in each st around (15)
🧶 Round 7: (sc 3, dec) x 3 (12)
🧶 Rounds 8–10: sc in each st around (12)
🧶 Fasten off. Stuff lightly.
Assembly & Final Touches
➡️ The Hair: Cut strands of Orange yarn approx. 10cm long. Latch hook them onto the head starting from the hairline and working back. Use the pet slicker brush to vigorously brush the yarn until it turns into fluff. Trim into the iconic “horns” shape.
➡️ The Face: Using Red embroidery thread or thin yarn, stitch lines starting from the corners of the mouth, curving up through the cheeks, and ending vertically through the center of the eyes. This is the defining feature—take your time.
➡️ The Suit: Sew three red pom-poms (or crochet small red balls: 6sc in MR) down the center of the chest. Surface slip stitch a red belt line between Rounds 12 and 13 of the body.
➡️ Assembly: Sew head to body. Attach ruff around the neck seam. Sew arms at the shoulder line. Sew boots to the bottom of the body.
Tips & FAQs
Q: The hair isn’t fluffing up properly.
A: Ensure you are using 100% acrylic yarn. Cotton or wool blends do not brush out into “fur” as easily.
Q: The head wobbles.
A: The ruff adds weight. Be sure to stuff the neck very firmly, or insert a supportive dowel or glue stick inside the neck for stability.
A Final Word
You have summoned a creature of great character from a single strand of yarn. Stand back and admire the balance of fear and softness you have achieved. It is a true testament to your skill.

