There is a profound joy in shrinking the world of high fashion down to the tip of a crochet hook. This project is not merely a doll; she is a style icon in miniature, a celebration of free-spirited elegance and the bohemian soul. We are not just crafting a toy; we are acting as couturiers, building a wardrobe that tells a story of sunny days and wildflower fields.
Let us pick up our hooks and breathe life into this fashionable wanderer.
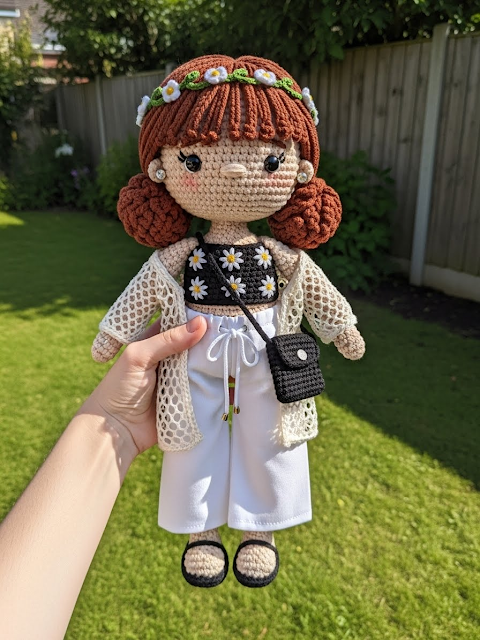
About This Creation: The Art of Miniature Fashion
The “Daisy Wanderer” represents a shift from simple plushies to detailed character design. The focus here is on texture and layering. Unlike standard amigurumi where the outfit is often crocheted as part of the body, this project features removable garments.
This approach teaches you valuable skills in shaping fit-to-size clothing and working with finer details like embroidery on knitwear. She is the perfect canvas for your creativity—once you master the base body, you can design endless wardrobes for her.
Project Snapshot
📊 Difficulty: Intermediate (requires color changes and clothing construction) ⏰ Est. Time: 12–15 Hours 📏 Size: Approx. 28cm (11 inches) tall “Elegance is the only beauty that never fades.” — Audrey Hepburn
Materials & Tools Needed
🧶 Yarn:
- Skin Tone: Sport weight/4ply cotton (Beige or preferred tone)
- Clothing: Black (top/bag), White (pants/cardigan), Cream (cardigan variant), Yellow (centers/shoes), Green (vines).
- Hair: Chestnut Brown (DK or Sport weight).
🪡 Hook: 2.00mm or 2.25mm (keep tension tight). ✨ Other Materials:
- 8mm or 9mm Safety Eyes (Black)
- Fiberfill stuffing (high quality)
- Tapestry needle (sharp tip for embroidery)
- Small gold bead or button (for the bag)
- Optional: Craft wire or a glue stick for neck stability.
- Blush for cheeks.

Abbreviations & Stitches Used
- MR: Magic Ring
- ch: Chain
- sc: Single Crochet
- inc: Increase (2 sc in one st)
- dec: Decrease (invisible decrease preferred)
- hdc: Half Double Crochet
- dc: Double Crochet
- sl st: Slip Stitch
- BLO: Back Loop Only
- FLO: Front Loop Only
The Complete “Daisy Wanderer” Pattern
The Head (Gaze of Innocence Shaping)
Work in spirals with Skin Tone.
Rnd 1: 6 sc in MR (6) Rnd 2: 6 inc (12) Rnd 3: (1 sc, inc) x 6 (18) Rnd 4: (2 sc, inc) x 6 (24) Rnd 5: (3 sc, inc) x 6 (30) Rnd 6: (4 sc, inc) x 6 (36) Rnd 7: (5 sc, inc) x 6 (42) Rnd 8: (6 sc, inc) x 6 (48) Rnd 9: (7 sc, inc) x 6 (54) Rnd 10–19: Sc in each st around (54) [10 rounds] Rnd 20 (Cheek Shaping): 18 sc, (inc, 1 sc) x 3, 6 sc, (1 sc, inc) x 3, 18 sc (60) Rnd 21–24: Sc in each st around (60) Rnd 25: 18 sc, (dec, 1 sc) x 3, 6 sc, (1 sc, dec) x 3, 18 sc (54) Insert safety eyes between Rnd 19 and 20, roughly 9 stitches apart (centered on the face). Rnd 26: (7 sc, dec) x 6 (48) Rnd 27: (6 sc, dec) x 6 (42) Rnd 28: (5 sc, dec) x 6 (36) Rnd 29: (4 sc, dec) x 6 (30) Start stuffing firmly, emphasizing the cheeks. Rnd 30: (3 sc, dec) x 6 (24) Rnd 31: (2 sc, dec) x 6 (18) Rnd 32: (1 sc, dec) x 6 (12) Fasten off, leave a long tail for sewing.
The Legs & Body
Make 2 Legs. Start with White (Shoes), switch to Skin Tone.
Rnd 1: (White) 6 sc in MR (6) Rnd 2: 6 inc (12) Rnd 3: (1 sc, inc) x 6 (18) Rnd 4–6: Sc in each st around (18) Rnd 7: (Skin Tone) BLO sc around (18) Rnd 8–20: Sc in each st around (18) Fasten off first leg. Do not cut yarn of second leg.
Joining: Rnd 21: Ch 3, join to first leg with sc. Sc around first leg (18), sc across ch 3 (3), sc around second leg (18), sc across other side of ch 3 (3). (42) Rnd 22–28: Sc in each st around (42) [Hips] Rnd 29: (5 sc, dec) x 6 (36) Rnd 30–35: Sc in each st around (36) Rnd 36: (4 sc, dec) x 6 (30) Rnd 37–42: Sc in each st around (30) Rnd 43: (3 sc, dec) x 6 (24) Rnd 44: (2 sc, dec) x 6 (18) Rnd 45–46: Sc in each st around (18) [Neck] Stuff body firmly. Insert neck support if using.
The Arms (Make 2)
Skin Tone.
Rnd 1: 6 sc in MR (6) Rnd 2: (2 sc, inc) x 2 (8) Rnd 3–18: Sc in each st around (8) Lightly stuff the hand only. Flatten top and sc through both sides to close.
The Couture: Palazzo Pants
White Yarn. These are worked from the waist down.
Row 1: Ch 43 (measure around doll waist to ensure fit), sl st to join. Rnd 2: Ch 2 (does not count as st), dc in each ch around, sl st to join. (43) Rnd 3–8: Dc in each st around. Divide for Legs: Skip 21 sts, sl st into 22nd st. Work each leg separately. Leg Rnd 1: Ch 2, 2 dc in every st around (increase for volume). Leg Rnd 2–10: Dc in each st around. Leg Rnd 11 (Cuff): (1 sc, dec) around until opening fits ankle snugly. Leg Rnd 12: Sc around. Fasten off. Repeat for second leg. Weave a black string through the waist for the drawstring.
The Couture: Daisy Crop Top
Black Yarn.
Row 1: Ch 38 (check chest circumference), turn. Row 2: Sc in 2nd ch from hook and across. Row 3–10: Sc across. Row 11: Sc across. Fasten off. Straps: Attach yarn at top corners, ch 8, attach to back. Embroidery: Use white yarn to stitch 3-4 simple daisy shapes (lazy daisy stitch or simple straight stitches) with yellow french knots in the center.
The Couture: Lacy Cardigan
White or Cream Yarn.
Row 1: Ch 30. Row 2: Dc in 4th ch from hook. Ch 1, sk 1, dc in next repeat across. (Mesh stitch). Row 3–12: Repeat mesh pattern to create a rectangle. Assembly: Fold the rectangle in half lengthwise. Sew the short sides up leaving a hole for the arm. This creates a shrug style.
The Crown: Hair & Headband
Chestnut Brown.
Wig Cap: Repeat Rnd 1–9 of Head pattern. Strands: Ch 20, sc back down. Repeat around the rim of the cap for bangs and side pieces. Buns: Make 2 small spheres (6 sc in MR, inc to 12, sc 2 rnds, dec to 6). Sew to sides of wig cap. Headband: With Green, ch 50. Sew tiny white “x” shapes along it to mimic flowers. Tie around head.

Assembly & Final Touches
- Body: Sew the arms to the body at Rnd 43.
- Head: Sew head to neck securely. Add extra stuffing in the neck area to prevent wobbling.
- Face: Embroider a tiny nose one row below the eyes using skin tone yarn (wrap 2-3 times). Apply blush under the eyes.
- Dressing: Put on the pants first, then the top. Slide the cardigan arms on carefully.
- Bag: Crochet a small black rectangle (10 sc x 8 rows), fold and sew sides. Add a long chain strap (50 ch). Sew a gold bead to the front.
Tips & FAQs
- Q: My doll’s head is wobbly. What do I do?
- A: This is common with the “Echo of Youth” aesthetic (large head). Use a glue stick (the tube itself, emptied and cleaned) or a dowel inside the neck for a rigid spine.
- Q: Can I use acrylic yarn?
- A: Yes, but cotton provides that crisp, high-definition stitch look seen in the photos. Acrylic will be fuzzier.
A Final Word
You have now woven a little soul into existence. The Daisy Wanderer is ready to sit upon your shelf or explore the garden. Remember, the beauty of amigurumi lies in the imperfections—the unique tension of your hand that makes this doll solely yours.
Until we meet again in the atelier,
Patricia

