
There is a profound quiet in the studio today, the kind that invites innovation. I have been sketching a little warrior, one who usually roars but today simply coos. This project is about softening the edges of a legend. We are taking a fierce icon and translating him into pure, handheld joy.
About This Creation & The Texture Angle
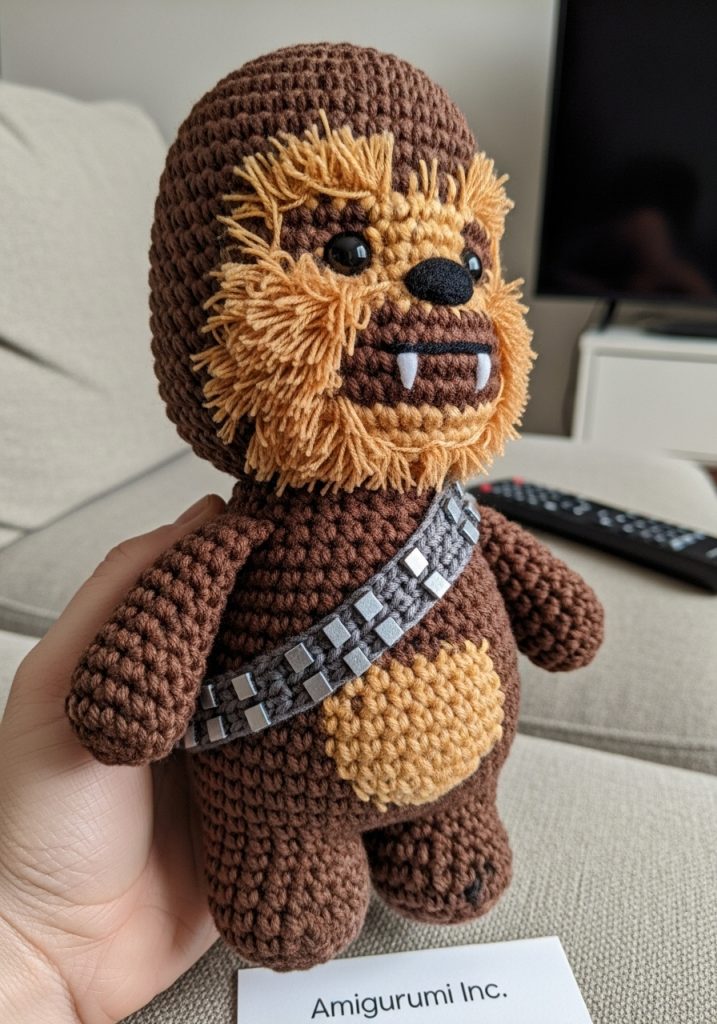
This Star-Cub is not merely a toy; it is a study in texture management. Many creators shy away from “furry” characters because specialty yarns can be difficult to see and work with. However, this project utilizes standard cotton or acrylic yarn. We achieve that iconic fuzzy look through strategic loop placement and brushing.
We are channeling the “Baby Schema” here. By lowering the eyes and widening the head, we tap into the biological instinct to nurture. He is designed to be held, to sit on a desk as a silent, loyal companion.
Project Snapshot:
📊 Difficulty: Intermediate (due to color changes/loops)
⏰ Est. Time: 4–6 Hours
📏 Size: Approx. 14cm Tall
“The magic is not in the complexity of the stitch, but in the placement of the eyes.” — Patricia
Materials & Tools Needed
🧶 Yarn:
- Medium Weight (4) Yarn in Chocolate Brown (Body)
- Medium Weight (4) Yarn in Caramel or Honey (Face/Highlights)
- Light Weight (3) Yarn in Silver/Grey (Bandolier)
- Scrap Black Yarn (Nose)
🪡 Hook: 2.5mm (US C/2) – We want tight stitches so stuffing does not show.
✨ Other Materials:
- 10mm Safety Eyes (Black)
- Fiberfill Stuffing
- Yarn Needle
- Pet Slicker Brush (for fuzzing up the yarn)
- White Embroidery Thread (for the tiny fangs)
Abbreviations & Stitches Used
ch: chain
sl st: slip stitch
sc: single crochet
inc: increase (2 sc in one stitch)
dec: decrease (invisible decrease preferred)
blo: back loop only
The Complete Star-Cub Pattern
The Head (Chocolate Brown)
We begin with the cranium. It must be oversized to achieve that ‘chibi’ look.
Round 1: 6 sc in a magic ring (6)
Round 2: inc in every st (12)
Round 3: (sc 1, inc) x 6 (18)
Round 4: (sc 2, inc) x 6 (24)
Round 5: (sc 3, inc) x 6 (30)
Round 6: (sc 4, inc) x 6 (36)
Round 7: (sc 5, inc) x 6 (42)
Round 8: (sc 6, inc) x 6 (48)
Round 9 – Round 20: sc in each st around (48) [Note: We do 12 rounds here to give him a high forehead, crucial for the aesthetic.]
Round 21: (sc 6, dec) x 6 (42)
Round 22: (sc 5, dec) x 6 (36)
Round 23: (sc 4, dec) x 6 (30)
Insert safety eyes between Round 16 and 17, approximately 9 stitches apart. Ensure they are low on the face.
Round 24: (sc 3, dec) x 6 (24)
Round 25: (sc 2, dec) x 6 (18)
Fasten off, leaving a long tail for sewing. Stuff firmly, focusing on the cheeks.
The Legs (Make 2 – Chocolate Brown)
Short and stout foundations.
Round 1: 6 sc in a magic ring (6)
Round 2: inc in every st (12)
Round 3: (sc 1, inc) x 6 (18)
Round 4 – Round 6: sc in each st around (18)
Fasten off the first leg. Do NOT fasten off the second leg. Chain 2, then join to the first leg with a sc.
The Body
Round 7: sc 18 around first leg, sc 2 along the chain, sc 18 around second leg, sc 2 along the other side of the chain (40)
Round 8 – Round 12: sc in each st around (40) [Building the pot belly.]
Round 13: (sc 8, dec) x 4 (36)
Round 14: sc in each st around (36)
Round 15: (sc 4, dec) x 6 (30)
Round 16: sc in each st around (30)
Round 17: (sc 3, dec) x 6 (24)
Round 18: sc in each st around (24)
Round 19: (sc 2, dec) x 6 (18)
Fasten off and stuff the body firmly.
The Arms (Make 2 – Chocolate Brown)
Round 1: 6 sc in a magic ring (6)
Round 2: (sc 1, inc) x 3 (9)
Round 3 – Round 9: sc in each st around (9)
Round 10: Fold opening flat and sc through both sides to close (4)
Fasten off, leave tail for sewing.
The Bandolier (Silver/Grey)
The accessory that defines the hero.
Row 1: ch 35 (check length against your doll).
Row 2: Starting in 2nd ch from hook, sc across.
Row 3: Turn, sc 2, bobble stitch (4 dc cluster), sc 2 repeat until end.
Fasten off. Sew ends together to form a sash.
Assembly & Final Touches
➡️ Head to Body: Pin the head to the body. Because the head is large, ensure you sew around the neck twice to prevent wobbling.
➡️ Face Sculpting: Using Caramel yarn, cut 3-inch strands. Latch hook them around the face (framing the eyes and mouth area) to create a “mane.” Once attached, use the slicker brush to vigorously brush these strands until they turn into soft fluff. Trim neatly.
➡️ The Fangs: Using white embroidery thread, stitch two tiny vertical lines below the nose.
➡️ The Bandolier: Place the sash over the right shoulder and tack it down with a small stitch so it does not slip.
Tips & FAQs
Q: My “fur” looks messy. A: Trimming is the secret. After brushing the yarn, give it a haircut. Uniformity brings the look together.
Q: Can I use safety eyes for a child under 3? A: I recommend embroidering the eyes with black yarn instead for safety compliance.
A Final Word
There is immense satisfaction in seeing a pile of yarn become a character with a soul. This Star-Cub is a protector of dreams and a keeper of secrets. I hope he brings a smile to your face every time you pass your workspace.
Go forth and create, Patricia

