There are mornings when the sun is too bright, the bed is too warm, and the world simply asks too much of us. This project is a tribute to those quiet, heavy-lidded moments. We are not creating just a doll today; we are crafting a feeling. The “Still Tired” Fox is a gentle reminder that it is perfectly acceptable to need a moment—and a strong coffee—before facing the day. Let us pick up our hooks and find comfort in the rhythm of the stitch.
About The Chibi Fox (Monday Morning Edition)
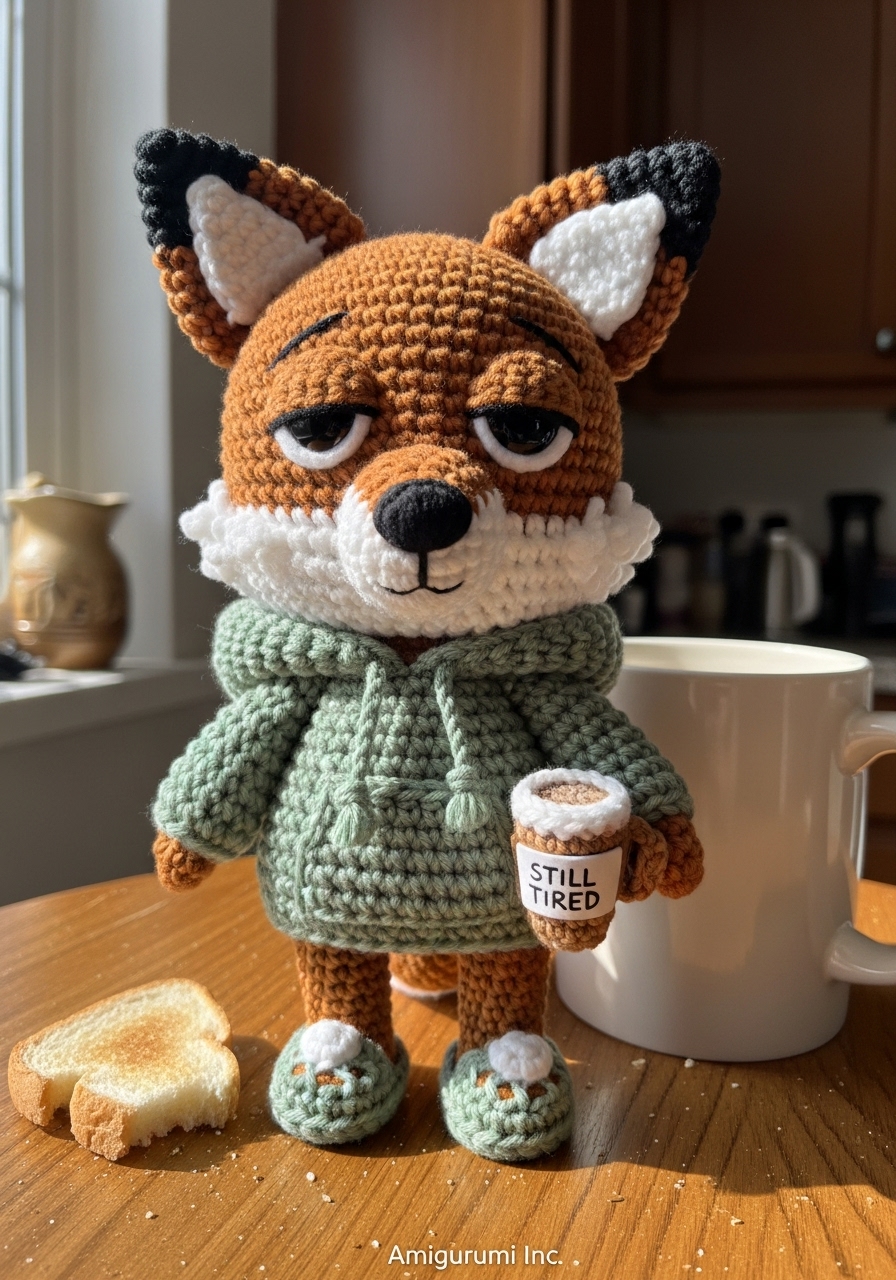
Unlike his perky forest cousins, this little fox has hit the snooze button one too many times. He is dressed in his most reliable “cozy-core” essentials: a hooded sweatshirt that is slightly too big (for maximum comfort) and slippers that have seen better days. His posture is unapologetically slouched, and his grip on his tiny crocheted coffee cup is the only thing tethering him to wakefulness. He is an endearing sculpted piece of reality, rendered in soft cotton.
Project Snapshot:
📊 Difficulty: Intermediate (Requires shaping and facial detailing)
⏰ Est. Time: 6-8 Hours
📏 Size: 20cm (Slouching)
“Even the wildest creatures need a slow start to the morning.” — Patricia Poltera
Materials & Tools Needed
🧶 Yarn: Matte Cotton (DK/Light Worsted) in Fox Orange, Hoodie Color (Sage or Grey), Cup White, and Brown.
🧶 Yarn (Special): White Fluffy/Eyelash yarn for the muzzle patch.
🪡 Hook: 2.75mm (for doll), 3.5mm (for oversized hoodie).
✨ Other Materials: 12mm Safety Eyes, Polyfill stuffing, Black embroidery thread, Tapestry needle.

Abbreviations & Stitches Used
ch: chain
sl st: slip stitch
sc: single crochet
inc: increase (2 sc in one st)
dec: decrease (sc 2 together)
BLO: back loop only
The Complete Chibi Fox Pattern
Part 1: The Chibi Head (Orange Cotton)
The foundation of his cuteness is the exaggerated size of the head.
➡️ R1: Start 6 sc in a magic ring.
➡️ R2: Inc in every st (12).
➡️ R3: (Sc 1, inc) x 6 (18).
➡️ R4: (Sc 2, inc) x 6 (24).
➡️ R5: (Sc 3, inc) x 6 (30).
➡️ R6: (Sc 4, inc) x 6 (36).
➡️ R7: (Sc 5, inc) x 6 (42).
➡️ R8-R16: Sc in each st around (42).
➡️ R17: (Sc 5, dec) x 6 (36).
➡️ Insert Safety Eyes between R13 and R14, spaced 8 stitches apart. Place one slightly lower than the other.
➡️ R18: (Sc 4, dec) x 6 (30).
➡️ R19: (Sc 3, dec) x 6 (24).
➡️ R20: (Sc 2, dec) x 6 (18).
➡️ Finish off, leaving a tail for sewing. Stuff firmly.
Part 2: The Heavy Eyelids (Orange Cotton)
These are crucial for the sleepy expression. Make 2.
➡️ Ch 6.
➡️ Starting in 2nd ch from hook, sl st, sc, hdc, sc, sl st.
➡️ Fasten off. You will sew these directly over the top half of the safety eyes later.
Part 3: The Fluffy Muzzle Patch (White Fluffy Yarn)
This creates the signature heart-shaped face.
➡️ R1: Ch 4. In 2nd ch from hook, sc 3. Ch 1, turn.
➡️ R2: Inc, sc 1, inc (5). Ch 1, turn.
➡️ R3: Inc, sc 3, inc (7). Ch 1, turn.
➡️ R4: Sc across (7).
➡️ Fasten off. This patch will be sewn onto the face before adding the nose.
Part 4: The Slouchy Body (Orange Cotton)
➡️ R1: 6 sc in magic ring.
➡️ R2: Inc in every st (12).
➡️ R3: (Sc 1, inc) x 6 (18).
➡️ R4-R8: Sc around (18).
➡️ R9: (Sc 1, dec) x 6 (12).
➡️ Fasten off. Stuff lightly so he is squishy.
Part 5: The Oversized Hoodie (Your Choice of Color)
Use the larger 3.5mm hook to ensure it looks baggy.
➡️ Body: Ch 20, join to form a circle. Sc around for 6 rows.
➡️ Hood: Attach yarn to back of neck opening. Sc 10 rows back and forth (not in round). Fold top edge and sew closed to make the hood shape.
➡️ Sleeves (Make 2): Attach yarn to side of hoodie body. Ch 8, join circle. Sc 10 rows (make them long!). Fasten off.
➡️ Pocket: Ch 5, sc 2 rows. Sew onto front of hoodie, leaving top open.
Part 6: Accessories (Cup, List, & Slippers)
➡️ Cup: With white, 6 sc in ring. BLO sc 6 for R2. Sc 6 for R3-4. Change to brown (coffee) for last row. Embroider “TIRED” or dashes on side.
➡️ List: Ch 5, sc 3 rows in white. Use black thread to stitch messy lines.
➡️ Slippers: Ch 4, sc around chain (oval). Work 2 rows sc. Embroidery a “hole” with skin color yarn if desired.
Assembly & Final Touches
This is where the personality emerges.
1. The Face: Sew the Fluffy Muzzle Patch centrally below the eyes. Embroider a small black triangle nose on the fluff.
2. The Tired Gaze: Sew the Eyelids over the top half of the safety eyes. Angle them slightly downwards at the outer corners for maximum exhaustion.
3. The Posture: Sew the head to the body, but tilt the head slightly forward and to the side. He should look like he is nodding off.
4. Dressing: Put the hoodie on the doll. Pull the sleeves down so they cover his paws completely. Place the slippers on his feet.
5. Props: Stitch the coffee cup to one sleeve-end and the crumpled list to the other.
Artisan’s Notes
For the hoodie, I recommend using a slightly stiffer cotton or even a wool blend if you want a “fuzzier” fabric look, though the stitch definition of cotton is always superior for photography. Do not overstuff the body; a little squishiness helps him sit or stand with that characteristic slouch.
Tips & FAQs
Q: My fox won’t stand up!
A: Because of the large head and slouchy posture, you may need to put a small pouch of weighted beads (plastic pellets) in the base of the body and feet. Alternatively, lean him against a stack of books—it fits the theme!
Q: Can I use felt for the muzzle?
A: I strongly advise against it. The texture of the fluffy yarn against the smooth cotton is the “Touch of Reality” we strive for. Felt often looks flat in comparison.
A Final Word
I hope this little sleepy fox brings a smile to your face, even on the grayest of Mondays. There is beauty in the imperfections, in the tiredness, and in the slow, steady progress of a project well made.
Patricia Poltera

