It is a joy to have you here in the studio today. We are about to breathe life into Bella, a little dancer who carries the softness of spring in her step. This project is close to my heart because it balances simple shapes with a burst of color, proving that elegance does not need to be complicated. Let us pick up our hooks and begin this journey together.
About This Creation & Angle
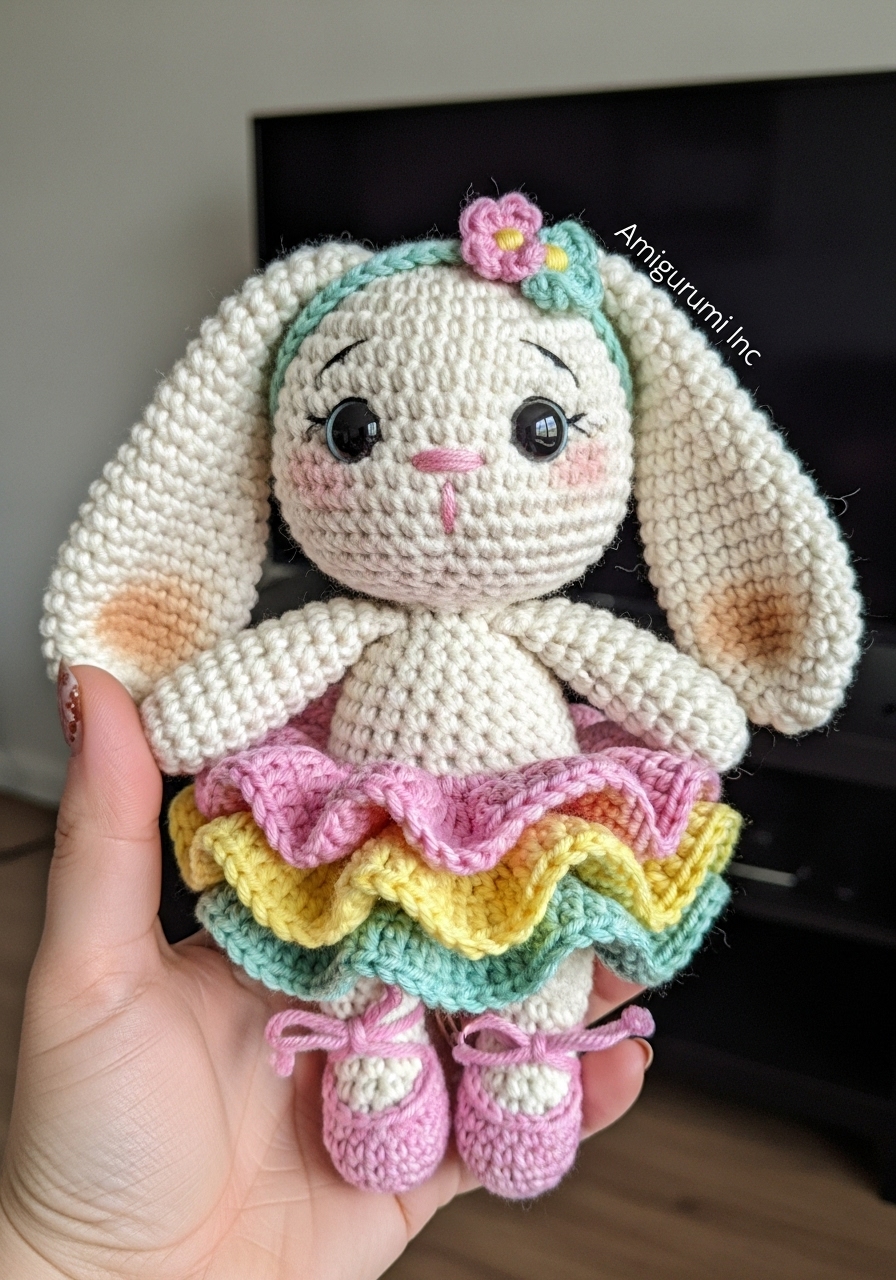
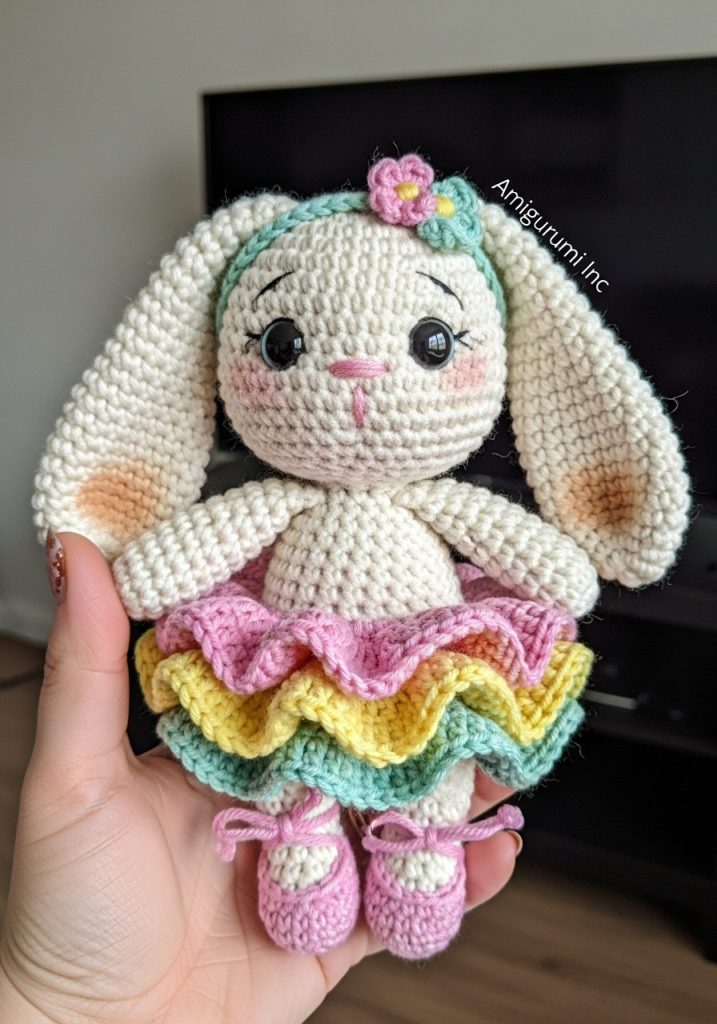
Bella is designed to capture the innocence of a child’s first recital. We are avoiding the stiff, store-bought look in favor of something that feels cherished and held. By using a “sherbet” palette—mint, lemon, and soft pink—we create a visual story that is bright yet gentle on the eyes.
Commercially, this project hits a sweet spot. It appeals to parents looking for heirlooms and crafters who want to practice garment-making on a miniature scale. The removable tutu adds a layer of playability that transforms this from a mere statue into a beloved toy.
Project Snapshot:
📊 Difficulty: Intermediate (due to the color changes and tutu)
⏰ Est. Time: 6–8 Hours
📏 Size: Approx. 18cm tall (ears included)
“There is a quiet magic in the moment a ball of yarn becomes a friend. Treat every stitch as a heartbeat.” — Patricia Poltera
Materials & Tools Needed
🧶 Yarn: Cotton or cotton-blend sport weight yarn. Colors: Cream (Main), Baby Pink, Lemon Yellow, Mint Green, and a scrap of Black for embroidery.
🪡 Hook: 2.5mm (or size needed to obtain a tight fabric)
✨ Other Materials: Fiberfill stuffing, 10mm safety eyes, tapestry needle, stitch markers, small pearl bead (optional for headband).
Abbreviations & Stitches Used
ch: chain
sl st: slip stitch
sc: single crochet
inc: increase (2 sc in one stitch)
dec: decrease (invisible decrease preferred)
BLO: back loop only
FLO: front loop only
The Complete Bella Pattern
The Head (In Cream)
We begin with the seat of her expression. We want a large, rounded shape to emphasize that youthful look.
Row 1: Start with a magic ring and work 6 sc into it. (6)
Row 2: Work 2 sc in each stitch around. (12)
Row 3: 🧶 sc in next st, inc in next. Repeat 6 times. (18)
Row 4: 🧶 sc in next 2 sts, inc in next. Repeat 6 times. (24)
Row 5: 🧶 sc in next 3 sts, inc in next. Repeat 6 times. (30)
Row 6: 🧶 sc in next 4 sts, inc in next. Repeat 6 times. (36)
Row 7: 🧶 sc in next 5 sts, inc in next. Repeat 6 times. (42)
Row 8: 🧶 sc in next 6 sts, inc in next. Repeat 6 times. (48)
Row 9: 🧶 sc in next 7 sts, inc in next. Repeat 6 times. (54)
Row 10: 🧶 sc in next 8 sts, inc in next. Repeat 6 times. (60)
Rows 11–22: sc in each stitch around. (60) Place eyes between Rows 18 and 19, about 11 stitches apart.
Row 23: 🧶 sc in next 8 sts, dec. Repeat 6 times. (54)
Row 24: 🧶 sc in next 7 sts, dec. Repeat 6 times. (48)
Row 25: 🧶 sc in next 6 sts, dec. Repeat 6 times. (42)
Row 26: 🧶 sc in next 5 sts, dec. Repeat 6 times. (36)
Row 27: 🧶 sc in next 4 sts, dec. Repeat 6 times. (30)
Row 28: 🧶 sc in next 3 sts, dec. Repeat 6 times. (24)
Artisan’s Note: Stuff the head firmly now. Pay attention to the cheeks; add a little extra stuffing there to round them out.
Row 29: 🧶 sc in next 2 sts, dec. Repeat 6 times. (18)
Fasten off, leaving a long tail for sewing.
The Legs (Make 2)
Start with Baby Pink for the slippers.
Row 1: Magic ring, 6 sc. (6)
Row 2: inc in each st around. (12)
Row 3: 🧶 sc in next st, inc in next. Repeat 6 times. (18)
Rows 4–6: sc in each stitch around. (18)
Row 7: Change to Cream. Working in BLO, sc in each stitch around. (18)
Rows 8–15: sc in each stitch around. (18)
Fasten off the first leg. Do not fasten off the second leg.
The Body
We will join the legs to create the body.
Row 16: From the second leg, chain 3. Join to the first leg with a sc. sc in the remaining 17 sts of the first leg, sc in the 3 chains, sc in the 18 sts of the second leg, sc in the other side of the 3 chains. (42)
Rows 17–24: sc in each stitch around. (42) This creates the tummy.
Row 25: 🧶 sc in next 5 sts, dec. Repeat 6 times. (36)
Rows 26–28: sc in each stitch around. (36)
Row 29: 🧶 sc in next 4 sts, dec. Repeat 6 times. (30)
Rows 30–32: sc in each stitch around. (30)
Row 33: 🧶 sc in next 3 sts, dec. Repeat 6 times. (24)
Row 34: 🧶 sc in next 2 sts, dec. Repeat 6 times. (18)
Row 35: sc in each stitch around. (18)
Fasten off and stuff the body well.
The Arms (Make 2 – Cream)
Row 1: Magic ring, 6 sc. (6)
Row 2: inc in each st around. (12)
Rows 3–12: sc in each stitch around. (12)
Row 13: 🧶 sc in next 4 sts, dec. Repeat 2 times. (10)
Row 14: Flatten the opening and sc through both sides to close (5 sc). Leave a tail for sewing.
The Lopped Ears (Make 2 – Cream)
We want these long and soft, draping down rather than standing up.
Row 1: Magic ring, 6 sc. (6)
Row 2: inc in each st around. (12)
Row 3: 🧶 sc in next st, inc in next. Repeat 6 times. (18)
Rows 4–8: sc in each stitch around. (18)
Row 9: 🧶 sc in next 7 sts, dec. Repeat 2 times. (16)
Rows 10–14: sc in each stitch around. (16)
Row 15: 🧶 sc in next 6 sts, dec. Repeat 2 times. (14)
Rows 16–20: sc in each stitch around. (14)
Row 21: Flatten and sc through both sides to close. Leave a tail for sewing.
The Sherbet Tutu
This is worked as a separate piece to tie around the waist. Use Baby Pink.
Row 1: Chain a length that fits loosely around the waist (approx 30 ch), sl st to join circle.
Row 2: sc in each ch around.
Row 3 (Pink Ruffle): In FLO, ch 3, 2 dc in same st, 2 dc in next st. Repeat around. Fasten off Pink.
Row 4 (Yellow Ruffle): Join Yellow yarn to the BLO of Row 2. ch 3, 2 dc in same st, 2 dc in next st. Repeat around. Fasten off Yellow.
Row 5 (Mint Ruffle): Join Mint yarn to the foundation chain loops behind the Yellow layer. ch 3, 2 dc in same st, 2 dc in next st. Repeat around.
Assembly & Final Touches
- Head to Body: Pin the head to the body. Ensure the face is facing forward before sewing securely.
- Arms: Sew the arms at the neck seam, slightly angled forward as if she is ready to hold a pose.
- Ears: Attach the ears at Row 5 of the head. Sew them so they hang downwards, framing the face.
- Face: Use black yarn to embroider a small “Y” shape for the nose and mouth between the eyes. Add small pink lines for blush under the eyes if desired.
- Dress: Slide the tutu onto the body.
- Slipper Ties: Cut two lengths of pink yarn. Tie them around the ankles in a bow to simulate ballet ribbons.
Tips & FAQs
Q: Can I use acrylic yarn? A: You certainly can, though cotton offers a cleaner stitch definition which helps the photos look crisp.
Q: The head feels too heavy. A: This is common with the “Echo of Youth” style. Be sure to stuff the neck area very firmly, or insert a small dowel or extra rolled-up felt inside the neck for support.
A Final Word
And there she is—Bella. She is not just loops of thread; she is a character waiting for a story. I hope you found peace in the rhythm of your hands today. Remember, the slight imperfections are what give her a soul.

