
There is a quiet magic in stitching a companion who looks as though she has stories to tell. Today, we bring Penelope to life—a guardian of the garden who reminds us that patience, much like a seed, always blooms into something beautiful. Let us pick up our hooks and begin this journey together.
About This Creation & The Heirloom Angle
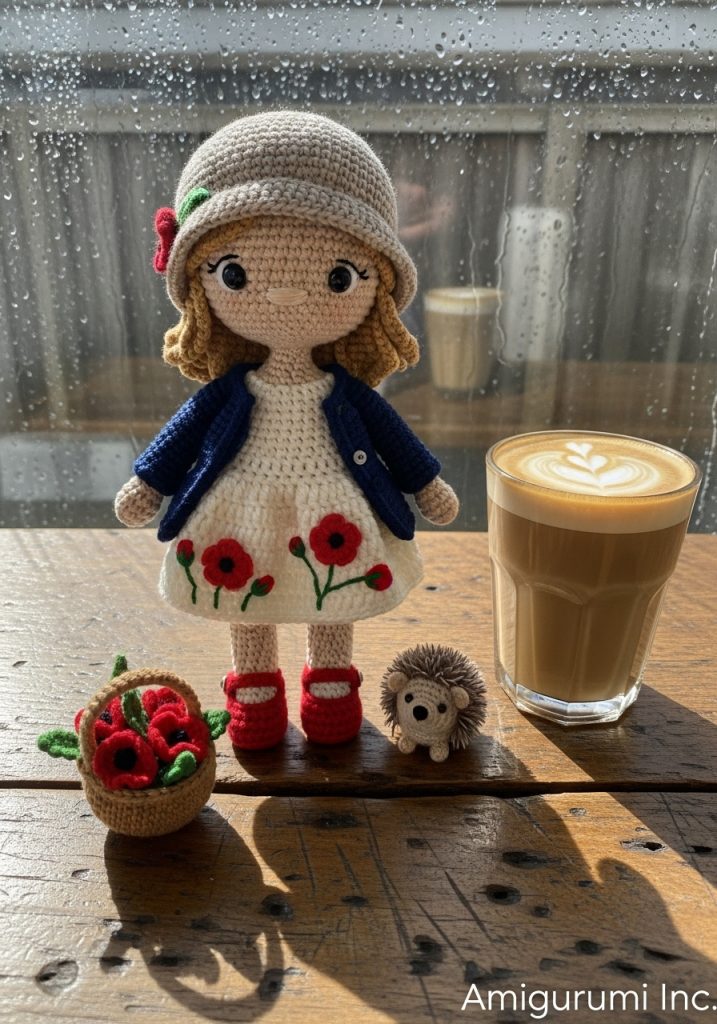
Penelope is not merely a doll; she is a study in texture and narrative. In this project, we move beyond simple shaping to explore the art of “wardrobing.” By creating removable garments—her structured cloche hat, the embroidered A-line dress, and the textured cardigan—we elevate a simple toy into a cherished keepsake.
This pattern also introduces you to the concept of “micro-companions.” The miniature hedgehog, Barnaby, is designed to complement Penelope’s scale, teaching you how to work with intention on a much smaller canvas. The poppy details are the final flourish, using simple embroidery stitches to turn plain white yarn into a flowering meadow.
Project Snapshot:
📊 Difficulty: Intermediate (Requires patience with small details)
⏰ Est. Time: 12–15 Hours
📏 Size: Approx. 28cm (11 inches) tall
“A true heirloom is not defined by the yarn you buy, but by the love you stitch into the smallest details.” — Patricia Poltera
Materials & Tools Needed
🧶 Yarn: Sport weight or DK cotton yarn in Biscuit (Skin), Cream White (Dress), Navy Blue (Cardigan), Ruby Red (Shoes/Flowers), Beige (Hat/Basket), and Warm Brown (Hedgehog).
🪡 Hook: 2.5mm (or size needed to obtain tight tension)
✨ Other Materials: 8mm safety eyes, embroidery needle, fiberfill stuffing, stitch markers, small black beads (for Hedgehog eyes), wire (optional for neck support), cardboard (for shoe soles).
Abbreviations & Stitches Used
ch: chain
sl st: slip stitch
sc: single crochet
inc: increase (2 sc in one st)
dec: decrease (invisible decrease preferred)
hdc: half double crochet
dc: double crochet
BLO: back loop only
FLO: front loop only
bobble: bobble stitch (for hedgehog texture)
The Complete Penelope Pattern
Component 1: The Sculpted Head (Skin Color)
Work in a continuous spiral.
R1: Start 6 sc in a magic ring (6)
R2: Inc in all 6 st (12)
R3: (Sc 1, inc) x 6 (18)
R4: (Sc 2, inc) x 6 (24)
R5: (Sc 3, inc) x 6 (30)
R6: (Sc 4, inc) x 6 (36)
R7: (Sc 5, inc) x 6 (42)
R8: (Sc 6, inc) x 6 (48)
R9: (Sc 7, inc) x 6 (54)
R10–R19: Sc in each st around (54) [10 rounds for height]
R20: (Sc 8, inc) x 6 (60) [Cheek shaping begins]
R21–R24: Sc in each st around (60)
R25: (Sc 8, dec) x 6 (54)
R26: (Sc 7, dec) x 6 (48)
Insert safety eyes between R18 and R19, roughly 10 stitches apart.
R27: (Sc 6, dec) x 6 (42)
R28: (Sc 5, dec) x 6 (36)
R29: (Sc 4, dec) x 6 (30)
R30: (Sc 3, dec) x 6 (24)
Stuff the head firmly, paying attention to the cheek curves.
R31: (Sc 2, dec) x 6 (18)
R32: (Sc 1, dec) x 6 (12)
Fasten off, leaving a long tail for sewing.
Component 2: The Body (Skin Color)
R1: Start 6 sc in a magic ring (6)
R2: Inc in all 6 st (12)
R3: (Sc 1, inc) x 6 (18)
R4: (Sc 2, inc) x 6 (24)
R5: (Sc 3, inc) x 6 (30)
R6: (Sc 4, inc) x 6 (36)
R7: (Sc 5, inc) x 6 (42)
R8: (Sc 6, inc) x 6 (48)
R9–R14: Sc in each st around (48)
R15: (Sc 6, dec) x 6 (42)
R16–R17: Sc in each st around (42)
R18: (Sc 5, dec) x 6 (36)
R19–R20: Sc in each st around (36)
R21: (Sc 4, dec) x 6 (30)
R22–R23: Sc in each st around (30)
R24: (Sc 3, dec) x 6 (24)
R25–R26: Sc in each st around (24)
R27: (Sc 2, dec) x 6 (18)
R28: (Sc 4, dec) x 3 (15)
R29–R31: Sc in each st around (15) [Neck elongation]
Fasten off. Stuff firmly.
Component 3: The Limbs
Legs (Make 2 – Skin Color)
R1: Ch 6. Start in 2nd ch from hook. Sc 4, 3 sc in last ch. Rotate to other side. Sc 3, inc (12)
R2: Inc, sc 3, inc x 3, sc 3, inc x 2 (18)
R3: Sc 1, inc, sc 3, (sc 1, inc) x 3, sc 3, (sc 1, inc) x 2 (24)
R4–R6: Sc in each st around (24)
R7: Sc 6, dec x 6, sc 6 (18) [Shaping the foot]
R8: Sc 6, dec x 3, sc 6 (15)
R9–R25: Sc in each st around (15) [Adjust length as desired]
R26: (Sc 3, dec) x 3 (12)
Fasten off. Stuff the lower leg firmly and the upper leg lightly.
Arms (Make 2 – Skin Color)
R1: Start 6 sc in a magic ring (6)
R2: (Sc 1, inc) x 3 (9)
R3–R20: Sc in each st around (9)
R21: Flatten opening and sc through both layers to close.
Fasten off.
Component 4: The Poppy Dress (Cream White)
Worked from the top down. Turning at end of rows initially.
Row 1: Ch 25. Sc in 2nd ch from hook and across (24)
Row 2: (Sc 3, inc) x 6 (30)
Row 3: (Sc 4, inc) x 6 (36)
Row 4: Sc 5, ch 6 (skip 8 st for armhole), sc 10, ch 6 (skip 8 st), sc 5 (32 st + 12 ch = 44)
Row 5: Sc across all st and chains (44)
Row 6: (Sc 10, inc) x 4 (48)
Join with sl st to first st to begin working in rounds.
R7–R20: Sc in each st around (48)
R21: (Sc 7, inc) x 6 (54)
R22–R28: Sc in each st around (54)
R29: (Sc 1, ch 1) in each st around for a decorative edge.
Fasten off.
Artisan’s Note: Use red yarn and a needle to embroider 5-petal flowers along the skirt hem. Use green thread for vertical stems.
Component 5: The Navy Cardigan (Navy Blue)
Row 1: Ch 27. Sc in 2nd ch from hook and across (26)
Row 2: (Sc 2, inc) around (approx 34)
Row 3: Divide for sleeves: Sc 5, ch 6 (skip 7), sc 10, ch 6 (skip 7), sc 5.
Row 4: Sc across all st and chains.
Row 5–R10: Sc in each st across.
Sleeves: Join yarn at armpit. Sc 15 around the opening. Work 8 rounds. Fasten off.
Component 6: Accessories
Red Shoes (Make 2)
Follow Leg R1–R3 pattern in Red.
R4: BLO sc around (24)
R5–R6: Sc around (24)
R7: Sc 8, ch 6 (strap), skip 8 st, sl st to other side.
Fasten off.
Cloche Hat (Beige)
R1: 6 sc in MR.
R2: Inc x 6 (12)
R3: (Sc 1, inc) x 6 (18)
R4: (Sc 2, inc) x 6 (24)
R5: (Sc 3, inc) x 6 (30)
R6: (Sc 4, inc) x 6 (36)
R7: (Sc 5, inc) x 6 (42)
R8: (Sc 6, inc) x 6 (48)
R9–R15: Sc around (48)
R16: FLO (Sc 3, inc) x 12 (60) [Brim]
R17–R18: Sc around (60). Fasten off.
Barnaby the Hedgehog
Body (Brown): 6 sc in MR. Increase to 24 sc. Work 5 rounds sc.
Spines (Darker Brown): Use loop stitch or bobble stitch for 5 rounds over the back half of the body.
Face: Sew on bead eyes and embroider a snout.
Basket
R1: 6 sc in MR. Increase to 30 sc.
R2: BLO sc around (30).
R3–R8: Sc around (30).
Handle: Ch 20, sc back down the chain. Sew to sides.
Assembly & Final Touches
- Sew the head to the neck of the body. Ensure it is firm so it does not wobble.
- Attach arms at R17 of the body.
- Sew legs to the bottom of the body, slightly spaced apart.
- Embroider the nose on the face using pink thread (horizontal stitches).
- Dress Penelope: First the dress, then the shoes, then the cardigan.
- Place the hat at a slight angle.
- Fill the basket with small red crocheted circles (poppies) and place Barnaby beside her.
Tips & FAQs
Q: My hedgehog looks flat?
A: Ensure you are stuffing him very firmly before closing the final round. The texture stitches need a solid base to pop.
Q: Can I use acrylic yarn?
A: You may, but cotton provides that crisp, defined stitch definition seen in the photos. Acrylic often creates a “fuzz” that obscures the embroidery.
A Final Word
Creating Penelope is an exercise in mindfulness. When you stitch that tiny hedgehog or weave in the ends of the poppy stems, you are not just making a doll; you are crafting a memory. May she bring a sense of peaceful joy to your home.
Yours in creativity,
Patricia

