My Dearest Maker,
To hold a hook is to hold a wand; we do not simply make loops, we cast intentions. This project is close to my heart because it captures the spirit of resilience wrapped in the comfort of yarn. We are not just making a doll today; we are crafting a companion for the bookshelf, a guardian of stories. Take a deep breath, pour your tea, and let us begin this journey together.
About This Creation & The Art of Layering
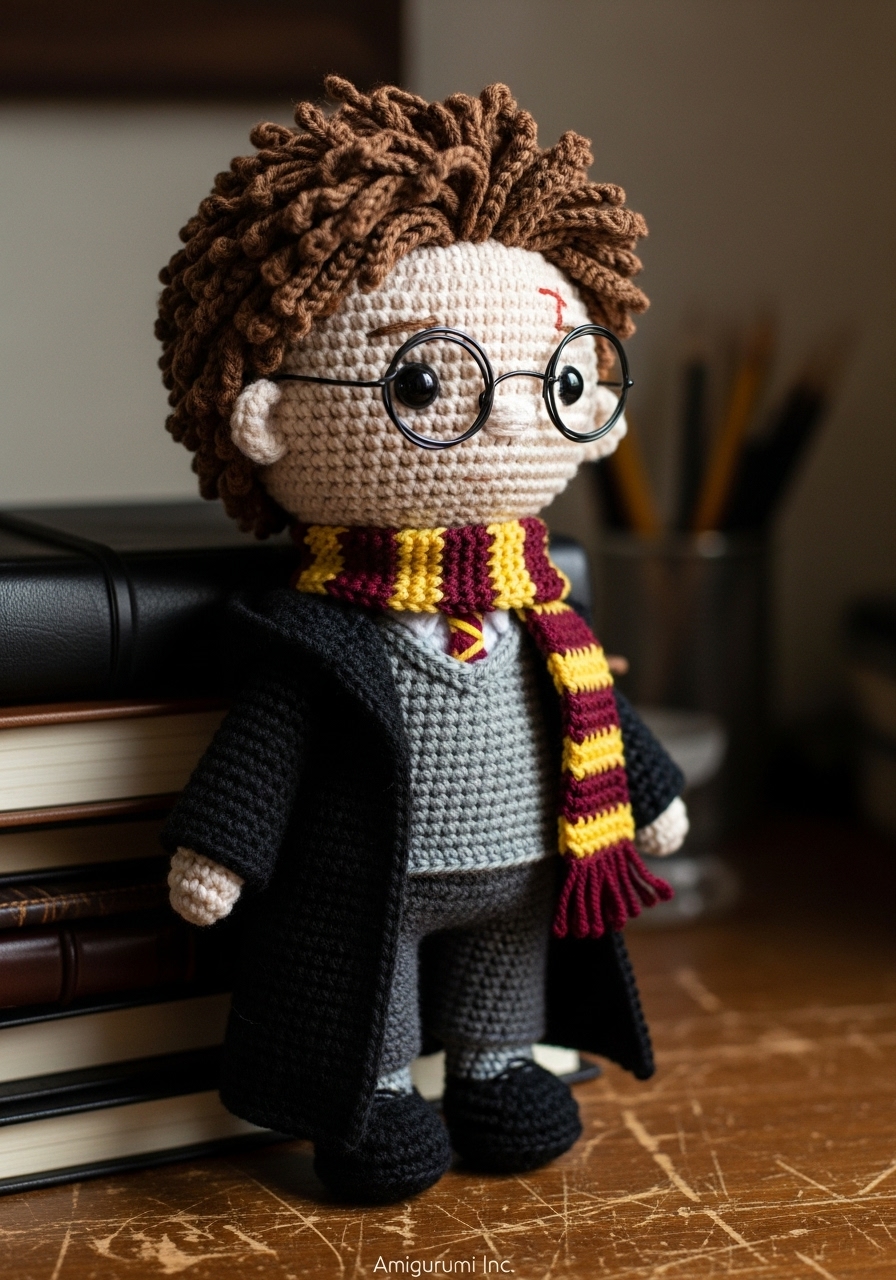
The Spellbound Scholar is designed to teach you the sophisticated skill of “garment layering” in amigurumi. Unlike simple dolls where clothes are merely color changes on a tube, this project features a structured body with a removable robe and a dimensional scarf. This approach adds a tangible quality to the final piece—he feels substantial, like a true collector’s item. We focus on “The Gaze of Innocence” aesthetic, placing the eyes low to create that look of wonder and determination.
Project Snapshot
📊 Difficulty: Intermediate to Advanced (Requires patience with color changes and assembly)
⏰ Est. Time: 12–15 Hours of mindful crafting
📏 Size: Approximately 11 inches (28 cm) tall
“Magic is found in the tension of the yarn and the patience of the hand.” — Patricia Poltera
Materials & Tools Needed
🧶 Yarn: DK or Sport Weight Cotton Yarn. Colors needed: • Skin Tone (Beige/Fair) • Charcoal Grey (Trousers/Vest) • White (Shirt) • Jet Black (Robe, Hair, Shoes) • Burgundy (Scarf/Tie detail) • Gold/Mustard (Scarf/Tie detail)
🪡 Hook: 2.5mm (or size needed to achieve tight tension)
✨ Other Materials: • 10mm Safety Eyes (Black) • Polyester Fiberfill stuffing • Black crafting wire (approx. 1mm thick) for glasses • Tapestry needle • Stitch markers • Fabric glue (optional, for securing hair ends) • Small amount of embroidery thread (Dark Brown for mouth/eyebrows)

Abbreviations & Stitches Used
ch: chain
sl st: slip stitch
sc: single crochet
inc: increase (2 sc in one stitch)
dec: invisible decrease (sc 2 together through front loops)
hdc: half double crochet
dc: double crochet
BLO: back loop only
FLO: front loop only
The Complete Spellbound Scholar Pattern
Component 1: The Head (The Seat of Wisdom)
Artisan’s Note: We shape the cheeks to give him a youthful, cherubic face. Do not rush the stuffing; firm stuffing is crucial for the glasses to sit correctly.
Start with Skin Tone yarn.
➡️ Round 1: 6 sc in a Magic Ring (6)
➡️ Round 2: inc in each st around (12)
➡️ Round 3: (sc 1, inc) x 6 (18)
➡️ Round 4: (sc 2, inc) x 6 (24)
➡️ Round 5: (sc 3, inc) x 6 (30)
➡️ Round 6: (sc 4, inc) x 6 (36)
➡️ Round 7: (sc 5, inc) x 6 (42)
➡️ Round 8: (sc 6, inc) x 6 (48)
➡️ Round 9: (sc 7, inc) x 6 (54)
➡️ Rounds 10–19: sc in each st around (54) [10 rounds of height]
➡️ Round 20 (Cheek Shaping): sc 18, (inc, sc 1) x 3, sc 6, (sc 1, inc) x 3, sc 18 (60)
➡️ Rounds 21–23: sc in each st around (60)
Insert safety eyes between Rounds 19 and 20, approximately 10 stitches apart. Ensure they are centered relative to the cheek increases.
➡️ Round 24: (sc 8, dec) x 6 (54)
➡️ Round 25: (sc 7, dec) x 6 (48)
➡️ Round 26: (sc 6, dec) x 6 (42)
➡️ Round 27: (sc 5, dec) x 6 (36)
➡️ Round 28: (sc 4, dec) x 6 (30)
➡️ Round 29: (sc 3, dec) x 6 (24)
Stuff the head firmly, paying attention to the cheeks.
➡️ Round 30: (sc 2, dec) x 6 (18)
➡️ Round 31: (sc 1, dec) x 6 (12)
➡️ Fasten off, leaving a long tail for sewing.
Component 2: The Messy Hair (The Crown)
Artisan’s Note: This is constructed as a wig cap with separate strands. The “messiness” is intentional; do not sew the strands down too flat.
Start with Black (or Dark Brown) yarn.
➡️ Round 1: 6 sc in MR (6)
➡️ Round 2: inc in each st around (12)
➡️ Round 3: (sc 1, inc) x 6 (18)
➡️ Round 4: (sc 2, inc) x 6 (24)
➡️ Round 5: (sc 3, inc) x 6 (30)
➡️ Round 6: (sc 4, inc) x 6 (36)
➡️ Round 7: (sc 5, inc) x 6 (42)
➡️ Rounds 8–12: sc in each st around (42)
Hair Strands (Crochet directly onto the edge of the cap):
➡️ Strand Type A (Front Bangs): Ch 6, start in 2nd ch from hook, sl st 5, sl st into next st on cap. Repeat 4 times.
➡️ Strand Type B (Side/Back): Ch 9, start in 2nd ch from hook, hdc 8, skip 1 st on cap, sl st into next. Repeat around the rest of the cap until you reach the bangs again.
➡️ Fasten off, leaving a long tail for sewing.
Component 3: Legs & Body (The Foundation)
Start with Black (Shoes).
➡️ Round 1: 6 sc in MR (6)
➡️ Round 2: inc in each st around (12)
➡️ Round 3: (sc 1, inc) x 6 (18)
➡️ Rounds 4–6: sc in each st around (18)
➡️ Round 7 (Heel): sc 6, ch 1, turn. sc 6 back. ch 1, turn. sc 6. Resume working in the round.
➡️ Round 8: sc in each st around, picking up stitches at the side of the heel flap (18)
Switch to Charcoal Grey (Trousers).
➡️ Rounds 9–20: sc in each st around (18). Fasten off Leg 1. Make Leg 2 but do NOT fasten off.
Joining:
➡️ Round 21: From Leg 2, ch 3, join to Leg 1 with a sc. Sc 18 around Leg 1, sc 3 along the chain, sc 18 around Leg 2, sc 3 along the other side of the chain (42)
➡️ Rounds 22–28: sc in each st around (42)
Switch to White (Shirt).
➡️ Round 29: BLO sc in each st around (42) [Creates the belt line]
➡️ Round 30: sc in each st around (42)
Switch to Grey (Vest) for the chest area, keep sides white if you wish, or make the whole torso Grey to simulate the sweater vest.
Let’s simplify for neatness: Switch to Grey.
➡️ Round 31: (sc 5, dec) x 6 (36)
➡️ Rounds 32–36: sc in each st around (36)
➡️ Round 37: (sc 4, dec) x 6 (30)
➡️ Rounds 38–40: sc in each st around (30)
➡️ Round 41: (sc 3, dec) x 6 (24)
➡️ Round 42: (sc 2, dec) x 6 (18)
➡️ Round 43: (sc 1, dec) x 6 (12)
➡️ Rounds 44–45: Switch to Skin Tone. sc in each st around (12) [Neck]
➡️ Fasten off, leaving a long tail.
Component 4: The Arms (x2)
Start with Skin Tone.
➡️ Round 1: 6 sc in MR (6)
➡️ Round 2: (sc 2, inc) x 2 (8)
➡️ Rounds 3–5: sc in each st around (8)
Switch to White (Shirt Cuff).
➡️ Round 6: inc in each st around (16) [Cuff flare]
➡️ Round 7: sc in each st around (16)
Switch to Black (Robe Sleeve – optional) or Grey (Sweater Sleeve).
We will do Grey to match the vest.
➡️ Round 8: dec in each st around (8)
➡️ Rounds 9–18: sc in each st around (8)
➡️ Round 19: Flatten top and sc through both layers to close.
Component 5: The Wizard’s Robe (Removable)
Artisan’s Note: Worked in rows, not rounds. Use Black Yarn.
➡️ Row 1: Ch 25. Start in 2nd ch from hook. sc 24. Ch 1, turn.
➡️ Row 2 (Raglan Increase): sc 4, inc, sc 4, inc, sc 4, inc, sc 4, inc, sc 4 (28)
➡️ Row 3: sc in each st across.
➡️ Row 4: sc 5, inc, sc 5, inc, sc 6, inc, sc 5, inc, sc 4 (32)
➡️ Row 5: sc 6, ch 6 (skip 6 sts for armhole), sc 8, ch 6 (skip 6 sts for armhole), sc 6.
➡️ Row 6: sc across, working sc into the chains (32)
➡️ Rows 7–20: hdc in each st across (32). Continue until the robe reaches the ankles.
➡️ Fasten off.
Hood: Join yarn at the neck of the robe (Row 1).
➡️ Row 1: Pick up 24 sc along the neck.
➡️ Rows 2–15: hdc in each st across.
➡️ Final Step: Fold the top of the rectangle in half and sew the top seam closed to form the hood point.
Component 6: The Scarf
Colors: Burgundy and Gold.
➡️ Row 1 (Burgundy): Ch 6. sc in 2nd ch from hook and each ch across (5).
➡️ Rows 2–4 (Burgundy): sc in each st across.
➡️ Rows 5–8 (Gold): sc in each st across.
Repeat color blocks until scarf is approx. 12 inches long.
Add tassels to the ends.
Assembly & Final Touches
1. The Face: Embroider the eyebrows using Dark Brown thread; give them a slight downward slant for that determined look. Using Black thread, embroider the lightning bolt scar on the forehead, slightly off-center.
2. The Glasses: Take your black crafting wire. Wrap it around a thick marker or lip balm tube to form two perfect circles. Connect them with a small bridge of wire. Bend the ends back to form the arms of the glasses. Place onto the face and secure with a tiny dab of glue or a stitch of black yarn if intended for a child.
3. Body Assembly: Sew the head to the neck. Sew the arms to Round 40 of the body.
4. Dressing: Put the robe on the doll. Wrap the scarf loosely around the neck.
Tips & FAQs
Q: My head is wobbling. What should I do? A: This is common! You can insert a wooden dowel or a rolled-up tube of felt inside the neck before sewing the head on to provide a “spine.”
Q: The hair looks too neat. A: Use your fingers to twist and pull the strands. You can even use a little hairspray or diluted glue to hold a “wind-swept” shape.
A Final Word
You have done it. You have turned a skein of string into a character with a soul. Look at him—ready to board a train, ready to learn spells, ready to be a friend. This is the power of your hands. Treasure it.
Until our hooks meet again, Patricia

