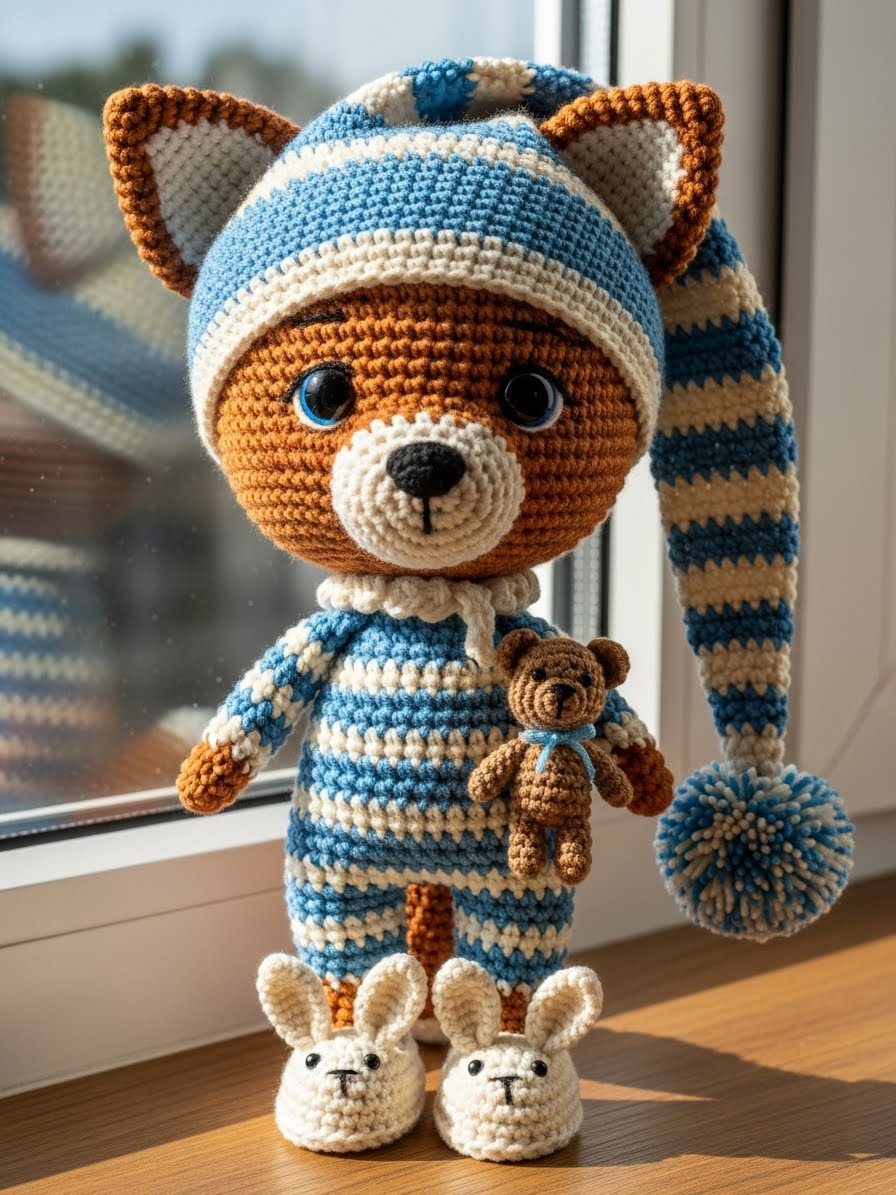
There is a quiet magic in the moments before sleep, when the house settles and the world feels small and safe. It is this feeling I wanted to capture with our newest friend. We have dressed our beloved Chibi Fox not for adventure, but for rest.
He is ready to hibernate in your arms, wearing his softest stripes and clutching a tiny companion of his own. As you work on this project, I hope you find a similar sense of peace in the rhythm of your hook. Let us create something that feels like a warm hug.
With love and yarn, Patricia
About The Sleepytime Snuggler
This project takes our standard Chibi Fox DNA—that oversized head and innocent gaze—and wraps it in pure coziness. The challenge and joy here lie in the accessories. Unlike sewing fabric clothes, every inch of this fox’s attire is created with your hook.
The striped onesie requires clean color changes to keep the lines sharp. The nightcap offers a lesson in tapered shaping, and the bunny slippers? They are a masterclass in working with tiny details. The fluffy white muzzle remains the centerpiece, grounding the cartoonish proportions with a touch of tactile reality.
Project Snapshot
📊 Difficulty: Intermediate (Color changes & small details)
⏰ Est. Time: 6-8 Hours
📏 Size: 20cm (Standing in slippers)
“The soul of amigurumi is in the details—the tilt of a hat, the grip on a teddy bear.” — Patricia Poltera
Materials & Tools Needed
🧶 Yarn: Matte Cotton (DK or Sport weight). Colors: Fox Orange, Fluffy White (for muzzle/ears/tail tip), Pastel Blue (Onesie), Cream (Onesie stripes), Soft Pink (Slippers).
🪡 Hook: 2.5mm (for body) and 3.0mm (for fluffy yarn).
✨ Other Materials: 12mm Safety Eyes, Fiberfill stuffing, Stitch markers, Tapestry needle, Small amount of brown yarn for the mini-bear.

Abbreviations & Stitches Used
ch: chain
sl st: slip stitch
sc: single crochet
inc: increase (2 sc in one st)
dec: decrease (sc 2 together)
BLO: back loop only
The Complete Chibi Fox Pattern
Part 1: The Oversized Chibi Head (Fox Orange)
Work in continuous spirals.
➡️ R1: 6 sc in magic ring (6)
➡️ R2: Inc in every st (12)
➡️ R3: (1 sc, inc) x 6 (18)
➡️ R4: (2 sc, inc) x 6 (24)
➡️ R5: (3 sc, inc) x 6 (30)
➡️ R6: (4 sc, inc) x 6 (36)
➡️ R7: (5 sc, inc) x 6 (42)
➡️ R8: (6 sc, inc) x 6 (48)
➡️ R9: (7 sc, inc) x 6 (54)
➡️ R10-20: Sc in each st around (54)
➡️ R21: (7 sc, dec) x 6 (48)
➡️ R22: (6 sc, dec) x 6 (42)
Insert safety eyes between R16 and R17, about 9 stitches apart.
➡️ R23: (5 sc, dec) x 6 (36)
➡️ R24: (4 sc, dec) x 6 (30)
➡️ R25: (3 sc, dec) x 6 (24)
➡️ R26: (2 sc, dec) x 6 (18)
Fasten off, leaving a long tail for sewing.
Part 2: The Fluffy Muzzle Patch (White Fluffy Yarn)
This is worked flat in rows to create a heart/diamond shape. Use larger hook if yarn is thick.
➡️ R1: Ch 2, 2 sc in 2nd ch from hook, ch 1, turn.
➡️ R2: Inc in each st (4), ch 1, turn.
➡️ R3: Inc, 2 sc, inc (6), ch 1, turn.
➡️ R4: Inc, 4 sc, inc (8), ch 1, turn.
➡️ R5-6: Sc across (8).
➡️ R7: Sc 4, turn (leave rest unworked).
➡️ R8: Dec, dec. Fasten off.
Attach yarn to the other side of R7 and repeat R8 to form the top of the “heart.”
Part 3: The Stubby Body (Fox Orange)
➡️ R1: 6 sc in magic ring.
➡️ R2: Inc in every st (12).
➡️ R3: (1 sc, inc) x 6 (18).
➡️ R4: (2 sc, inc) x 6 (24).
➡️ R5-9: Sc in each st around (24).
➡️ R10: (2 sc, dec) x 6 (18).
Fasten off. Stuff firmly.
Part 4: The Striped Onesie (Blue & Cream)
Make two legs first.
➡️ Leg 1 & 2: Ch 6, join to form ring. Sc around for 4 rows (striped).
➡️ Join legs: Sc around both legs to form the hip (approx 24 sts).
➡️ Torso: Work up the body, changing color every 2 rows.
➡️ Dec at the armpits and create small straps to go over the shoulders.
Part 5: The Nightcap (Blue)
➡️ R1: 4 sc in magic ring.
➡️ R2: Sc around.
➡️ R3: (1 sc, inc) x 2 (6).
➡️ R4-5: Sc around.
➡️ R6: (2 sc, inc) x 2 (8).
Continue increasing by 2 stitches every 3rd row until the opening fits the head.
Finish with a fluffy white pom-pom on the tip.
Part 6: Bunny Slippers (Make 2 – Pink)
➡️ Sole: Ch 4, work oval around chain (approx 10 sts).
➡️ Upper: Sc around in BLO (10).
➡️ Front: Dec x 3 over the front toe area.
➡️ Ears: Ch 3, sl st back (make 2 directly on the slipper toe).
Part 7: The Micro-Bear (Brown)
➡️ Body/Head: Ch 4, join ring. Work tiny bobbles for arms/legs. Top with a smaller loop for the head. Embroider eyes with black thread.
Assembly & Final Touches
🧵 The Face: Sew the fluffy white patch onto the lower center of the face. Place the safety nose button right in the middle of the patch.
🧵 The Limbs: Crochet simple orange tubes for arms and legs. Attach the legs to the body, then slide the onesie on.
🧵 The Dressing: Secure the nightcap with a few invisible stitches so it droops nicely. Stitch the bunny slippers onto the feet.
🧵 The Hold: Tack the Micro-Bear to the fox’s chest and sew the fox’s hands around it to ensure he never drops his friend.
Tips & FAQs
Q: My fluffy yarn is hard to see stitches in.
A: Use a stitch marker at the start of every row. Trust your fingers to feel the stitches rather than just your eyes.
Q: Can I make the onesie removable?
A: Yes! Add tiny buttons to the straps instead of sewing them down.
A Final Word
I hope this sleepy little fox brings a sense of calm to your collection. There is something deeply rewarding about crafting comfort. Until our hooks meet again, may your tension be even and your yarn knot-free.

