There is something profoundly special about paying homage to great artists through our own craft. This bunny is not just a toy; she is a celebration of color, boldness, and the resilience of the creative spirit. I have designed her to sit proudly on your shelf, reminding you every day to live vividly. Let us pick up our hooks and paint with yarn.
About This Creation & The Artistic Angle
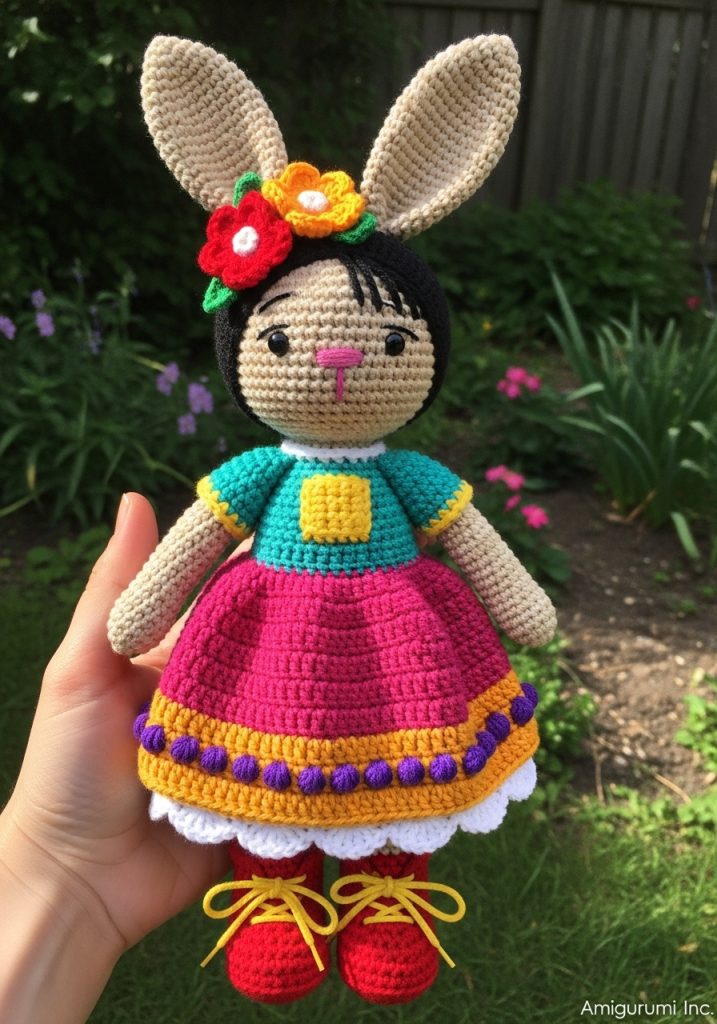
We often stick to safe pastels in amigurumi, but this project challenges us to embrace high-contrast saturation. By combining the “amigurumi folk” aesthetic with structural shaping, we create a doll that feels like a collector’s item rather than a simple plushie. The focus here is on mixed textures—the smoothness of the cotton yarn against the bobble-stitch detailing on the skirt creates a tactile experience that is truly delightful.
Project Snapshot:
📊 Difficulty: Intermediate (Color changes & bobble stitch)
⏰ Est. Time: 6–8 Hours
📏 Size: Approx. 28cm (11 inches) including ears
“Art is the heartbeat of the hands.” — Patricia
Materials & Tools Needed
🧶 Yarn: 100% Mercerized Cotton (DK or Sport weight). Colors: Sand (Skin), Teal (Bodice), Hot Pink (Skirt), Red (Boots/Flower), Pumpkin Orange (Band/Flower), Magenta (Flower), Black (Hair/Soles), White (Underskirt), Yellow (Embroidery).
🪡 Hook: 2.5mm or 2.75mm (keep tension tight)
✨ Other Materials: Fiberfill stuffing 10mm Safety Eyes Tapestry needle (long) Black embroidery thread (for the unibrow) Stitch markers Pins for assembly
Abbreviations & Stitches Used
ch: chain
sl st: slip stitch
sc: single crochet
inc: increase (2 sc in one st)
dec: decrease (invisible decrease preferred)
blo: back loop only
flo: front loop only
bobble: 4-dc bobble stitch (yarn over, insert, pull up, yarn over, pull through 2 loops – repeat 4 times, yarn over pull through all loops)
The Complete Frida Bunny Pattern
The Head Using Sand/Beige Yarn
R1: Start 6 sc in a magic ring. (6)
R2: Inc in every st. (12)
R3: (Sc 1, inc) x 6. (18)
R4: (Sc 2, inc) x 6. (24)
R5: (Sc 3, inc) x 6. (30)
R6: (Sc 4, inc) x 6. (36)
R7: (Sc 5, inc) x 6. (42)
R8–16: Sc in each st around. (42) [9 rounds of height]
R17: (Cheek Shaping) Sc 12, (inc, sc 1) x 6, sc 18. (48) [This pushes the cheeks out]
R18–20: Sc in each st around. (48)
Insert safety eyes between R16 and R17, about 9 stitches apart. Position them centered over the cheek increases.
R21: (Sc 6, dec) x 6. (42)
R22: (Sc 5, dec) x 6. (36)
R23: (Sc 4, dec) x 6. (30)
R24: (Sc 3, dec) x 6. (24)
Stuff the head firmly, focusing on the cheeks.
R25: (Sc 2, dec) x 6. (18)
Fasten off, leaving a long tail for sewing.
The Ears (Make 2) Using Sand/Beige Yarn
R1: Start 5 sc in a magic ring. (5)
R2: Inc in every st. (10)
R3–12: Sc in each st around. (10) [Keep stuffing light or empty for flat ears]
R13: (Sc 3, dec) x 2. (8)
Fasten off. Pinch the bottom flat and sew shut.
The Legs & Boots (Make 2) Start with Black (Sole)
R1: Ch 6. Start in 2nd ch from hook. Sc 4, 3 sc in last ch. Turn to other side. Sc 3, inc. (12)
R2: Inc, sc 3, inc x 3, sc 3, inc x 2. (18)
Change to Red (Boot)
R3: BLO sc in each st around. (18)
R4–5: Sc in each st around. (18)
R6: Sc 5, dec x 4, sc 5. (14) [Shapes the toe]
R7: Sc 5, dec x 2, sc 5. (12)
R8–10: Sc in each st around. (12)
Change to Sand/Beige (Skin)
R11: BLO sc in each st around. (12)
R12–22: Sc in each st around. (12)
Fasten off the first leg. Do not fasten off the second leg.
The Body Continuing from Second Leg
R23: Ch 3 (to join legs), sc into the stitch of the first leg. Sc 12 around first leg, sc 3 along the chain, sc 12 around second leg, sc 3 along the other side of chain. (30)
Change to White (Undies)
R24–26: Sc in each st around. (30)
Change to Hot Pink (Skirt Base)
R27: BLO Sc in each st around. (30) [We will attach the skirt to the front loops later]
R28–32: Sc in each st around. (30)
Change to Teal (Bodice)
R33: BLO sc in each st around. (30)
R34–38: Sc in each st around. (30)
R39: (Sc 3, dec) x 6. (24)
R40: (Sc 2, dec) x 6. (18)
Fasten off. Stuff the body firmly.
The Skirt Join Hot Pink yarn to the FLO of R27 of the body, holding the doll upside down.
R1: Ch 1, inc in every st around. Sl st to join. (60)
R2–6: Ch 1, sc in each st around. Sl st to join. (60)
Change to Pumpkin Orange
R7: Ch 1, sc in each st around. (60)
Change to Purple (The Bobbles)
R8: (Sc 4, Bobble stitch in next st) repeat around. (60)
Change back to Hot Pink
R9–10: Sc in each st around. (60)
Fasten off and weave in ends.
The Underskirt Join White yarn to any internal loop inside the skirt/body join.
R1: (Ch 3, sk 1, sl st) repeat around to create a lace/scallop edge that peeks out.
The Arms (Make 2) Using Sand/Beige Yarn
R1: Start 6 sc in a magic ring. (6)
R2–15: Sc in each st around. (6)
Fasten off. Do not stuff excessively; we want them to hang naturally.
The Hair Cap Using Black Yarn
R1: Start 6 sc in a magic ring. (6)
R2: Inc in every st. (12)
R3: (Sc 1, inc) x 6. (18)
R4: (Sc 2, inc) x 6. (24)
R5: (Sc 3, inc) x 6. (30)
R6: (Sc 4, inc) x 6. (36)
R7–11: Sc in each st around. (36)
R12: Sc 10, hdc 2, dc 12, hdc 2, sc 10. [This creates a slight curve for the forehead/hairline]
Fasten off.
The Flowers (Make 3: Red, Orange, Magenta)
R1: In a magic ring: (Ch 2, 2 dc, ch 2, sl st) x 5. Pull tight.
Assembly & Final Touches
The Face: Before attaching the hair, embroider a small triangular nose with black thread. Above the eyes, embroider the signature “unibrow”—a thick, slightly curved line connecting both eyes.
The Hair: Sew the black hair cap onto the head. The “dip” created by the dc stitches in R12 should be centered on the forehead.
The Crown: Sew the three flowers firmly onto the top of the hair cap/head.
The Body: Sew the head to the neck opening of the body. Attach arms at round R38 of the body.
Details: Using yellow yarn, surface slip stitch a square on the chest of the teal bodice. Embroider small “X” laces on the red boots.
Tips & FAQs
Q: How do I make the neck sturdy?
A: Insert a rolled-up piece of felt or a glue stick tube inside the neck before sewing the head on to prevent it from wobbling.
Q: Can I brush the yarn?
A: I do not recommend brushing mercerized cotton; it looks best clean and defined. If you use acrylic, a light brushing can give a fuzzier look.
A Final Word
Creating this doll is an act of painting without a brush. I hope she brings a splash of color to your home and reminds you that imperfections—like a unibrow or a handmade stitch—are what make us beautiful.
Patricia