
The season of affection is upon us, and what better way to capture it than with yarn that feels like a warm embrace? Valentina is more than just a toy; she is a keeper of secrets and a courier of “I love you.” Let us work with patience and joy, stitch by gentle stitch.
About This Creation & The Gift of Time
In a world of instant gratification, a handmade gift speaks a language of deep care. We are using the “Valentine’s Day Gift Guide” angle here because this project is swift enough to finish in a weekend but impressive enough to be the centerpiece of a gift basket.
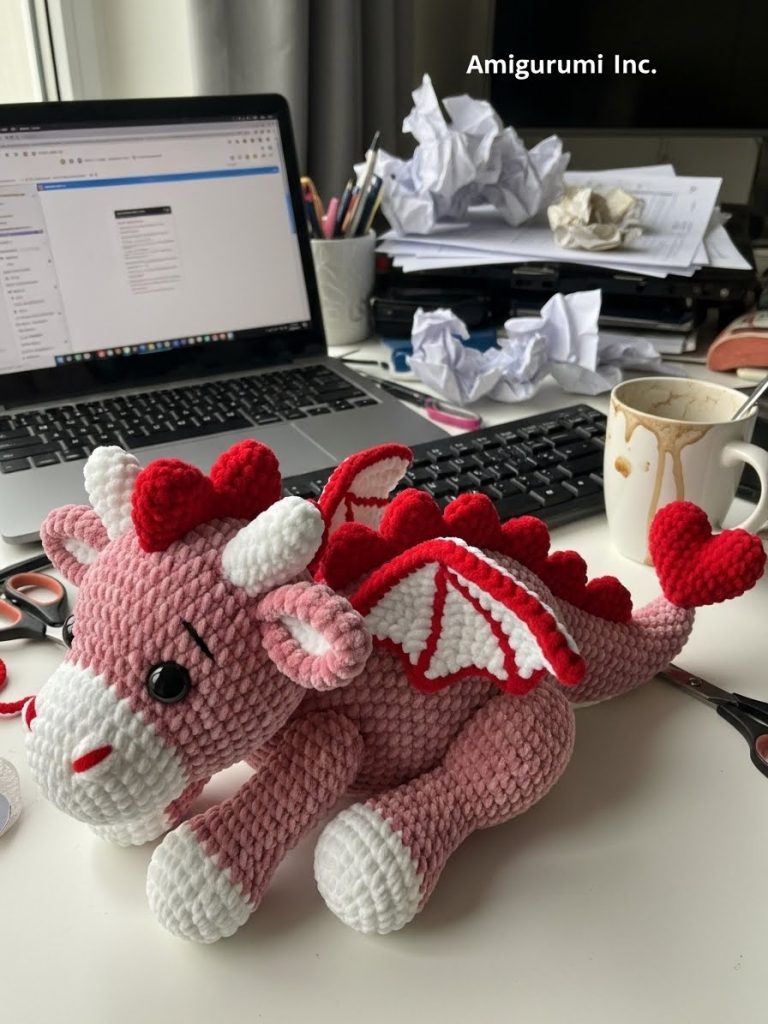
Valentina is designed with “The Embrace of Softness” in mind. By using velvet or chenille yarn, we hide the stitch definition slightly, giving her a professional, plush-toy finish that looks store-bought yet feels distinctly artisan. The heart-tipped tail is our narrative hook—a literal trail of love she leaves behind.
Project Snapshot:
📊 Difficulty: Intermediate (Working with velvet requires feeling stitches)
⏰ Est. Time: 4–6 Hours
📏 Size: Approx. 14cm (Length)
“Softness is not a weakness; it is the truest form of strength.” — Patricia
Materials & Tools Needed
🧶 Yarn: Super Bulky/Chenille Yarn (Size 6). Colors: Soft Pink (Main), Snowy White (Muzzle/Wings), Deep Red (Spines/Heart).
🪡 Hook: 4.0mm or 4.5mm (to keep tension tight on bulky yarn).
✨ Other Materials: 14mm Safety Eyes, Polyester stuffing, Yarn needle (large eye), Stitch markers, Black embroidery thread.
Abbreviations & Stitches Used
ch: chain
sl st: slip stitch
sc: single crochet
inc: increase (2 sc in one st)
dec: decrease (invisible decrease preferred)
BLO: back loop only
The Complete Valentina Pattern
Component 1: The Head
Start with White Yarn (Muzzle).
➡️ R1: 6 sc in magic ring (6)
➡️ R2: Inc in each st around (12)
➡️ R3: (1 sc, inc) x 6 (18)
➡️ R4-5: Sc in each st around (18)
Change to Pink Yarn.
➡️ R6: (2 sc, inc) x 6 (24)
➡️ R7: (3 sc, inc) x 6 (30)
➡️ R8-12: Sc in each st around (30)
Insert safety eyes between R7 and R8, about 5 stitches apart.
➡️ R13: (3 sc, dec) x 6 (24)
➡️ R14: (2 sc, dec) x 6 (18)
Begin stuffing firmly.
➡️ R15: (1 sc, dec) x 6 (12)
➡️ R16: Dec in all sts (6). Fasten off and weave in end.
Component 2: The Body (Lying Down Pose)
Using Pink Yarn.
➡️ R1: 6 sc in magic ring (6)
➡️ R2: Inc in each st around (12)
➡️ R3: (1 sc, inc) x 6 (18)
➡️ R4: (2 sc, inc) x 6 (24)
➡️ R5-10: Sc in each st around (24)
➡️ R11: (2 sc, dec) x 6 (18)
➡️ R12-14: Sc in each st around (18)
➡️ R15: (1 sc, dec) x 6 (12)
Stuff the body moderately.
➡️ R16: Sc in each st around (12)
➡️ Continue sc in rounds for 10 more rounds to form the long tail base, stuffing lightly as you go.
➡️ Decrease until closed.
Component 3: The Legs (Make 4)
Start with White Yarn.
➡️ R1: 6 sc in magic ring (6)
➡️ R2: Inc in each st around (12)
Change to Pink Yarn.
➡️ R3-5: Sc in each st around (12)
➡️ R6: (Dec) x 6 (6). Fasten off, leaving a tail for sewing.
Component 4: The Wings (Make 2)
Using White Yarn. Work in rows.
➡️ R1: Ch 7, turn.
➡️ R2: Sc in 2nd ch from hook, hdc, dc, dc, hdc, sc. (6)
➡️ R3: Ch 1, turn. Sc across.
Border: Join Red Yarn. Sc around the entire perimeter of the wing to create the bold outline. Create 3 ch points at the bottom edge for the dragon wing shape.
Component 5: The Heart Tail Tip
Using Red Yarn. Make 2 small bumps (lobes).
➡️ Lobe 1: 6 sc in MR. Sl st and cut yarn.
➡️ Lobe 2: 6 sc in MR. Do not cut yarn.
➡️ Join to Lobe 1 with a sc. Sc around both lobes (12).
➡️ Dec every 2nd st until you have a point (6).
➡️ Fasten off and sew to the end of the tail.
Component 6: The Spines
Using Red Yarn.
➡️ Surface crochet a line of slip stitches down the center of the back (from head to tail).
➡️ Work back up the line: (Ch 3, sk 1 sl st, sl st in next) repeat down the entire length to create the ruffled ridge.
Artisan’s Notes on Shaping
Sculpting the face is vital. After stuffing the head, use a strand of pink yarn to “needle sculpt” the eye sockets—pulling the yarn from the neck opening to the eyes and back—to give her that sweet, indented expression.
Assembly & Final Touches
✨ Head Placement: Sew the head to the body at a slight angle so she looks like she is lying down and looking forward.
✨ Limbs: Attach legs low on the body (belly side) so she rests flat on a surface.
✨ Wings: Sew wings to the upper back, spacing them evenly.
✨ Details: Embroider small eyebrows with black thread. Add small white horns and pink ears (simple triangles) to the head.
Tips & FAQs
Q: My velvet yarn is “worming” (loops popping out). Help!
A: This happens if tension is too loose. Drop down a hook size or crochet tighter than usual.
Q: Is this safe for babies?
A: If gifting to a child under 3, replace the safety eyes with embroidered black eyes to eliminate choking hazards.
A Final Word
You have stitched love into form, my friend. Valentina is ready to guard hearts. Remember, the imperfections in your work are simply the fingerprints of your spirit.

