Hello, my fellow fiber artists. It is Patricia here.
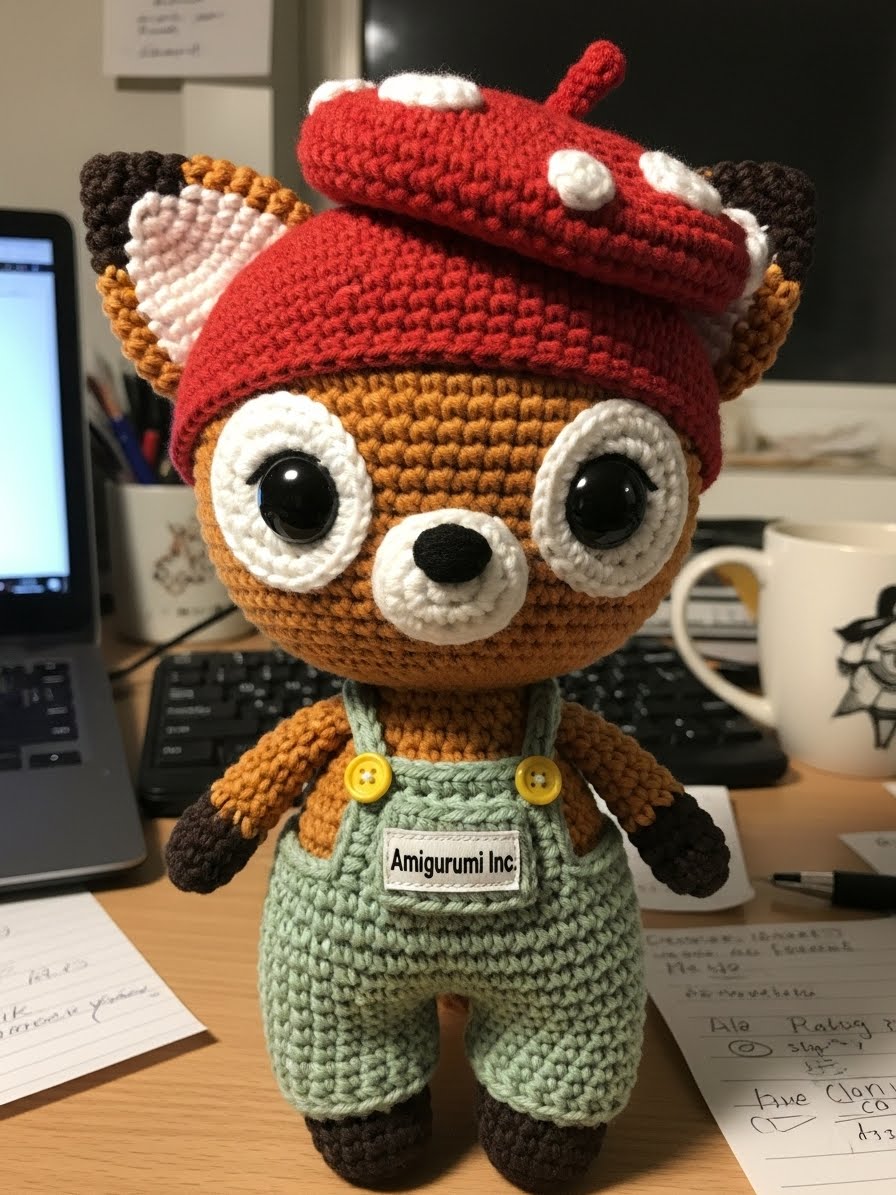
There is a quiet magic in the forest floor, isn’t there? The damp earth, the scent of pine, and the sudden pop of red from a toadstool hiding in the fern. Today, we channel that earthy wonder into our crochet hooks. We are dressing our beloved Chibi Fox as a little forager, ready to scout the woods for fungal treasures.
This project is dear to my heart because it combines two of my favorite textures: the smooth, matte cotton of the fox and the structured, cozy stitch-work of his tiny wardrobe.
About The Chibi Fox (Forager Edition)
Our little fox isn’t just a toy; he is a character with a story. With his oversized head and wide, innocent eyes, he looks to you for guidance. In this edition, we give him purpose. He is dressed in practical yet adorable “Mossy Green” overalls and topped with a “Toadstool Beret”—a vibrant red hat speckled with white spots.
The contrast is the key here. The fiery orange of his fur against the sage green and bright red creates a color palette that pops beautifully in photos. It feels nostalgic, like an illustration from a vintage storybook found in an attic.
Project Snapshot
📊 Difficulty: Intermediate (Requires color changes and small clothing details)
⏰ Est. Time: 5-7 Hours of dedicated crafting
📏 Size: Approx 20cm (Standing in shoes)
“Every stitch is a step deeper into the enchanted woods.” — Patricia Poltera
Materials & Tools Needed
🧶 Yarn: 100% Matte Cotton (DK or Sport weight). You will need Fox Orange, Soft Cream (for sweater), Sage Green (for overalls), Bright Red (for hat), and White (for fluffy muzzle and hat spots).
🪡 Hook: 2.5mm or 2.75mm (Keep tension tight!)
✨ Other Materials: 14mm or 16mm Safety Eyes (Black), Polyester stuffing, Stitch markers, Tapestry needle.

Abbreviations & Stitches Used
ch: chain
sl st: slip stitch
sc: single crochet
hdc: half double crochet
inc: increase (2 sc in one st)
dec: decrease (sc 2 together)
blo: back loop only
The Complete Chibi Fox Pattern
The Chibi Head (Fox Orange)
We start with the most important part—that massive, adorable head. We want a shape that is wider at the bottom (cheeks) than the top.
➡️ R1: 6 sc in magic ring (6)
➡️ R2: Inc in every st (12)
➡️ R3: (Sc 1, inc) x 6 (18)
➡️ R4: (Sc 2, inc) x 6 (24)
➡️ R5: (Sc 3, inc) x 6 (30)
➡️ R6: (Sc 4, inc) x 6 (36)
➡️ R7: (Sc 5, inc) x 6 (42)
➡️ R8: (Sc 6, inc) x 6 (48)
➡️ R9-18: Sc in each st around (48) [10 rows for height]
➡️ R19: (Sc 6, dec) x 6 (42)
➡️ R20: (Sc 5, dec) x 6 (36)
➡️ R21: (Sc 4, dec) x 6 (30)
➡️ R22: (Sc 3, dec) x 6 (24)
➡️ R23: (Sc 2, dec) x 6 (18)
Fasten off. Leave a long tail for sewing.
The Fluffy Muzzle Patch (White Fluffy/Brushed Yarn)
This is the secret ingredient. Do not skip this! It gives him that realistic “animal” face.
➡️ R1: Ch 7. Start in 2nd ch from hook.
➡️ R2: Sc 5, 3 sc in last ch. Rotate to other side. Sc 4, inc in last st (14)
➡️ R3: Inc, sc 4, inc x 3, sc 4, inc x 2 (20)
➡️ R4: Sc around, creating a soft oval shape.
Fasten off. Brush this piece vigorously with a pet slicker brush until it is fuzzy!
The Ears (Make 2 – Orange)
➡️ R1: 4 sc in magic ring (4)
➡️ R2: (Sc 1, inc) x 2 (6)
➡️ R3: (Sc 2, inc) x 2 (8)
➡️ R4: (Sc 3, inc) x 2 (10)
➡️ R5: (Sc 4, inc) x 2 (12)
➡️ R6: Sc around (12)
Flatten and sew closed.
The Stubby Body (Cream – Starting with the Under-Sweater)
We start with Cream to simulate the sweater worn underneath, then switch to Orange for legs later if you prefer, or make separate pants. Here, we build the body in the sweater color.
➡️ R1: 6 sc in magic ring (6)
➡️ R2: Inc in every st (12)
➡️ R3: (Sc 1, inc) x 6 (18)
➡️ R4: (Sc 2, inc) x 6 (24)
➡️ R5-10: Sc around (24)
➡️ R11: (Sc 2, dec) x 6 (18)
Fasten off.
The Wardrobe: Mossy Overalls (Sage Green)
These are crocheted separately and pulled onto the body.
➡️ Legs (Make 2): Ch 12, join to form circle. Sc around for 4 rows. Fasten off first leg, do not fasten off second.
➡️ Join: Chain 2 from second leg, join to first leg. Sc around both legs and the chain (approx 28 sts).
➡️ Torso: Sc around for 6 rows.
➡️ Bib: Work on the front 8 stitches only. Sc back and forth for 4 rows.
➡️ Straps: Ch 12, attach to back of pants. Cross them over the back!
The Wardrobe: Toadstool Beret (Bright Red)
➡️ R1: 6 sc in magic ring (6)
➡️ R2: Inc in every st (12)
➡️ R3: (Sc 1, inc) x 6 (18)
➡️ R4: (Sc 2, inc) x 6 (24)
➡️ R5: (Sc 3, inc) x 6 (30)
➡️ R6: (Sc 4, inc) x 6 (36)
➡️ R7: (Sc 5, inc) x 6 (42)
➡️ R8-10: Sc around (42)
➡️ R11: (Sc 5, dec) x 6 (36)
➡️ R12: (Sc 4, dec) x 6 (30) [This creates the gathered brim]
Fasten off. Detail: Embroider or crochet tiny white circles and sew them onto the red hat for the mushroom spots.
Assembly & Final Touches
It is time to bring him to life.
- The Face: Sew the Fluffy White Patch onto the lower center of the head. Insert the Safety Eyes through the patch for that “deep set” look. Embroider a tiny black nose triangle in the center of the patch.
- The Ears: Sew them high on the head, spaced wide apart.
- Dressing: Put the Overalls on the body before sewing the head on (it is easier!). Cross the straps at the back.
- The Beret: Place the beret on one side of the head at a jaunty angle. You can stitch it in place to keep it secure.
Artisan’s Note: Do not overstuff the body. We want him to look a little chubby and relaxed, not stiff.
Tips & FAQs
Q: Can I use acrylic yarn?
A: You can, but matte cotton provides that high-end, professional finish that photographs so well. It captures the light without the “plastic” shine of acrylic.
Q: How do I make the muzzle fluffier?
A: Use a wire pet brush (slicker brush). Gently brush the yarn of the muzzle patch after you have crocheted it, but before you sew it on.
A Final Word
I hope this little forager brings a touch of woodland spirit into your home. There is something grounding about making a creature who belongs to the earth. Until next time, keep your stitches tight and your heart open.
Yours in crafting,
Patricia

